8
1. Make sure the subwoofer is turned off (the Power Switch is in the OFF position and the Power Cable
is removed from the wall outlet).
2. Make sure that your audio equipment (amplifier/preamplifier/AV receiver) is turned off.
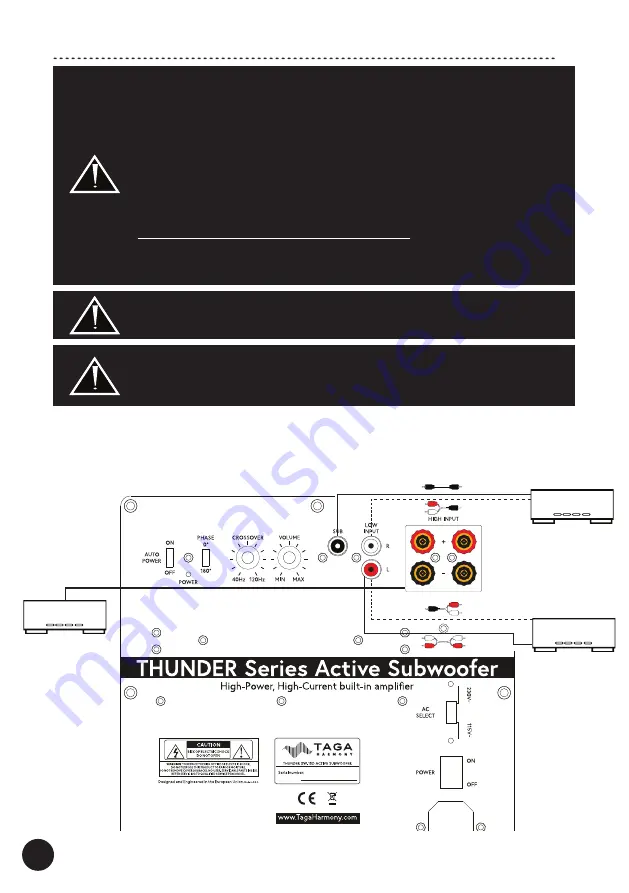
3. Turn the Volume Regulator to MIN (max counter clockwise).
4. Choose one of the following connection methods:
Hooking Up The Subwoofer
AV receiver,
Amplifier etc.
(LFE) SUB OUT
single RCA output
AV receiver,
Amplifier etc.
L/R RCA outputs
AV receiver, Amplifier etc.
Speaker outputs
Check „Kit Content” for a list of cables supplied with this product.
Before connecting make sure that your subwoofer and audio equipment are
turned off - otherwise you may damage this subwoofer and/or audio equipment.
This may void your warranty.
Speaker cables
Y-type subwoofer
interconnect
RCA-RCA
interconnect
Y-type subwoofer
interconnect
RCA-RCA subwoofer
interconnect
Before using the subwoofer for the first time!
Your subwoofer will typically be set at the factory to accommodate the electrical
outlet voltage in your area.
However before using this subwoofer for the first time we recommend to verify
that the AC Select Switch is set in the position which is compatible with electric
power voltage in your area.
The AC Select Switch is placed behind a seal and indicates the factory setting
for the voltage - there are 2 positions available 115V [used for 115-120V range
voltage] and 230V [used for 220-240V range voltage].
If the voltage indicated is incorrect, follow the below steps.
In the case that you do need to change the voltage:
1. Make sure that the Power Cable is disconnected from the subwoofer.
2. Remove the factory applied seal which protects the AC Select Switch.
3. Set the voltage to the 115V or 230V setting as required for your area.


