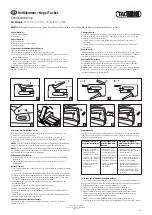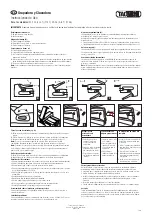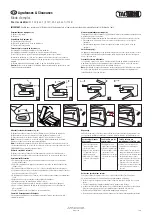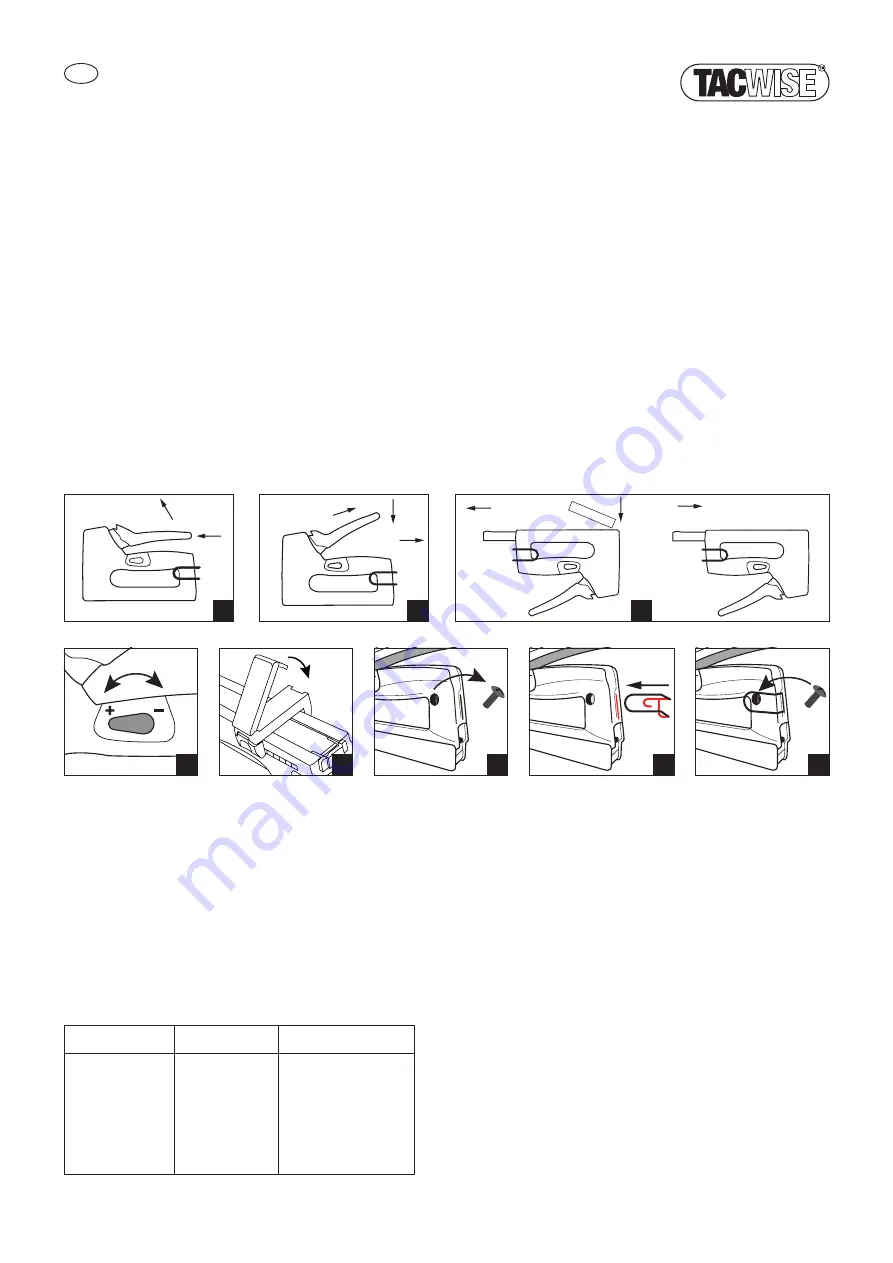
Unlocking the handle (a):
1.
Push handle in
2.
Release
Locking the handle (b):
1.
Pull handle up and back
2.
Compress handle towards tacker body
3.
Pull handle back
To load with staples or nails (c):
1.
With the tool upside down, squeeze the magazine end and slide the magazine out.
2.
Insert the staples or nails, ensuring they are placed along the left edge of the magazine
with the sharp edge pointing upwards.
3.
Carefully close the magazine until it locks into position.
Note:
Do not load fasteners of different lengths together. Do not load staples and nails mixed together.
Note:
We strongly recommend that you only use approved/genuine Tacwise staples and nails.
Depth adjuster (d):
Features an impact depth adjuster when fastening into thicker or harder materials. Be sure
to use the appropriate staple/nail leg length and test the tool on a test workpiece.
• To increase power: Turn dial to plus (+) sign on the body of the tacker.
• To decrease power: Turn dial to minus (–) sign on the body of the tacker.
Margin guide (e):
A handy margin guide for accurate and precise fastening is included with this tool. To use,
clip the margin guide onto the base of the tool at the required depth.
EN
Staple & Nail Tacker
Operating Instructions
For models:
Z4-140 (4-in-1), Z5-53 (5-in-1)
IMPORTANT
Please make sure that the person who is to use this equipment carefully reads and understands these instructions before use.
Staple/nails jammed
in tool
Tool does not
fire staple/nails
Tool does not drive
the staple/nail fully
• Use genuine Tacwise
staple/nails as specified
for the tool.
• Ensure the material and
staple/nail length is suitable.
• Clear/clean the magazine
and staple/nail mouth.
• Load staple/nails into the
magazine.
• Use genuine Tacwise
staple/nails as specified
for the tool.
• Clear/clean the magazine
and staple/nail mouth.
• Choose the appropriate material
or staple/nail length.
• Use depth adjuster to increase
or reduce power when fastening
into soft or hard materials.
• The material may be too hard to
fully drive longer length staple/nails.
• It may be necessary to add
pressure to the top of the tool.
Detachable belt hook
The belt hook has been placed loosely inside the box to reduce bulk and improve
the sustainability of our packaging. If you wish to use the belt hook, follow our simple
self-assembly instructions below.
Note:
To reduce the risk of personal injury, ensure all fastenings are removed from
the tool and the handle is in locked position before making any adjustments or removing/
installing the belt hook.
Attaching the belt hook (f, g, h):
1.
Remove the screw from the front side of the tool (f). Set the screw aside in a safe place.
2.
Slide the belt hook into position (g) from the back of the tool.
3.
Secure the belt hook firmly in place with the screw (h) that was used in step 1.
Note:
When attaching or replacing the belt hook, use only the screw that is provided.
Ensure the screw is securely tightened before use.
Note:
To reduce the risk of personal injury, DO NOT suspend the tool overhead or suspend
objects from the belt hook. ONLY hang tool’s belt hook from a secure work belt.
Removing the belt hook:
1.
Remove the screw from the front of the tool that holds the belt hook in place.
2.
Detach the belt hook and then reassemble the screw securely back into the tool.
Warning/Caution
• Only fire the tacker when in place for fastening to required material.
• Fully release the handle back to the starting position before firing each shot.
• Never fire tacker into the air – this can result in a serious injury.
• The operator and persons in the vicinity of the tool should wear CE or UKCA approved
eye protection/goggles.
• Only use Tacwise staple/nails as others may cause jamming or damage to the tool.
• Store out of reach of children and pets.
• Keep your work area clean and well lit.
• Always watch what you are doing and use common sense.
• Do not wear loose clothing or jewellery that can catch on moving parts.
• Store the tacker with the handle in the locked position.
Product advice & technical support
If you have a problem with your Tacwise hand tacker, email: [email protected]
Troubleshooting
Follow the instructions below if your tool seems not to operate properly. If this does
not solve the issue, please contact us at: [email protected]
Removing jammed staple/nails
You must remove any jammed staple/nails before using the tool any further. If you try
to fire a fastener while the tool is jammed, you could cause damage to the mechanism.
• Ensure the magazine is facing away from you and others.
• Squeeze the magazine end to slide the magazine out.
• Tilt the tool to remove any unused staple/nails in the channel (you can use pliers
for ease), this should clear the jammed staple/nail(s).
• Do not insert the damaged staple/nail(s) back into the magazine.
• Always carefully test the tool fire before fully proceeding with any work.
Guarantee
All Tacwise hand tackers are carefully checked, tested and are subject to the stringent
controls of Quality Assurance. Tacwise therefore offers the following guarantee. Your
warranty claim based on your sales contract with the retailer, including your statutory
rights, shall not be affected by this guarantee.
One month guarantee
If you are not completely satisfied with the performance of your product or it is faulty
or damaged on purchase, then we will exchange the product or issue a full refund within
28 days of purchase. Proof of purchase must be produced with an original receipt and
the tacker must be returned complete as purchased to the point of purchase. This does
not affect your statutory rights.
Three year standard warranty
Should your Tacwise tacker become defective due to faulty materials or workmanship
within 36 months from the date of purchase, we guarantee to replace, at our discretion,
the tool free of charge. This warranty does not cover:
• Tools that have received unauthorised changes or additions.
• Defects caused by accessories, components, spare parts or staple/nails which
are not genuine Tacwise brand.
• Component parts that are subject to natural wear and tear caused by use in
accordance with our operating instructions.
• Proof of purchase must be produced with an original receipt.
Tacwise Group Plc, England.
Rapesco-Tacwise BV, Netherlands.
tacwise.com
10/23
2
1
3
d
3
1
2
b
a
2
1
c
h
g
e
f


