6
7
FASTENING TOOLS
FOR THE PROFESSIONAL
•
Never point any power tool at yourself or at any other
person.
While working, hold the tool in such a way that no
injuries can be caused to the head or to the body in the event of
possible recoil.
•
Do not drive fasteners on top of other fasteners.
•
Do not use this tool to fasten electric cables.
This tool is not
designed for the installation of electric cabling and may damage
electric cables which could lead to injury by electric shock or
fire hazards.
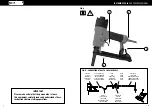
Features
(Fig. A)
1. Trigger
2. Quick Release Plug (Euro Fitting)
3. Magazine Release Lever
4. Magazine
Set up
Your air tool is fully assembled when you receive it. Before using it,
attach the air line and desired air system accessories. See Fig. B for
the recommended accessories and connection order. Be sure the
air hose is de-pressurised when installing or removing adaptors to
the air line.
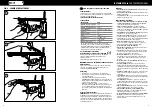
Connecting The Tool to an Air Supply
(Fig. B)
• Determine if the tool needs oil and, if necessary, place two
drops of oil in the air plug as shown in Fig. B. If you are using an
automatic in-line oiler, check and add oil if necessary.
• Turn the compressor on and set the regulator to the proper
pressure for the size and type of fastener being used.
• Connect the tool to the air supply.
Loading the Tool with Staples
(Fig. C)
• Hold the tool with the magazine at the top.
• Squeeze lever (1) situated at the back of the magazine.
• Pull the moveable magazine out.
• Place a strip of fasteners (with legs facing up) into the magazine
channel (2).
• Slide the magazine shut until the lock switch clicks.
NOTE:
We strongly recommend that you only use approved/genuine
Tacwise staples.
Operating the Tool
• Connect the tool to the air supply. Make sure the air pressure is
in correct range denoted in section of TECHNICAL DATA.
• Load fasteners as directed in the section called LOADING THE
FASTENERS.
• Hold the body and press the drive guide to work surface, be sure
the tool is straight and then gently depress the trigger to drive
the fastener.
• Lift the tool off the work surface.
Removing a Jammed Fastener
NOTE:
You must remove any jammed fasteners before using the tool
any further. If you continue to try and fire a fastener while the tool is
jammed, you could cause damage to the mechanism.
• Disconnect tool from the compressed air system
• Remove any unused fasteners from the magazine channel, this
should clear the jammed fastener(s).
• Following the removal of a jammed fastener, always carefully test
the tool function before proceeding with any work. If fasteners
become jammed in the nose piece frequently, have the tool
serviced by a Tacwise Engineer or appointed service agent.
Regular Maintenance
• Frequent, but not excessive, lubrication is required for best
performance. Oil added through the airline connection will lubricate
internal parts. An automatic airline oiler is recommended but oil
may be added manually before every operation or after about
1 hour of continuous use. Only a few drops of oil at a time are
necessary. Too much oil will collect inside the tool and be blown
out during the exhaust cycle. ONLY USE PNEUMATIC TOOL OIL. Do
not use detergent oil or additives, as these lubricants will cause
accelerated wear to the seal in the tool.
• Use a small amount of oil on all moving surface and pivots.
• Dirt and water in the air supply are major causes of pneumatic
tool wear. Use a filter/oiler for better performance and longer
life. The filter must have adequate flow capacity for the specific
application. Consult the manufacturer’s instructions for proper
maintenance of your filter.
• Keep tools clean for better and safer performance. Use
non-flammable cleaning solutions (CAUTION: Such solutions may
damage O-ring and other tool parts) only if necessary - DO NOT
SOAK.
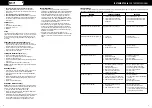
PROBLEM
CAUSE OF PROBLEM
SOLUTION
Air leaking at trigger area
1. O-ring in trigger valve is damaged.
2. Trigger valve head is damaged.
3. Trigger valve stem, seal or O-ring
is damaged.
1. Check and replace O-ring.
2. Check and replace trigger valve head.
3. Check and replace trigger valve stem,
seal or O-ring.
Air leaking between body and front plate
Damaged piston O-ring or bumper
Check and replace O-ring or bumper
Air leaking between body and cylinder cap
1. Screw loose.
2. Damaged seal.
1. Tighten screws.
2. Check and replace seal.
Blade driving fastener too deeply
1. Worn bumper.
2. Air pressure is too high.
1. Replace bumper.
2. Adjust the air pressure.
Runs slowly or has power loss
1. Insufficient oil.
2. Insufficient air supply.
3. Broken spring in cylinder cap.
4. Exhaust port in cylinder cap is blocked.
1. Lubricate as instructed.
2. Check air supply.
3. Replace spring.
4. Replace damaged internal parts.
Tool skips a fastener
1. Worn bumper or damaged spring (53).
2. Dirt in front plate.
3. Inadequate airflow to tool.
4. Worn or dry O-ring on piston.
5. Damaged O-ring on trigger valve.
6. Cylinder cap seal leaking.
1. Replace bumper or pusher spring.
2. Clean drive channel of front plate.
3. Check hose and compressor fittings.
4. Replace O-ring or lubricate.
5. Replace O-ring.
6. Replace seal.
Fasteners are jammed
1. Joint guider is worn.
2. Fasteners are wrong size or damaged.
3. Magazine or front plate screws are loose.
4. Blade in piston assembly is damaged.
1. Replace joint guider.
2. Use the recommended and undamaged
fasteners.
3. Tighten screws.
4. Replace piston assembly.
Tool will not drive down tight
1. Worn blade in piston assembly.
2. Lack of power.
3. Slow cycling and loss of power.
1. Replace piston assembly.
2. Adjust to adequate air pressure.
3. Check cylinder cap spring for broken
coils or reduced length. Check if exhaust
port of cylinder cap is restricted.
Trouble Shooting
Stop using the tool immediately if any of the following problems occur. Serious personal injury could occur. Any repairs or replacements must be
completed by a qualified person or an authorised service centre only.


