Contents
Qty Description
2
Front leg assemblies (with stainless steel pull pin)
2
Rear leg assemblies (with stainless steel push pin)
1
Port ring side
1
Starboard ring side
3
Ring cross braces 58-1/4"
2
Ring joiners 45-1/2"
6
Tubing joiner fittings
4
1-1/4" x 1/2” joiner pins
4
Tubing clamps
1
Port top console mount (identified on underside of mount)
1
Starboard top console mount (identified on bottom of mount)
1
Port bottom console mount (identified on bottom of mount)
1
Starboard bottom console mount (identified on bottom of mount)
8
1/4” stainless steel lag bolts and washers
6
Black tubing plugs
1
Canvas with lacing
2
Stainless steel locking pins
6
1-1/2” cap screws
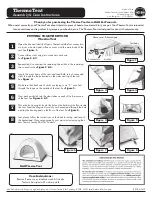
Installing the Console Mounts
1) Place the drilling template on the port side of the console,
aligning the dotted line with the top edge of the console
(Figure 1).
2) The 5° lines marked port are the relative drilling positions for
the top and bottom mounts.
3) The overall width of the mount extends 1" to the left and right
of the center of the drill hole. (You may have to reposition your
template to prevent the
mount from extending
over the side edges
of the console).
4) Drill the top mounting
holes with a 5/16" drill.
Make sure the mount is
level and that there are no
obstructions behind the
mount (Figure 2).
5) The lower mount must be at least 15" below the top mount. Use the same
technique as in Step 2.
Note: The top mount is larger to accommodate the draft of the console (consoles are narrower at the top).
It is imperative that the legs are vertical left to right.
Recommended Tools:
Level
Tape measure
Straight edge
Masking tape
Allen wrench
Drill
Figure 1
Figure 2
Front Leg Assembly
Rear Leg Assembly
Starboard Ring
Port Ring
Ring Cross Brace
Ring Joiners
Tubing Joiner Fittings
Joiner Pins
1-1/4" Tubing Caps
Port Top Mount
Port Bottom Mount
Starboard Bottom Mount
Starboard Top Mount
Tube Clamp