22
To enter the registration code into the app and complete the synching
process:
• Open the app on your android or iOS device
• At the bottom of the page touch the celtic knot icon
• Select the ‘+ ’ next to ‘Your Systems’
• When prompted, enter the 10 digit TAN number
• Enter a name for your system
Note: Multiple authorization levels are available to the system owner so they
can assign appropriate access to their system by an authorized technician
or service company. This access can be granted or removed by the system
owner at any point in time. It is recommended that an 'authorized technician'
be established at time of setup so the installing or service contractor can
have remote diagnostic and monitoring ability of the System M.
7.2 Set-up of the System M
7.3 Navigation of the User Interface (UHI)
To set up and operate the System M heat pump system the professional
installer needs to go through the EasyOn commissioning process. This is
accessed through the special installer only password and needs be done
at the touch screen display on the HydroBox. The EasyOn commissioning
is not available through the app, to limit the ability to make changes to
the programming that could affect the safe and intended operation of the
System M installation.
If you are the installer, please follow the EasyOn Commissioning & Report
Generation guide included with these instructions. This guide can be
removed from the general instructions after the commissioning is complete
as the commissioning report will be e-mailed to you (or the address entered
during the set up) and also stored by Taco / Dimplex for future technical
reference, if needed.
Start by familiarizing yourself with the user interface and navagation of the
screens. All screens are mirrored whether using the touch screen display on
the HydroBox or accessing it remotely through the smart device app, except
for the easy-on programing. For safety reasons, the easy-on programming
and essential settings can only be set up at the HydroBox.
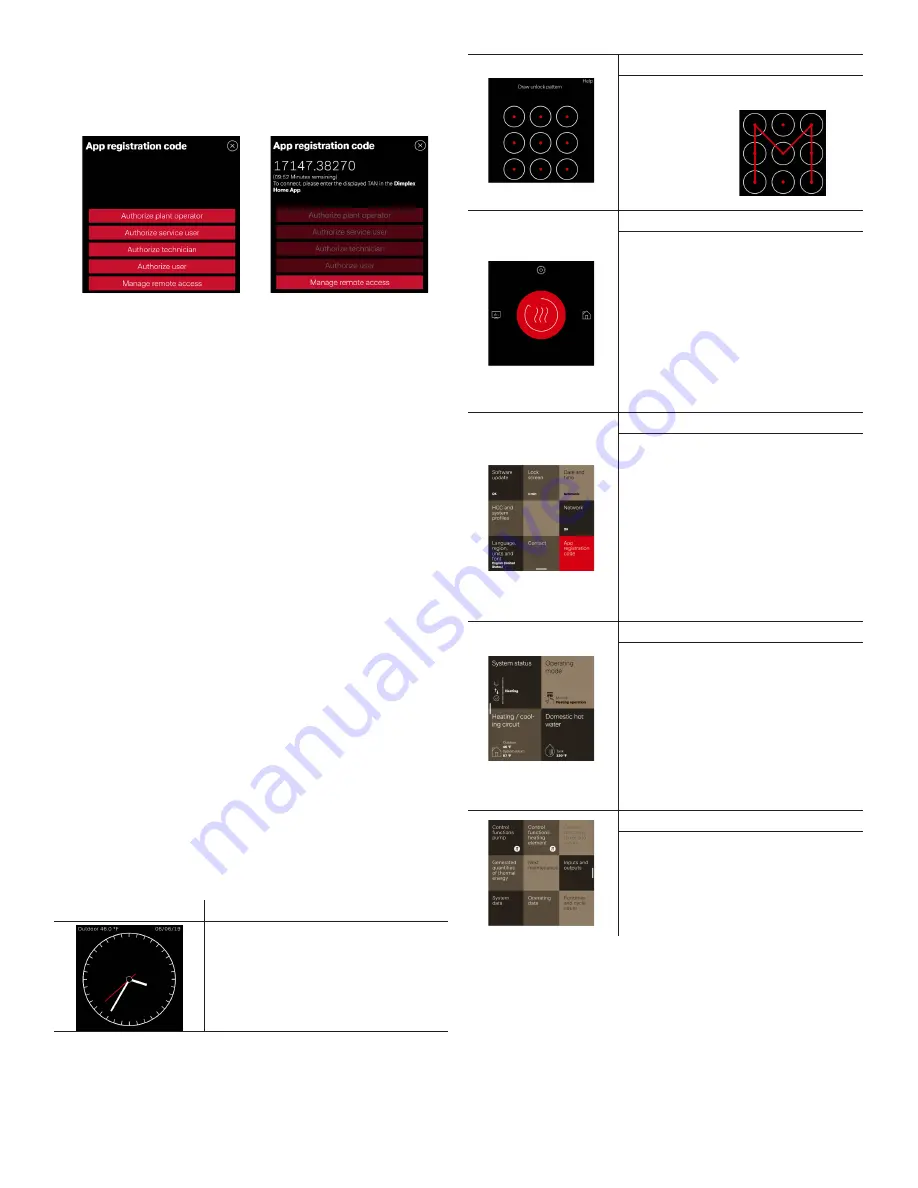
Screen Reference Name LOCK1 (Lock Screen / Clock):
The default display is a clock, showing
the date and current outdoor temperature.
Touch anywhere on the screen to begin.
If the user interface is left idle for more than
5 minutes it will return to this screen (time
is adjustable in SETTINGS LS screen)
LOGIN1 (Login Screen):
Drawn a “M“ pattern starting from the
bottom left dot to access the general
menu and settings:
HOME SCREEN:
This is your Home screen. If you press
and hold over the red circle the description
of the icons and when the system was last
accessed remotely through the app appear.
Top Cog icon = Settings
Right House icon = Status
Left Computer Screen Data icon = Analytics
The main Settings, Status of Your Home,
and Analytics screens can be accessed by
swiping starting from the icon across the
screen.
MAIN SETTINGS SCREEN:
To access the main Settings screen swipe
down, starting from the cog icon at the top
of the Home screen. The Settings screen
is where you should start first (see Quick
Start section or the full user interface
instructions) to set-up the basics of the
system and display preferences, confirm
network connection, check for software
updates, and register the smart device app.
To close the screen swipe up starting from
the bottom white bar (at the bottom of the
“Contact” square).
MAIN STATUS SCREEN:
Swiping left, starting from the house icon
will show the current status of the system
and primary sensor readings.
It is also the starting point for any changes
you want to make to setpoint temperatures
and where you can view any system
generated messages.
To close the screen swipe right starting
from the white bar along the left edge of the
screen.
MAIN ANALYTICS SCREEN:
From the Main Analytics screen you can
manually activate the pumps and fan
for testing and view system data and
operational information for the System M.
• Select the App Registration Code box in the lower right corner of the
Settings screen. Then select the Authorize User button. A registration
code will appear. You have 10 minutes to enter it into the app. If
an error message is returned, make sure the HydroBox is properly
connected to the internet.
App registration code screen
TAN number screen


