


7
7
8
8
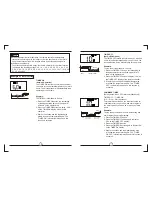
Indicators on LCD
Transmission Indicator
Temp./Timer display
Fan speed display
Sleep Display
Mode display
ON/OFF display
This transmission indicator lights when remote
controller transmits signals to the indoor unit.
Displays the current operation mode. Including
auto( ), cool( ), dry( ), heat( ) (Not
applicable to cooling only models), fan( )
and back to auto( ).
O
O
Displays the temperature setting(17C ~30C ). When
you set the operating mode to FAN, no temperature
setting is displayed. And
if in the TIMER mode, shows
the ON and OFF settings of the TIMER.
Displayed by pressing the ON/OFF button.
Press the ON/OFF button again to remove.
Displays the selected fan speed, AUTO(no display)
and three fan speed levels " " (LOW) " "
(MED) " " (HIGH) can be indicated.
The fan speed is AUTO when the operating mode is
either AUTO or DRY.
Displayed under sleeping operation.
Press the SLEEP button again to remove.
Note:
All indicators shown in the figure are for the purpose
of clear presentation. But during the actual operation
only the relative functional signs are shown on the
display window.
FOLLOW ME Display(on some models)
Displayed when FOLLOW ME function is activated.
TIMER ON display
TIMER OFF display
Displayed when TIMER ON time is set.
Displayed when TIMER OFF time is set.
How to use the buttons
Cooling /Heating/Fan operation
Ensure the unit is plugged in and power is
available.
1. Press the
MODE
button to select COOL,
HEAT(cooling & heating models only) or
FAN mode.
2. Press the
UP/DOWN
buttons to set the
desired temperature.
3. Press the
FAN
button to select the fan speed
in four steps- Auto, Low, Med,or High.
4. Press the
ON/OFF
button to start the air
conditioner.
The temperature can
O
O
O
be set within a range of 17 C~ 30 C in 1 C
increments.
In the FAN mode, the setting temperature is not
displayed in the remote controller and you are not
able to control the room temperature either. In this
case, only step 1, 3 and 4 may be performed.
NOTE
Auto operation
Ensure the unit is plugged in and power is
available. The OPERATION indicator on the
display panel of the indoor unit starts flashing.
1. Press the
MODE
button to select Auto.
2. Press the
UP/DOWN
button to set the
desired temperature. The temperature can
O
O
O
be set within a range of 17 C~ 30 C in 1 C
increments.
3. Press the
ON/OFF
button to start the air
conditioner.
1. In the Auto mode, the air conditioner can logically
choose the mode of Cooling, Fan, and Heating
by sensing the difference between the actual
ambient room temperature and the setting
temperature on the remote controller.
2. In the Auto mode, you can not switch the fan speed.
It has already been automatically controlled.
3. If the Auto mode is not comfortable for you , the
desired mode can be selected manually.
NOTE
2
2
1
1
4
3
3
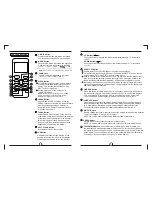
ON/OFF
MODE
FAN
TEMP
SHORT
CUT
TIMER ON
TIMER OFF
SLEEP FRESH
SWING DIRECT
LED FOLLOW ME
TURBO SELF CLEAN
ON/OFF
MODE
FAN
TEMP
SHORT
CUT
TIMER ON
TIMER OFF
SLEEP FRESH
SWING DIRECT
LED FOLLOW ME
TURBO SELF CLEAN


