6
Figure 1 Installing and Removing the Base
Power Source:
1. Make sure that the power cord is the correct type required in your area.
2. This LCD monitor is supplied with a UK 3 pin plug IEC lead.
3. Connect the AC-power cord into your LCD monitor’s AC-power-input. The AC-
power cord may be connected to either a wall power outlet or the power outlet
socket on your PC, depending on the type of power cord supplied with your LCD
monitor.
CONTROLS AND CONNECTORS
SIGNAL CABLE
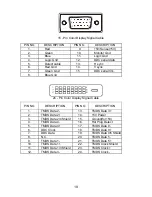
Connecting the Signal Cable:
Plug the Signal Cable one end to LCD monitor’s “D-
SUB” socket, the other end to the computer's VGA port and tighten the two screws
on the cable connector.
Connecting the DVI Cable:
Plug the DVI Cable one end to LCD monitor’s “DVI”
socket, the other end to the computer's DVI port and tighten the two screws on the
cable connector.
Connecting the HDMI Cable:
Plug the HDMI Cable one end to the output port of
HDMI video equipment, the other end to
LCD monitor’s “HDMI” socket.
Connecting the Power Cord:
Connect the AC-power cord into your LCD monitor’s
“AC-IN”. The AC-power cord may be connected to either a wall power outlet or the
power outlet socket on your PC, depending on the type of power cord supplied with
your LCD monitor.
Connecting the Audio Cable:
Connect the audio cable between the monitor’s
“AUDIO-IN” socket and the PC’s audio output (green port).
1. AC-IN socket
2. HDMI input socket
3. DVI input socket
4. D-SUB input socket
5. AUDIO-IN socket
Figure 2 Connecting Cables


