background image

29

216

31

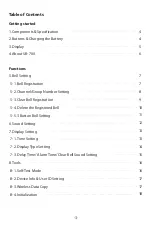
1. Components & Specification

2. Buttons & Charging the Battery

Components

Specification

Pager

User Manual

Power Adapter

and Charging Cable

(DC5V 1A, Micro USB)

Frequency 

Power 

Battery

Dimension

Weight

FSK/433.42MHz

AC 100~240V/DC 5V/1A

3.7V / 320mAh (Li-polymer)

W45 x L56 x H11(mm)

42g

Features

Buttons

1. Watch-type portable pager

2. The first water-resistance pager

3. Longer-lasting battery

4. Firmware update through software

5. Wireless bell data copy


Button Description

Cancel, Exit or Check battery level

Power ON/OFF 

(Touch and hold for 3sec)

Enter, Save or Input data

Shift

Button

Screen 

-4-

Summary of Contents for Nttworks SB-700

Page 1: ...User Manual Please read the user manual carefully before start using the device User Manual Direct Pager SB 700 29 216 31 ...

Page 2: ...high speed charger 9V it causes the damage of charging circuit and this will be not in warranty Please do not disassemble modify or repair this device without permission from the manufacturer It may cause a fire electric shock and product malfunction Please keep the device away from watery area Please do not subject it to shock It may cause a crack of the screen and product malfunction if you drop...

Page 3: ... Number Setting 5 3 Clear Bell Registration 5 4 Delete the Registered Bell 5 5 3 Button Bell Setting 6 Sound Setting 7 Display Setting 7 1 Time Setting 7 2 Display Type Setting 7 3 Delay Time Alarm Time Clear Bell Sound Setting 8 Tools 8 1 Self Test Mode 8 2 Device Info User ID Setting 8 3 Wireless Data Copy 8 4 Initialization 4 4 5 6 7 7 8 9 10 11 12 13 13 14 15 16 16 17 17 18 3 ...

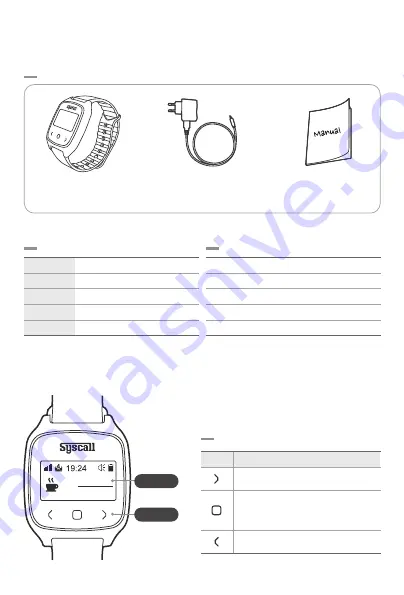
Page 4: ...on Weight FSK 433 42MHz AC 100 240V DC 5V 1A 3 7V 320mAh Li polymer W45 x L56 x H11 mm 42g Features Buttons 1 Watch type portable pager 2 The first water resistance pager 3 Longer lasting battery 4 Firmware update through software 5 Wireless bell data copy Button Description Cancel Exit or Check battery level Power ON OFF Touch and hold for 3sec Enter Save or Input data Shift Button Screen 4 ...

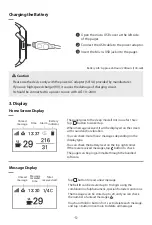
Page 5: ...t will be displayed on the screen with sound and or vibration You can check more than 2 messages depending on the display type You can check the battery level on the top right corner If there are received messages tap button to check The pager can be programmable through the bundled software Unread message Time Alarm Battery indicator Unread message Message received time Total received call Batter...

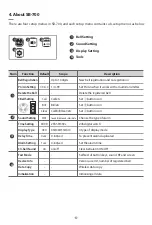
Page 6: ... and re registration Set Pn Gn when it works with a multi transmitter Delete the registered bell Set button icon Set button icon Set button icon Choose the type of alarm 24h digital watch 4 type of display mode To prevent alarm duplicated Set the alarm time Clear bell alarm ON OFF Self test of button keys sound RF and screen Version user ID number of registered bell Wireless data copy Initializing...

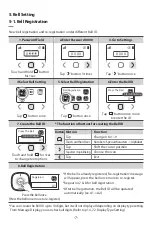
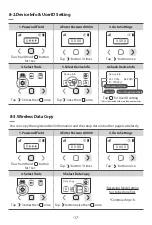
Page 7: ... Alphabet Shift the cursor position Choose the icon Exit Motion Tap Touchandhold1sec Tap Tapafterstopblinking Tap Button 8 Bell Registration Press the bell once Press the bell once more to re register If the bell is already registered Re registration message will appear press the bell once more to re register Repeat no 7 8 for bell registration After bell registration the Bell ID will be updated a...

Page 8: ...d in a range Pn Gn Setting Enter Pn Gn 01 06 00 02 01 06 00 02 Pn Channel number Gn Group number Group number range Touch and hold button for 1sec 1 Password Field 2 Enter Password 0000 3 Go to Settings Tap button 3 times 5 2 Channel Group Number Setting Set Pn Gn when it works with a multi transmitter Tap button once 4 Select Bell Setting 5 Select Pn Gn Setting 6 Enter Pn Gn Tap once then once 7 ...

Page 9: ...king Press The Bell A1 8 Icon Selection 10 Clear Bell Registration Press the bell once It is completed when Registered appears Register A1 clear bell to delete as it is A1 is cleared from the pager Clear Bell A1 Tap button once 4 Select Bell Setting 5 Select Bell Registration 6 Enter the Bell ID Tap button once Tap button once more to enter the ID Touch and hold button for 1sec 1 Password Field 2 ...

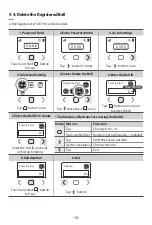
Page 10: ...ing Delete the Bell 4 Select Bell Setting 6 Enter the Bell ID Tap button once Tap button once more to enter the ID 1 Password Field 2 Enter Password 0000 3 Go to Settings Tap button 3 times Touch and hold button for 1sec Touch and hold button for 1sec 0 0 0 0 0 Tap button once 0 0 0 0 10 The function of buttons for creating the Bell ID Function Change 0 to 1 9 Number Specialcharacters Alphabet Shi...

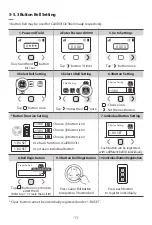
Page 11: ... button to register individually Each button can be registered with a different bell ID individually 1 BU SET 1 3BU 3 BU SET 1 BU SET Button Function Setting 1 3BU 2 3BU 3 3BU Choose button icon Choose button icon Choose button icon Use basic functions Call Bill Clr Use it as an individual button Clear button cannot be individually registered under 1 BU SET Tap 3 times then once 3 Bell Setting Set...

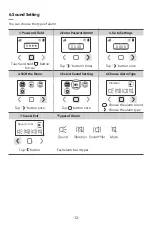
Page 12: ...ibration Sound Vibr Types of Alarm Sound Vibration Sound Vibr Mute Each alarm has 4 types 7 Save Exit Choose the alarm type Choose the alarm sound Tap button once Touch and hold button for 1sec 1 Password Field 2 Enter Password 0000 3 Go to Settings Tap button 3 times 0 0 0 0 0 Tap button once Tap button once 0 0 0 0 12 ...

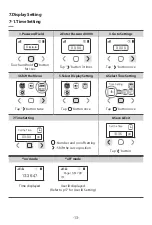
Page 13: ... SelectTime Setting Set the Time on 00 00 Time Setting Set the Time on 13 36 on mode off mode Pager SB 700 ID 13 36 47 Time displayed User ID displayed Refer to p17 for User ID Setting Tap button once Tap button once Touch and hold button for 1sec 1 Password Field 2 Enter Password 0000 3 Go to Settings Tap button 3 times Tap button twice 0 0 0 0 0 Tap button once 0 0 0 0 ...

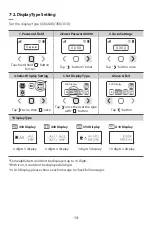
Page 14: ...y 430 Display 4 digits 3 display 350 Display 3 digits 5 display A10 Display 10 digits 2 display Some alphabets could not be displayed up to 10 digits With icon it could not be displayed all digits In A10 Display please choose each message to check full messages 430 Display 430 Display Touch and hold button for 1sec 1 Password Field 2 Enter Password 0000 3 Go to Settings Tap button 3 times 0 0 0 0 ...

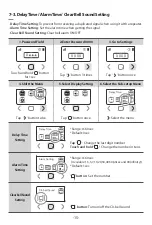
Page 15: ...nd hold Change the number in tens 6 Select the Sub setup Menu Range 0 60sec Default 0sec Range 0 60sec Available 1 3 5 7 10 20 30 40 50 60sec and 00 infinity Default 1sec Select the menu 10 ALARM Delay Time 10 ALARM Delay Time 0 10 ALARM AlarmTime Setting button Set the number Alarm Setting 01 ALARM ClearBellSound Setting button Turn on off the Clr bell sound Clr bell Sound Clr Tap button once Tap...

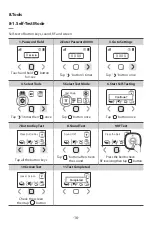
Page 16: ...Test 9 RFTest 8 SoundTest Press Button Key Tap all the button keys Tap button after check the sound Sound OK Press the Bell 10 ScreenTest 11 Test Completed Look at Screen Check the screen then tap button Completed Tap 3 times then once Tap button once Tap button once Touch and hold button for 1sec 1 Password Field 2 Enter Password 0000 3 Go to Settings Tap button 3 times 0 0 0 0 0 Tap button once ...

Page 17: ...ec 1 Password Field 2 Enter Password 0000 3 Go to Settings Tap button 3 times 0 0 0 0 0 Tap button once 0 0 0 0 You can copy the registered bell information and the setup data into other pagers wirelessly 8 3 Wireless Data Copy 4 SelectTools 5 Select Data Copy Data Copy Receiving Mode setting has to be done first Tap 3 times then once Tap button twice then once Touch and hold button for 1sec 1 Pas...

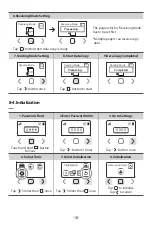
Page 18: ...is ready Receiving Mode Precessing 7 Sending Mode Setting 8 Start Data Copy Sending Mode 9 Data Copy Completed Tap button to start Sending Mode Precessing Sending Mode Completed 4 SelectTools 6 Initialization 5 Select Initialization Initialization Remove All Data Tap to initialize Tap to cancel Touch and hold button for 1sec 1 Password Field 2 Enter Password 0000 3 Go to Settings Tap button 3 time...

Page 19: ......

Page 20: ...LL France www syscallglobal fr 0033 0 1 84 17 61 81 contact syscall fr 242 boulevard de Stalingrad 94500 Champigny sur Marne France NTTWORKS CO LTD 413 9 NTTWORKS Bldg Galhyun Dong Eunpyong Gu Seoul Korea Manufacturer ...

Reviews:

Related manuals for Nttworks SB-700