ENGLISH
OPERATION MANUAL
SYNQ
®
5/46
DFX-48
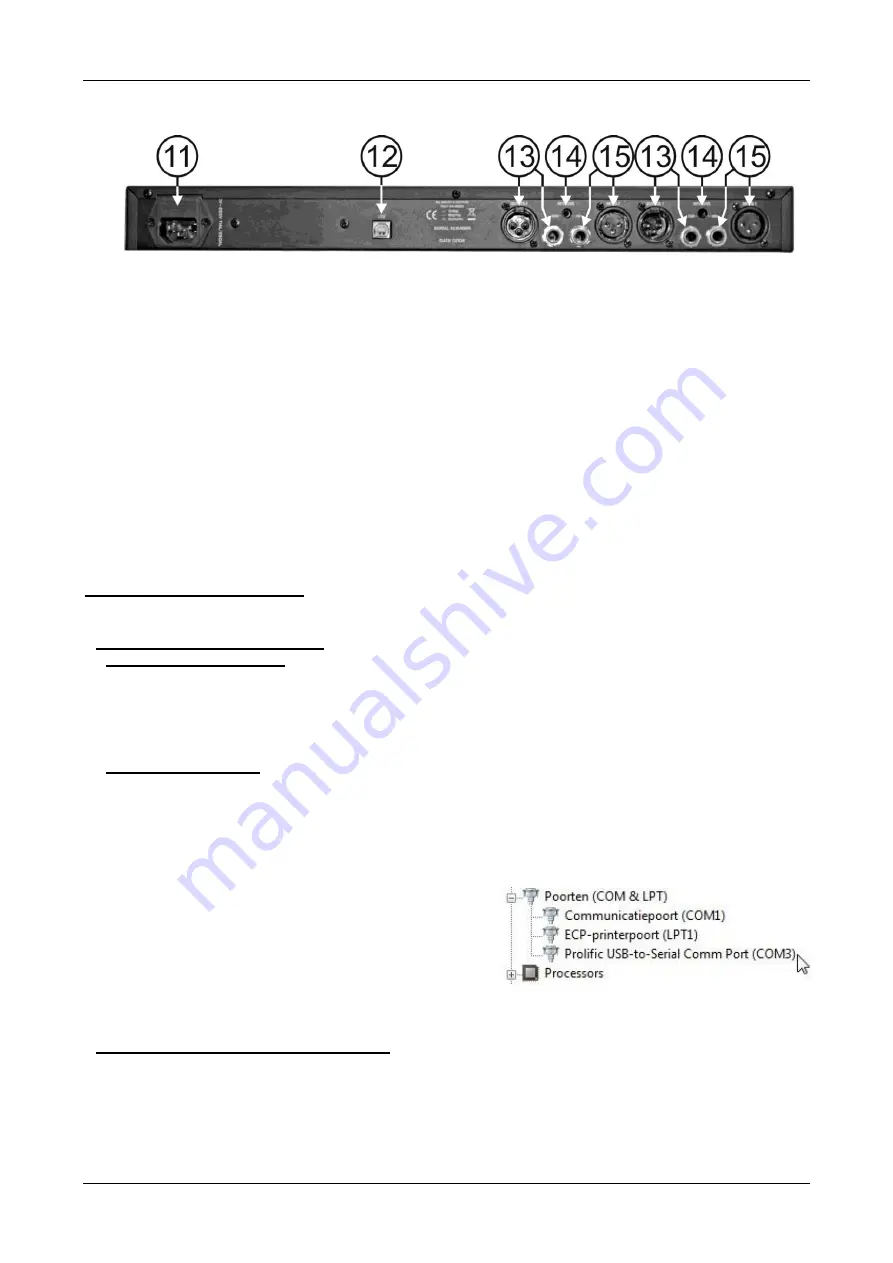
FUNCTIONS (rear)
11. MAINS INPUT
with IEC socket and integrated fuse holder, connect the supplied mains cable here.
12. USB CONNECTOR:
used to connect the processor to a PC or laptop. With the included PC-software
you can set all effect parameters via your PC and name the effects yourself. See further for more
information
on
the
PC
software.
The USB connector can also be used to upgrade the firmware of the unit.
13. BALANCED OUTPUTS:
can be used with XLR or JACK cables, both can be used with balanced or
unbalanced wiring (see chapter “connections” for more information)
14. INPUT LEVEL ADJUST:
use a SMALL screwdriver to adjust the input of the unit to the desired level.
15. BALANCED INPUTS:
can be used with XLR or JACK cables, both can be used with balanced or
unbalanced wiring.
PC SOFTWARE
The PC-
software is so easy to use that it doesn’t need a lot of explanation. If you are familiar with the use of
all parameters than you can use it right away, we will just give you some basic explanations.
Use a standard USB-cable to connect the USB-slot on the rear of the DFX-48 to one of the USB-slots of your
PC.
INSTALLING THE SOFTWARE:
Very important: before you install the Windows
®
software you should install a driver to ensure the
USB communication!
Part1
– installing the USB driver
AUTOMATIC installation:
First connect the DFX-48 with your PC via USB and switch the DFX-48 on.
Windows will detect new hardware and ask you if it can search and install a driver via internet: accept
this option. Windows will try to install the driver automatically. After some time windows will inform you
if it could install the driver or not.
Proceed with the manual driver installation if the driver could not be found and installed.
MANUAL installation:
Don’t yet connect the DFX-48 to your PC!
The installation file for the driver can be found on the supplied CDROM or you can download it from
the SYNQ-website (see download section of the DFX-48 product page).
UNZIP the file and double-click the exe-
file named “PL-2303 Driver Installer.exe” and follow the
instructions to install the driver properly.
To check if the driver is installed, open the Windows
®
device manager and check if the driver is available, you
can also check which COM-port is emulated (in most
cases it will be COM3, as shown on the picture) To be
able to see the driver listed, you should connect the DFX-
48 to your PC and turn it on.
Remark:
depending on the hardware inside your DFX-48
the drivername shown in windows can be different!
Part2
– installing the DFX-48 PC-software
The DFX-48 PC-software can be found on the supplied CDROM or you can download it from the SYNQ-
website (see download section of the DFX-48 product page).
Double-click the file named
“DFX48Setup_V101.exe” and follow the instructions to install the software.


