background image


14

  Chapter 2: Hardware Setup

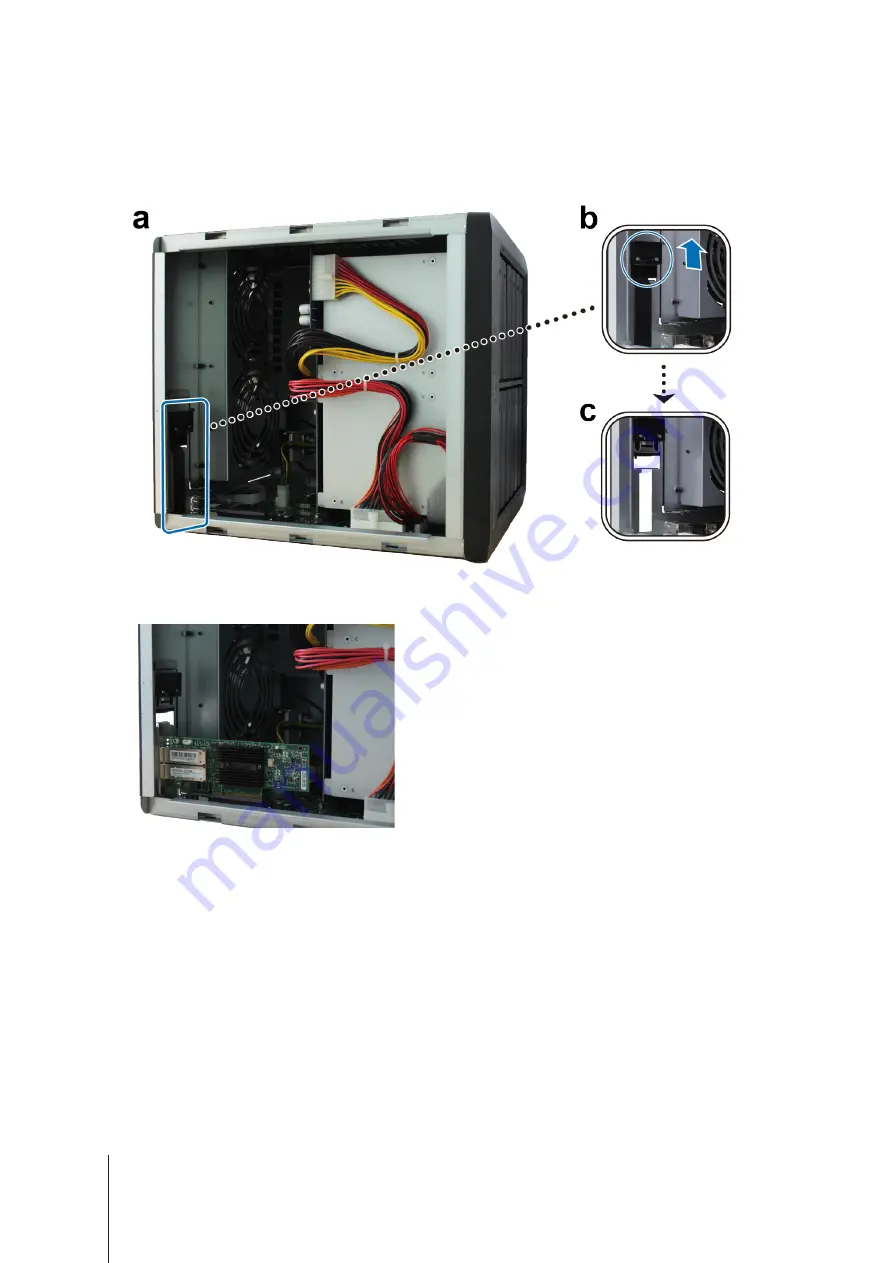
Remove the PCIe expansion slot shield:

Reposition your DiskStation so that the top will be facing your body, with drive trays on the right side.

Pull the clip above the PCIe expansion slot shield in the direction as illustrated below.

Remove the shield.

Install the network interface card:

Align the card’s connectors with the PCIe expansion slot.


Summary of Contents for DiskStation DS2419+

Page 1: ...Synology DiskStation DS2419 Hardware Installation Guide ...

Page 2: ...Tools and Parts for Drive Installation 6 Install Drives 6 Start Up Your DiskStation 9 Add a RAM Module on DiskStation 10 Add a Network Interface Card 13 Replace System Fan 16 Chapter 3 Install DSM on DiskStation Install DSM with Web Assistant 17 Learn More 17 Appendix A Specifications Appendix B LED Indicator Table Synology_HIG_DS2419 _20180419 2 ...

Page 3: ...ontents to verify that you have received the items below Also make sure to read the safety instructions carefully to avoid harming yourself or damaging your DiskStation Package Contents Main unit x 1 AC power cord x 1 RJ 45 LAN cable x 2 Screws for 2 5 drives x 52 Drive tray key x 2 Before You Start 1 Chapter 3 3 ...

Page 4: ...e 7 Drive Tray Lock Lock or unlock drive trays 8 Power Port Back Panel Connect the AC power cord here 9 Fan Disposes of excess heat and cools the system If the fan malfunctions the DiskStation will emit a beeping sound 10 PCI Express Expansion Slot Supports one PCIe x8 slot x4 link add on card 11 USB 3 0 Port Connect external drives or other USB devices to the DiskStation here 12 RESET Button 1 Pr...

Page 5: ...er cord Wipe with damp paper towels Do not use chemical or aerosol cleaners To prevent the unit from falling over do not place on carts or any unstable surfaces The power cord must plug in to the correct supply voltage Make sure that the supplied AC voltage is correct and stable To remove all electrical current from the device ensure that all power cords are disconnected from the power source Risk...

Page 6: ...els Warning If you install a drive that contains data the system will format the drive and erase all existing data Please back up any important data before installation Install Drives 1 Press the right part of the drive tray to pop out the handle 2 Pull the drive tray handle in the direction as indicated below to remove the drive tray Hardware Setup 6 2 Chapter ...

Page 7: ...tening panels from the sides of the drive tray and store them in a safe place Place the drive in the blue area shown below of the drive tray Turn the tray upside down and tighten the screws to secure the drive in place 4 Insert the loaded drive tray into the empty drive bay Note Make sure the tray is pushed in all the way Otherwise the drive might not be able to function properly 5 Press the handl...

Page 8: ...tion to lock the handle of the drive tray and then remove the key 7 Repeat the steps above to assemble the other drives you have prepared 8 Drives are numbered as shown below Note If you want to create a RAID volume we recommended that all installed drives are of the same size to make the best use of drive capacity ...

Page 9: ...o connect the DiskStation to your switch router or hub 2 Connect one end of the AC power cord to the power port of the DiskStation and the other to the power outlet 3 Press the power button Congratulations Your DiskStation is now online and detectable from a network computer ...

Page 10: ...e 1 Press and hold the power button until you hear a beep sound to shut down your DiskStation Disconnect all cables from your DiskStation to prevent any possible damage 2 Remove the side panel a Remove the 2 screws on the back of DiskStation b Pull the side panel Place the side panel to the side Note When you remove the case you expose sensitive internal components Avoid touching anything other th...

Page 11: ... b Push the RAM module with moderate pressure into the memory slot until you hear a click Note Hold the memory module by its edges and do not touch the gold connectors When memory capacity is changed the device will perform a memory check upon the next start up This will prolong the start up time by up to ten minutes This behavior is normal and will only occur once 4 Replace the side panel Replace...

Page 12: ...er recognize the memory or start up successfully confirm that the memory has been properly installed To remove the RAM Module 1 Follow step 1 to 3 of the To install the RAM module section to shut down your DiskStation disconnect the cables and then remove the bottom lid 2 Push the levers on both sides of the memory module outwards The module will be released from the slot 3 Hold the memory module ...

Page 13: ...crews from the long bracket of your network interface card and then remove the bracket 2 Replace the long bracket with a short one and tighten the 2 screws to secure the short bracket To install a network interface card 1 Press and hold the power button until you hear a beep sound to shut down your DiskStation Disconnect all cables from your DiskStation to prevent any possible damage 2 Remove the ...

Page 14: ...kStation so that the top will be facing your body with drive trays on the right side b Pull the clip above the PCIe expansion slot shield in the direction as illustrated below c Remove the shield 4 Install the network interface card a Align the card s connectors with the PCIe expansion slot ...

Page 15: ...e card and the bracket c Push back the clip to secure the newly inserted card Note Make sure the connectors are fully inserted Otherwise the network interface card might not be able to function properly 5 Replace the top cover and then replace and tighten the 2 screws you removed in Step 2 ...

Page 16: ... your DiskStation to prevent any possible damages 2 Pull the 6 push pins that secure the fan module 3 Pull out the malfunctioning fan module to remove it from your DiskStation 4 Install the new fan module a Install the new module with the power connector at the bottom so that it can be properly put onto the chassis b Make sure that all 6 push pins on the new module are pulled outwards before the m...

Page 17: ...stant will be launched in your web browser It will search for and find the DiskStation within the local network The status of the DiskStation should be Not Installed 5 Click Connect to start the setup process and follow the onscreen instructions Note 1 The DiskStation must be connected to the Internet to install DSM with Web Assistant 2 Suggested browsers Chrome Firefox 3 Both the DiskStation and ...

Page 18: ...Supported RAID Types Basic JBOD RAID 0 RAID 1 RAID 5 RAID 6 RAID 10 Synology Hybrid RAID Up to 2 Disk Fault Tolerance Agency Certifications FCC Class B CE Class B BSMI Class B EAC VCCI Class B RCM CCC HDD Hibernation Yes Scheduled Power On Off Yes Wake on LAN Yes Language Localization Environment Requirements Line voltage 100V to 240V AC Frequency 50 60Hz Operating Temperature 32 to 104 F 0 to 40 ...

Page 19: ...Mbps connection Blinking 100 Mbps network active Off 10 Mbps connection No network Rear LAN on upper side of jack Green Static Gigabit connection Orange Static 100 Mbps connection Off 10 Mbps connection No network Rear LAN on lower side of jack Green Static Network connected Blinking Network active Off No network Drive Status Indicator on tray Green Static Drive ready and idle Blinking Accessing d...

Reviews: