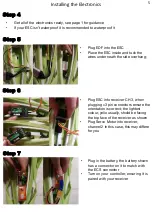
Synergy HB-02 Birdroni Installation Manual Download Page 7

Step 8

Package the electronics in a similar mannor as 
shown

Ensure your battery is sitting bellow the EDF, 
you should slide it under the rear cover seal
until it is up to half under

This will ensure a good position of the centre 
of mass for optimal stability and planing
behaviour

Please note that the packaging of the 
electronics will differ for different electronics, 
so the battery place,ent for the optimal centre 
of mass may differ too

Don’t 

forget to unplug the battery

when not 

running the HB-02 to prevent the LiPo from
discharging too much, as this will result in the 
inability to recharge it

Test your electronics, 

Servo movement, move the servo control and 
see the servo movement

Please note that you may have to unscrew the
servo arm and reposition it to neutralise the 
rudder.

Test the EDF by increasing the throttle slightly
and placing your hand behing the EDF

You should feel air blowing on your hand, if 
you dont then place your hand in front of the 
EDF intake, take caution

If  you feel the air blowing from the back to the 
front then you need to reverse é of your EDF 
to ESC cables; unplug the battery take unplug
é cables from the ESC and plug them back in 
the opposite way;

Plug the battery back in and repeat the test; 

Step 9

6

Summary of Contents for HB-02 Birdroni

Page 1: ...HB 02 Birdroni Pre Assembled Kit Electronics Installation Manual ...

Page 2: ...handbook here About About Before We get Started Parts Electronics Installation Instructions Page Number For this kit you will need the 3D printed parts and non 3D printed parts which come included The list of electronics that you will ned include 50mm EDF without a lip ESC LiPo Battery Receiver and Transmitter You will also need the following common household tools scissors tape Duct Tape or Maski...

Page 3: ... contain very sharp edges Please be aware that 2 Some part may differ slightly to the pictures shown in this kit don t be alarmed you have the latest part This manual was shot with a prototype model which received some minor udgrades 2 For this kit you will need the 3D printed parts and non 3D printed parts which come included The list of electronics that you will ned include 50mm EDF without a li...

Page 4: ...ts 3 Non Printed Parts Included in the kit Cable Extensions Wax Seal Electronics Not Included in the Kit Please Note These may differer to your electronics LiPo Battery EDF ESC Transmitter Receiver Pre Assembled Body ...

Page 5: ... PLEASE DO DOUBLE CHECK Step 2 Prepare parts 7 and the hull with the EDF mounted Place these in the groove closest to the EDF see arrow To remove your EDF if you want to use it in another RC kit simply pull this stopper out from the slot in the part Step 3 Prepare the wire extenders Attach wire extenders to your bullet connectors of the EDF Wrap tape on top of them to ensure they do not detach IMP...

Page 6: ...into receiver CH 3 when plugging 3 pin connectors ensure the orientation is correct the lightest colour yello usually shoild be facing the top face of the receiver as shown Plug Servo Motor into receiver channel 2 in this case this may differe for you Installing the Electronics Step 7 Plug in the battery the battery shown has a connector on it to match with the ECS connector Turn on your controlle...

Page 7: ...Po from discharging too much as this will result in the inability to recharge it Test your electronics Servo movement move the servo control and see the servo movement Please note that you may have to unscrew the servo arm and reposition it to neutralise the rudder Test the EDF by increasing the throttle slightly and placing your hand behing the EDF You should feel air blowing on your hand if you ...

Page 8: ...Step 10 Go out and enjoy yourself with your very own HB 02 Birdroni 7 ...

Reviews: