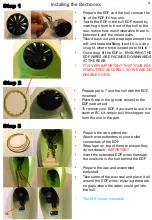
Synergy HB-02 Birdroni Installation Manual Download Page 5

Step 1

Prepare the EDF and the hull, remove the 
lip of the EDF if it has one.

Test fit the EDF in the hull EDF mount by 
inserting it from to front of the hull to the 
rear, notice how much clearance there is
between it and the mount walls.

Take it back out and wrap tape around the 
edf; and keep testfitting it until it is a very
snug fit, where force is needed to fit it in

Once snug fit the EDF in , ENSURING THE 
EDF WIRES ARE FACINGS DOWNWARDS 
AT THE REAR.

IT IS VERY IMPORTANT THAT YOUR EDF 
IS MOUNTED SECURELY, SO PLEASE DO 
DOUBLE CHECK

Step 2

Prepare parts 7 and the hull with the EDF 
mounted

Place these in the groove closest to the 
EDF (see arrow)

To remove your EDF, if you want to use it in 
another RC kit, simply pull this stopper out 
from the slot in the part

Step 3

Prepare the wire extenders

Attach wire extenders to your bullet
connectors of the EDF

Wrap tape on top of them to ensure they
do not detach -

IMPORTANT

Insert the extended EDF wires therough
the oval hole in the hull behind the EDF

Prepare the wax and assembled
bodyshell

Take some of the wax seal and place it all 
around the EDF wires, ensuring there are 
no gaps where the water could get into
the hull.

The EDF is now mounted!

4

Installing the Electronics

Summary of Contents for HB-02 Birdroni

Page 1: ...HB 02 Birdroni Pre Assembled Kit Electronics Installation Manual ...

Page 2: ...handbook here About About Before We get Started Parts Electronics Installation Instructions Page Number For this kit you will need the 3D printed parts and non 3D printed parts which come included The list of electronics that you will ned include 50mm EDF without a lip ESC LiPo Battery Receiver and Transmitter You will also need the following common household tools scissors tape Duct Tape or Maski...

Page 3: ... contain very sharp edges Please be aware that 2 Some part may differ slightly to the pictures shown in this kit don t be alarmed you have the latest part This manual was shot with a prototype model which received some minor udgrades 2 For this kit you will need the 3D printed parts and non 3D printed parts which come included The list of electronics that you will ned include 50mm EDF without a li...

Page 4: ...ts 3 Non Printed Parts Included in the kit Cable Extensions Wax Seal Electronics Not Included in the Kit Please Note These may differer to your electronics LiPo Battery EDF ESC Transmitter Receiver Pre Assembled Body ...

Page 5: ... PLEASE DO DOUBLE CHECK Step 2 Prepare parts 7 and the hull with the EDF mounted Place these in the groove closest to the EDF see arrow To remove your EDF if you want to use it in another RC kit simply pull this stopper out from the slot in the part Step 3 Prepare the wire extenders Attach wire extenders to your bullet connectors of the EDF Wrap tape on top of them to ensure they do not detach IMP...

Page 6: ...into receiver CH 3 when plugging 3 pin connectors ensure the orientation is correct the lightest colour yello usually shoild be facing the top face of the receiver as shown Plug Servo Motor into receiver channel 2 in this case this may differe for you Installing the Electronics Step 7 Plug in the battery the battery shown has a connector on it to match with the ECS connector Turn on your controlle...

Page 7: ...Po from discharging too much as this will result in the inability to recharge it Test your electronics Servo movement move the servo control and see the servo movement Please note that you may have to unscrew the servo arm and reposition it to neutralise the rudder Test the EDF by increasing the throttle slightly and placing your hand behing the EDF You should feel air blowing on your hand if you ...

Page 8: ...Step 10 Go out and enjoy yourself with your very own HB 02 Birdroni 7 ...

Reviews: