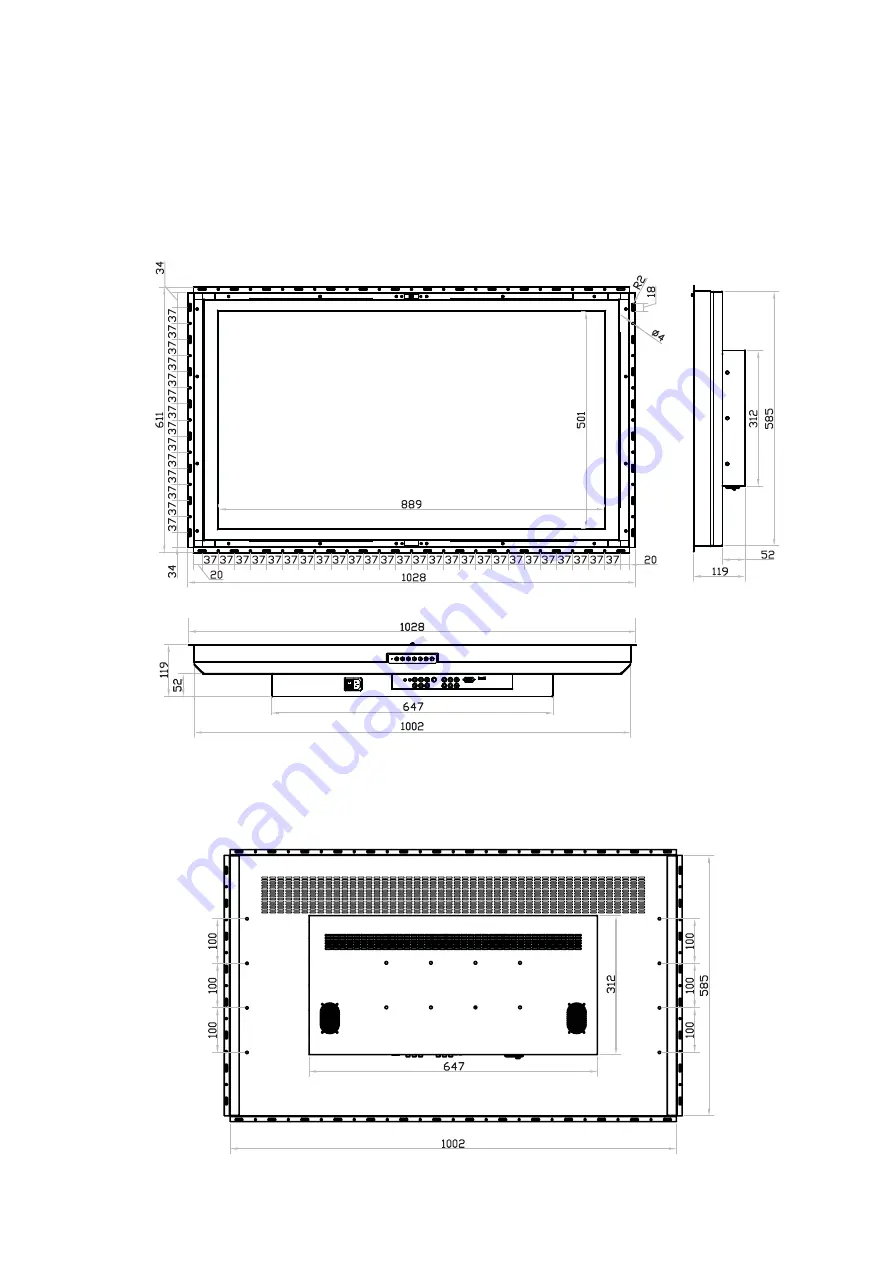
2.3 ID-40Pw series Dimension Diagram
Chapter 2
P.5
Front View
Rear View
UNIT : mm
1mm = 0.03937 inch
ID-40Pw/ID-40Aw/ID-40AwN
Page 1: ...Toll Free 1 888 865 6888 Tel 510 226 8368 Fax 510 226 8968 Email sales RackmountMart com...
Page 2: ...Options TV tuner Quad Display ID 40AwN Front NEMA4 IP 65 LCD panel ID 40Pw Open frame LCD panel User Manual 40 wide LCD ID 40Aw Front aluminum LCD panel...
Page 3: ...1 Package Contents 3 2 2 Structure Diagram 4 2 3 Dimension Diagram 5 2 4 MountingMethod 6 Chapter 3 ID 40Aw Front aluminum LCD panel 3 1 Package Contents 7 3 2 Structure Diagram 8 3 3 Dimension Diagr...
Page 4: ...er 7 LCD Specifications 18 Chapter 8 TV Tuner Options 8 1 TV Tuner options 19 8 2 How to Use Remote Controller 20 21 Chapter 9 Quad Display Options 22 Chapter 10 Troubleshooting 23 Chapter 11 Dimensio...
Page 5: ...tning or other acts of nature unauthorized product modifi cation or failure to follow instructions supplied with the product Repair or attempted repair by anyone not authorized by us Any damage of the...
Page 6: ...ce for connecting the LCD Display to the related facilities should be well considers too The LCD Display comes with the standard parts shown on the package contents Check and make sure they are in clu...
Page 7: ...CA cable x 1 pc Remote controller x 1 pc 5 4 2 1 3 6 User Manual 1 4 3 2 5 6 AUDIO ASPECT PIP SLEEP FREEZE ADJUST SOURCE SWAP PIP AUDIO POSITION PIP ASPECT ZOOM ENTER CH POWER 1 DISPLAY 7 4 CLEAR INPU...
Page 8: ...P 4 2 2 ID 40Pw series Structure Diagram Chapter 2 1 2 Front View Rear View Rear case SAMSUNG LCD panel 1 2 Universal open frame mounting LCD membrane 3 3 4 4 ID 40Pw ID 40Aw ID 40AwN...
Page 9: ...2 3 ID 40Pw series Dimension Diagram Chapter 2 P 5 Front View Rear View UNIT mm 1mm 0 03937 inch ID 40Pw ID 40Aw ID 40AwN...
Page 10: ...ts when mounting the VESA bracket do not use screws that exceed the depth 6mm of the display mounting holes Using screws that are too long may cause damage to your display UNIT mm 1mm 0 03937 inch Uni...
Page 11: ...RCA cable x 1 pc Remote controller x 1 pc 5 4 2 1 3 User Manual 1 4 3 2 5 6 6 AUDIO ASPECT PIP SLEEP FREEZE ADJUST SOURCE SWAP PIP AUDIO POSITION PIP ASPECT ZOOM ENTER CH POWER 1 DISPLAY 7 4 CLEAR IN...
Page 12: ...8 3 2 ID 40Aw series Structure Diagram Chapter 3 Rear case SAMSUNG LCD panel 6mm aluminum front bezel 1 5 2 1 2 3 Front View Rear View LCD membrane Wall mount bracket 4 5 3 4 ID 40Pw ID 40Aw ID 40AwN...
Page 13: ...3 3 ID 40Aw series Dimension Diagram Chapter 3 P 9 Front View Rear View UNIT mm 1mm 0 03937 inch ID 40Pw ID 40Aw ID 40AwN...
Page 14: ...ovided To avoid damage of internal components when mounting the VESA bracket do not use screws that exceed the depth 6mm of the display mounting holes Using screws that are too long may cause damage t...
Page 15: ...c RCA cable x 1 pc Remote controller x 1 pc 5 4 2 1 3 User Manual 1 4 3 2 5 6 6 AUDIO ASPECT PIP SLEEP FREEZE ADJUST SOURCE SWAP PIP AUDIO POSITION PIP ASPECT ZOOM ENTER CH POWER 1 DISPLAY 7 4 CLEAR I...
Page 16: ...ture Diagram Chapter 4 5 Front View Rear View 4 Rear case SAMSUNG LCD panel 4mm protective glass Front Nema 4 IP 65 protection 1 2 1 2 3 6mm aluminum front bezel LCD membrane Wall mount bracket 4 5 3...
Page 17: ...4 3 ID 40AwN series Dimension Diagram Chapter 4 P 13 Front View Rear View UNIT mm 1mm 0 03937 inch ID 40Pw ID 40Aw ID 40AwN...
Page 18: ...ovided To avoid damage of internal components when mounting the VESA bracket do not use screws that exceed the depth 6mm of the display mounting holes Using screws that are too long may cause damage t...
Page 19: ...es and LCD Display Before attempting to connect anything to the LCD Display we suggest that turn off power to all devices before connecting them Apply power to connected devices again only after the L...
Page 20: ...tal video connection DVI D and video options only Scrolls through menu options and adjusts the displayed control To auto adjustment by pressing the button for 5 seconds Display the OSD menu Power on o...
Page 21: ...of bass sound Treble To set the value of treble sound Balance To set the balance value of treble and bass sound Surround Turn on or Turn off the surround sound 5 Advance Scale Select the scale 16 9 or...
Page 22: ...Input Signal Analog RGB Connection DB 15 connector Power Input Auto sensing 100 to 240VAC 50 60Hz Power Consumption Max 200 Watt Standby 20 Watt Compatibility Multi platform Mix PCs SUNs IBMs HPs DELL...
Page 23: ...ions Chapter 8 Remarks Package includes a remote controller TV AUDIO IN OUT S Video VGA Input Device Power 1 2 3 4 5 6 Component Video Connector Video out Video 1 Y 1 2 3 6 Pb Pr Video 2 4 5 HDMI ID 4...
Page 24: ...8 2 How to Use Remote Controller Chapter 8 P 20 1 5 4 3 2 6 8 7 9 10 11 12 13 14 15 20 25 24 23 22 19 21 26 27 27 2 2 16 17 18 29 34 33 32 31 28 30 35 36 ID 40Pw ID 40Aw ID 40AwN...
Page 25: ...model HOLD II Reserve for OEM model MIX Reserve for OEM model INDEX Reserve for OEM model TV RADIO Reserve for OEM model Reserve for OEM model MUTE Turn on or off the speaker SOURCE Selects desired i...
Page 26: ...75 Ohm x 1 Loop Through Out 1 0 Vpp 75 Ohm x 4 VCR Output 1 0 Vpp 75 Ohm x 1 Auto Gain Control Yes Time Date Yes On Screen Display Yes Camera Title 8 Character Title Display Format 2 x Zoom On Playbac...
Page 27: ...not function properly Check for incorrect battery orientation Check for dead batteries Check whether you are pointing the remote control transmitter properly at the display s receiver Check for any o...
Page 28: ...sion W x D x H Net Weight ID 40Pw series 1028 x 119 x 611 mm 40 5 x 4 7 x 24 1 45 kg 99 lb ID 40Aw series 1022 x 136 6 x 605 mm 40 2 x 5 4 x 23 8 45 kg 99 lb ID 40AwN series 1022 x 136 6 x 605 mm 40 2...
Page 29: ...unt of non ammonia non alcohol based glass cleaner onto a clean soft lint free cloth and wipe the screen 6 Don t use water or oil on the monitor directly 12 2 Cleaning the Remote Controller 1 Use a so...