


P.17
6.2 On-screen Menu
Chapter 6
1.
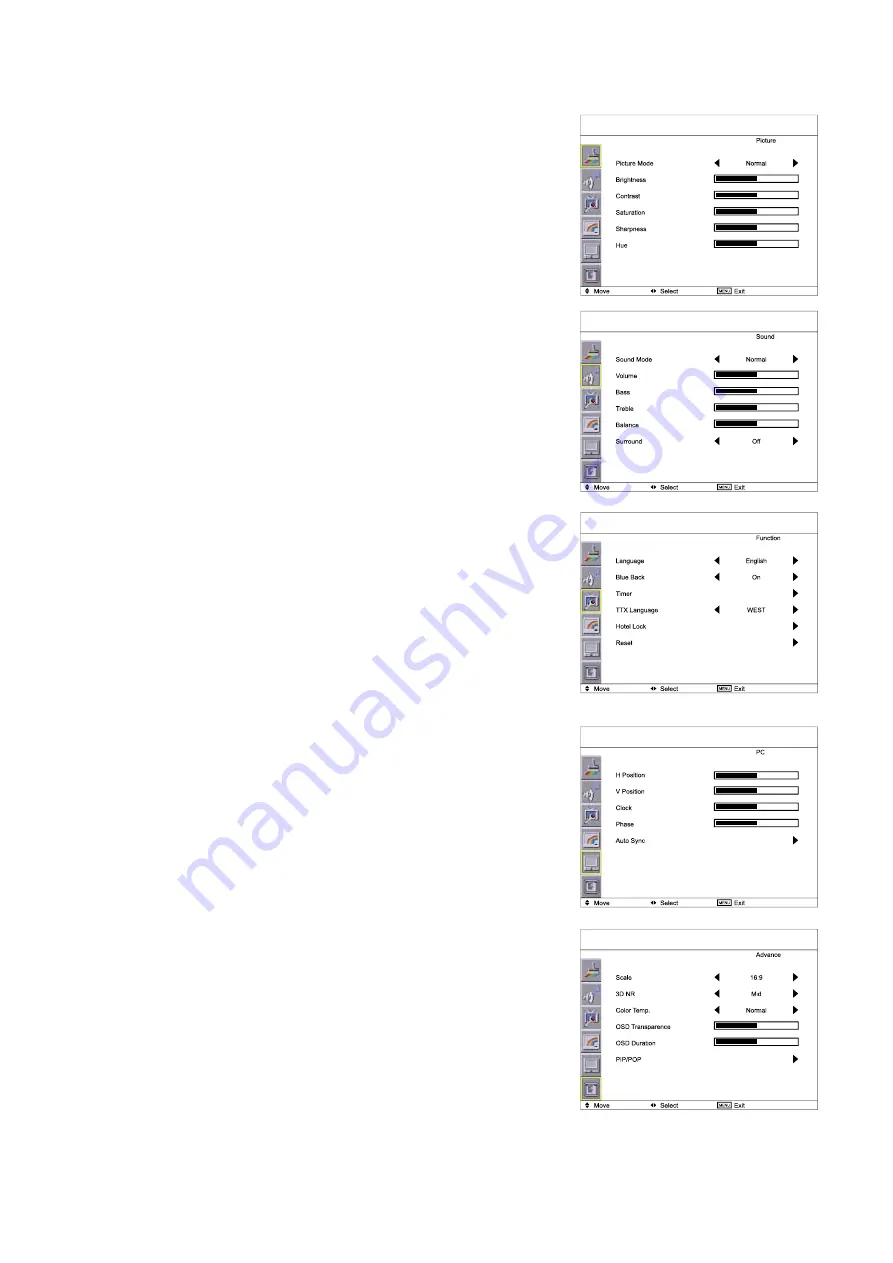
Picture
Picture Mode:
Normal / Soft / Vivid / User mode to choose
Brightness:
Adjust background black level of the screen image
Contrast:
Adjust the difference between the image background
(black level) and the foreground (white level)
Saturation:
Adjust the saturation of the image color
Sharpness:
Adjust the image from weak to sharp
Hue:
Adjust the screen hue value
4. PC
H. Position:
Align the screen image left or right
V. Position:
Align the screen image up or down
Clock :
Adjust the clock value
Phase:
Adjust the phase value
Auto Sync:
Adjust automatically sizes, centers, and
fi
ne tunes the
video signal to eliminate waviness and distortion.
2. Sound
Sound Mode:
Movie / User / Normal / News mode to choose
Volume:
Adjust the volume of sound
Bass:
To set the value of bass sound
Treble
:
To set the value of treble sound
Balance:
To set the balance value of treble and bass sound
Surround:
Turn on or Turn off the surround sound
5.
Advance
Scale:
Select the scale - 16:9 or 4:3
3D
NR
:
Low / Mid / High / Off mode to choose
Color Temp.:
Normal / Cool / Warm / User to choose
OSD Transparence:
Set the value of ODS Transparence
OSD Duration:
To set the time that menu will be display
PIP / POP:
To adjust picture in picture & picture on picture setting,
to enter into thescale, Sub Source, PIP Size, PIP
Position, Sound Source & Swap
3.
Function
Language:
Select the language in which the OSD menu is
displayed - English
Timer
:
To set the current time / off time & on time
TTX Language:
RUSSIAN, ARABIC, FARSI, WEST, EAST can be
choose
Hotel Lock:
Default password : 0000;
To enter into the Hotel Mode, Volume Control, Tuner
Control, Max Volume, Change Password, Source Lock,
Child Lock, Prog. Set & Prog. Num Submenu
Reset:
Recall returns the adjustments back to factory settings.
ID-40Pw/ID-40Aw/ID-40AwN


