background image

Beep Time after  

Power on 

Description

0 Sec

Walk switch abnormal

30SEC

Heat sensor abnormal

60Sec

Walk motor abnormal

Error description  : 0 sec --

Walk switch abnormal

Is the connector of walk switch  on 

main  PCB surely connected?

Reconnect the connector

Yes

No

Is the connector between the cable 

surely connected(Figure A)?

2.Error code number list

The console won’t show error , but we can identify the issue by gap time after 

power on 

Yes

No

Replace the main PCB

Reconnect the connector

Does the switch both stuck(Figure 

B/C)? 

Yes

Release or replace  the 

switch

No

Figure A

Figure B

Figure C

Summary of Contents for MR320

Page 1: ...tents 1 Specification 2 Error Number List 3 Trouble shooting flowchart 4 Service operation guide 5 Exploded diagram 6 Contact information Johnson Wellness A Division of Johnson Health Tech N A w e l l...

Page 2: ...ct specification Head Pillow Back Pad Seat Armrest Main body LED Remote Console Seat Cushion Backrest Cover Machine core Heat pad Side airbag Leg airbag Power Unit Control Unit Power Switch Fuse Socke...

Page 3: ...Serial No Location Production year 2017 Production month Sep Serial NO on kick stand Production year 2017 Production month Sep Serial NO Location for All Country Serial NO Location for Taiwan...

Page 4: ...Adapter EMP Filter Power Case Mechanism Walking motor Kneading motor...

Page 5: ...Heater L R Remote DC 24V in Kneading Motor Walking motor Air pump Air Valve LED L R Walking Switch Heater Sensor L R PUMP Air Valve L R Main PCB Main PCB Control Unit...

Page 6: ...tch on main PCB surely connected Reconnect the connector Yes No Is the connector between the cable surely connected Figure A 2 Error code number list The console won t show error but we can identify t...

Page 7: ...t sensor connector on main PCB surely connected Figure A No Replace the heater Hint Disable the heat function could skip the error for temporarily Is the connector of heater surely connected Reconnect...

Page 8: ...abnormal Is the connector of walk motor on main PCB surely connected Reconnect the connector Yes Is there 24V dc output from the plug on main PCB Yes Replace the mechanism or walk motor Replace the m...

Page 9: ...Service should only be done by an authorized service technician To disconnect turn all controls to the off position then remove the plug from the outlet DO NOT use any equipment that is damaged or ha...

Page 10: ...onnected the remote controller port Reconnect the connector Yes No Is the power switch light on Reconnect the power cord and turn on the power switch No Yes Yes Is the fuse normal No Yes Replace the f...

Page 11: ...m M M3 Is the connector of LED surely connect to the LCB figure C Reconnect the connector Yes No Uninstall the cover of LED figure A and connect a new LED figure B Does the new LED works Replace the n...

Page 12: ...ackrest pad Figure A check the connector Figure B Does the connector of the heater surely connected Replace heater Yes No Are the both sides heater abnormal Replace the main board Diagram M M3 No No F...

Page 13: ...Replace hand controller Remote assembly 1000412179 15 mins Picture of description How to Turn the power off disconnect the power cord Find a cushion pad and set it on the ground Grab the tape makes t...

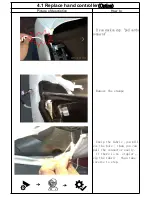
Page 14: ...4 1 Replace hand controller Picture of description How to Move away the kick stand Open the fabric Cut the three cable ties Caution there are stamps inside plastic side...

Page 15: ...4 1 Replace hand controller Picture of description How to Pull out the controller cable carefully Cut the tie on connector and reconnect a new hand controller Use the cable tie to bind the connector...

Page 16: ...4 1 Replace hand controller Picture of description How to Pull back the connector and tie up with cable tie Take inverse to setup Switch on the power test the main function Finish...

Page 17: ...Picture of description How to If you stuck on step pull out the connector Remove the stamps Unzip the fabric you will see the hole than you can pull the connector easily If there is no stapler zip th...

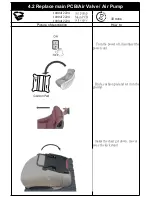
Page 18: ...12224 Air pump 1000412224 Main PCB 30 mins 1000412224 Air valve Picture of description How to Turn the power off disconnect the power cord Find a cushion pad and set it on the ground makes the chair g...

Page 19: ...4 2 Replace main PCB Air Valve Air Pump Picture of description How to Unizp the fabric Uninstall two screws and remove the back cover Uninstall 4 screws remove the plastic cover...

Page 20: ...e Air Pump Picture of description How to Unizp the fabric It is easy to replace PCB Valve Pump Caution Before you disconnect the connector remember mark the connector Than take inverse to set up Power...

Page 21: ...PCB filter PCB 1000412201 Filter PCB 20mins 1000412223 Adapter PCB Picture of description How to Turn the power off disconnect the power cord Find a cushion pad and set it on the ground Use paper clip...

Page 22: ...4 3 Replace adapter PCB filter PCB Picture of description How to Tear the spong Uninstall the screws there should be 5 screws Remove the cover...

Page 23: ...re of description How to Take out the plastic box Uninstall the screw Replace the adapter filter Caution Make sure the power cord is disconnected Than take inverse to set up And test the function Hint...

Page 24: ...4 4 Replace Mechanism 30 mins Picture of description How to Turn the power off disconnect the power cord Find a cushion pad and set it on the ground makes the chair get down moves away the kick stand...

Page 25: ...icture of description How to Uninstall 4 screws Remove the plastic cover on both sides Power On Use hand controller Running kneading function and press up arrow to move up the mechanism Hint Hold pres...

Page 26: ...tor kneading motorc Picture of description How to Use hand controller to move up the mechanism than take out the mechanism Remove upper wheels first than is the lower wheels Cut off the cable ties and...

Page 27: ...stall the screw of ground wire than disconnect the cable Take a new mechanism to replace connect the cable blue to blue black to black and install the screw and the plastic cover Put in the lower whee...

Page 28: ...4 4 Replace Mechanism Picture of description How to Use hand controller to move down the mechanism Than take inverse to setup And test the function Finish...

Page 29: ...lace Mechanism Option Picture of description How to If the walking motor is not work Uninstall the heater than uninstall the screws of the tunnel remove the tunnel than you can take out the mechanism...

Page 30: ...motor 45 mins 1000413746 Kneading motor Picture of description How to Please reference the 4 4 to take out the mechanism Disconnect the cable Uninstall the screws Hint Black pin is walking motor blue...

Page 31: ...4 5 Replace walking motor kneading motor Picture of description How to Replace the motor After replacing motor set the mechanism as the picture Remember to set the kneading arm at the same direction...

Page 32: ...neading motor Picture of description How to Remember take cable to though the hole Install the cover This is not a easy step Hint Black pin is walking motor blue pin is kneading motor Take inverse to...

Page 33: ...A 1000412179 1000412179 Remote controller assembly 1 PZMR337 1US 3B 1000412201 1000412201 filter PCB 1 PZMR337 1US 4B 1000412223 1000412223 adapter PCB 1 PZMR337 1US 4E 1000412224 1000412224 air pump...

Page 34: ...Level Parent PN Item NO JHT Parts No SAP Parts No Description 1 PZMR337 1US 33 1000413745 1000413745 walking motor 1 PZMR337 1US 34 1000413746 1000413746 kneading motor...

Page 35: ...ushion red 1 PZMR337 1US 1000417987 1000417987 head cushion brown American 1 PZMR337 1US 1000417989 1000417989 pu cover of massage chair beige American 1 PZMR337 1US 1000417990 1000417990 pu cover of...

Reviews: