background image


5

Hardware Installation  

Please note for Windows

®

 User’s 

Before attaching your new LCD monitor to your computer, please make sure that your resolution and 
refresh rates are set correctly for your monitor to work properly.  This is especially important if you are 
changing monitors (for example, from a CRT to a LCD).  Before disconnecting your old monitor, please 
set the resolution to 1024 x 768 and set the refresh rate to 60Hz.  

The maximum screen resolution is: 

1920 x 1080 @ 60Hz.  


You can adjust these settings by right clicking your desktop, select “Properties”, then “Settings”.   
To adjust the refresh rate, click on “Advanced” and search for this option. 

NOTE: 

Video card settings will be different based on the video capability of your computer.  Please 

consult your video graphics card or computer manual for more information. 


1. 

Carefully position your LCD monitor so that you can see all of the connection ports on the bottom 
of the monitor. 


2. 

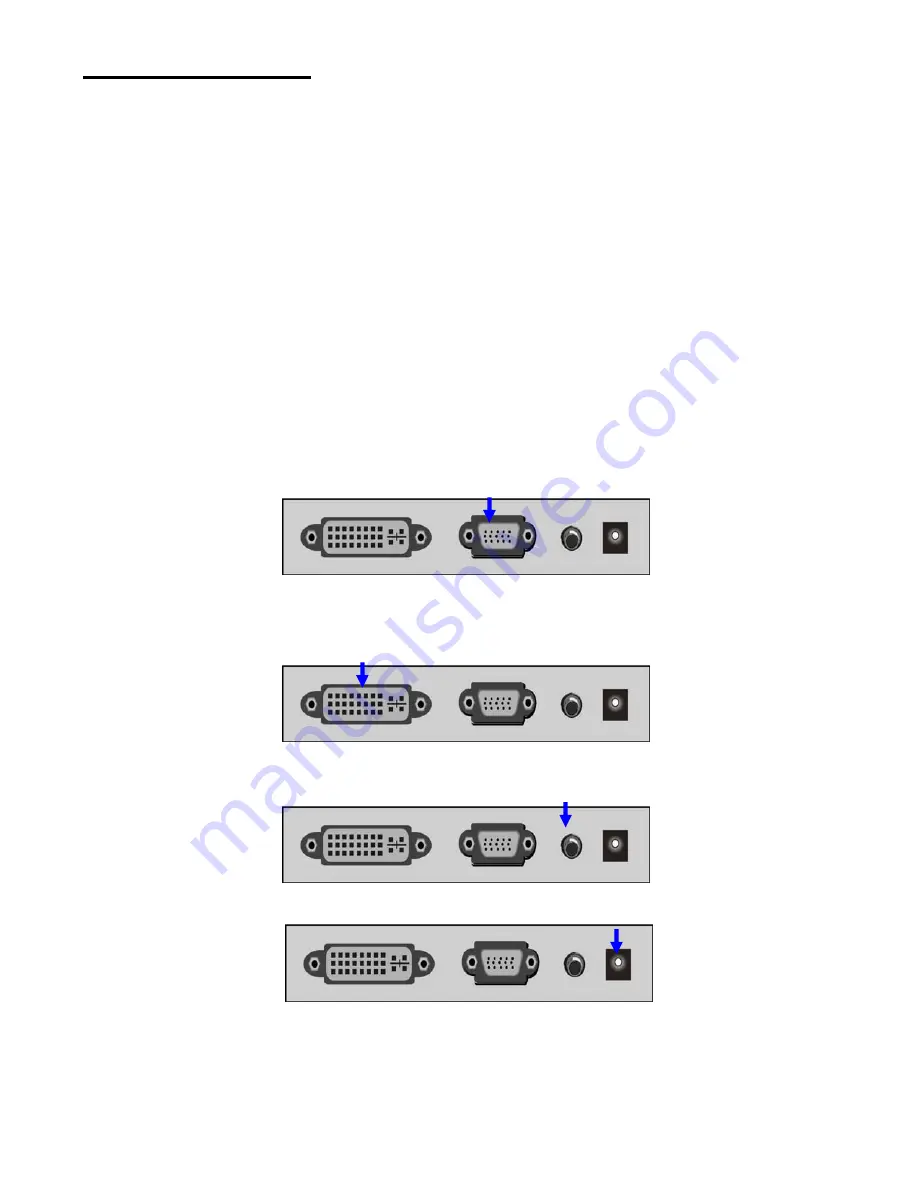
A.) Plug one end of the 15-pin D-Sub signal cable into the VGA connector 

d

 on the monitor and 

plug the other end of the cable into the 15-pin D-Sub connector at the rear of your PC. 


B.) 

OR 

if you are using a DVI signal cable (not included) plug one end into the DVI connector 

c

 on 

the monitor and plug the other end of the cable into the 24-pin DVI connector at the rear of your PC. 
Make sure that all of the screws are hand-tightened securely. 


2. 

Plug the Audio connector to the Audio In port 

e

 on the monitor, and to the computer line out at the 

rear of your PC.  This is optional if you wish to use a different audio source. 


3. 

Plug the power connector into the DC In port 

f

 port at the rear of the monitor. 


4. 

Connect the power cord to the power source. 

5. 

Power on the computer and the monitor. 


Summary of Contents for 11010230Y3

Page 1: ...in widescreen LCD Monitor Item Number 11010230Y3 Installation User s Manual All brand names and trademarks are the property of their respective owners Important Notice Please read this manual careful...

Page 2: ...tup 4 Hardware Installation 5 Menu Control Buttons 6 On Screen Display OSD Menu Mode 7 Troubleshooting your DVI monitor connection 8 Display Modes 9 Specifications 10 Troubleshooting 11 Maintenance 12...

Page 3: ...an extended period of time 6 Do not attempt to service this product yourself as opening or removing the cover may expose you to potential electric shock Only a qualified technician should service thi...

Page 4: ...AC Adaptor 100 240V 50 60Hz Hardware Setup Handle the LCD monitor with care Turn off the monitor s and computer s power before beginning setup Follow the installation instructions step by step Input c...

Page 5: ...graphics card or computer manual for more information 1 Carefully position your LCD monitor so that you can see all of the connection ports on the bottom of the monitor 2 A Plug one end of the 15 pin...

Page 6: ...wn left through the menu option selection 2 When not in the OSD Menu changes the signal source to from VGA DVI 6 UP 1 To navigate up right through the menu option selection 2 When not in the OSD Menu...

Page 7: ...Selects the 7 different display languages of the OSD Menu OSD DISPLAY Adjusts the horizontal and vertical position of the menu VGA DVI Selects the Video source as either VGA or DVI AUDIO Increases or...

Page 8: ...f the monitor and select DIGITAL INPUT The video card in your computer may have two types of connectors VGA and DVI Digital Visual Interface Many cards have both types of connectors Plug the monitor c...

Page 9: ...y Properties 1 Set the resolution Right click on the Windows desktop choose Properties choose Settings and set the resolution 2 Set the refresh rate See your graphic card s user guide for instructions...

Page 10: ...Digital DVI D sub 15 pin Stereo Phone Jack External Universal AC Adaptor DVI 24 pin Power Voltage Consumption Power saving mode 100 240V 50 60Hz universal via external power supply Active 60Watt Max...

Page 11: ...of power 4 No Signal Input A Check the signal connection between the computer and LCD monitor 5 Fuzzy image A Adjust the Phase through the OSD menu 6 Image too bright Image too dark A Adjust the Brig...

Page 12: ...or these chemicals can damage the LCD monitor 5 Screen To clean your LCD monitor screen or case use water or a mild cleaner as listed above Moisten a soft clean cloth or if possible use a special scre...

Page 13: ...e will not occur in television reception which can be determined by turning the equipment on and off Interference may be corrected by one or more of the following measures Reorient or relocate the rec...

Page 14: ...adapter in the original carton to the address below Include a copy of the original receipt for proof of purchase within 3 years Write the RA number on the outside of the package Packages without RA nu...

Page 15: ...costs such as lost profits or revenues cost of temporary replacements loss of data loss of equipment or use of equipment or any claims by third parties Beyond the retailer return policy please call t...

Reviews: