Synaps 11010223Y3 Installation & User Manual Download Page 8

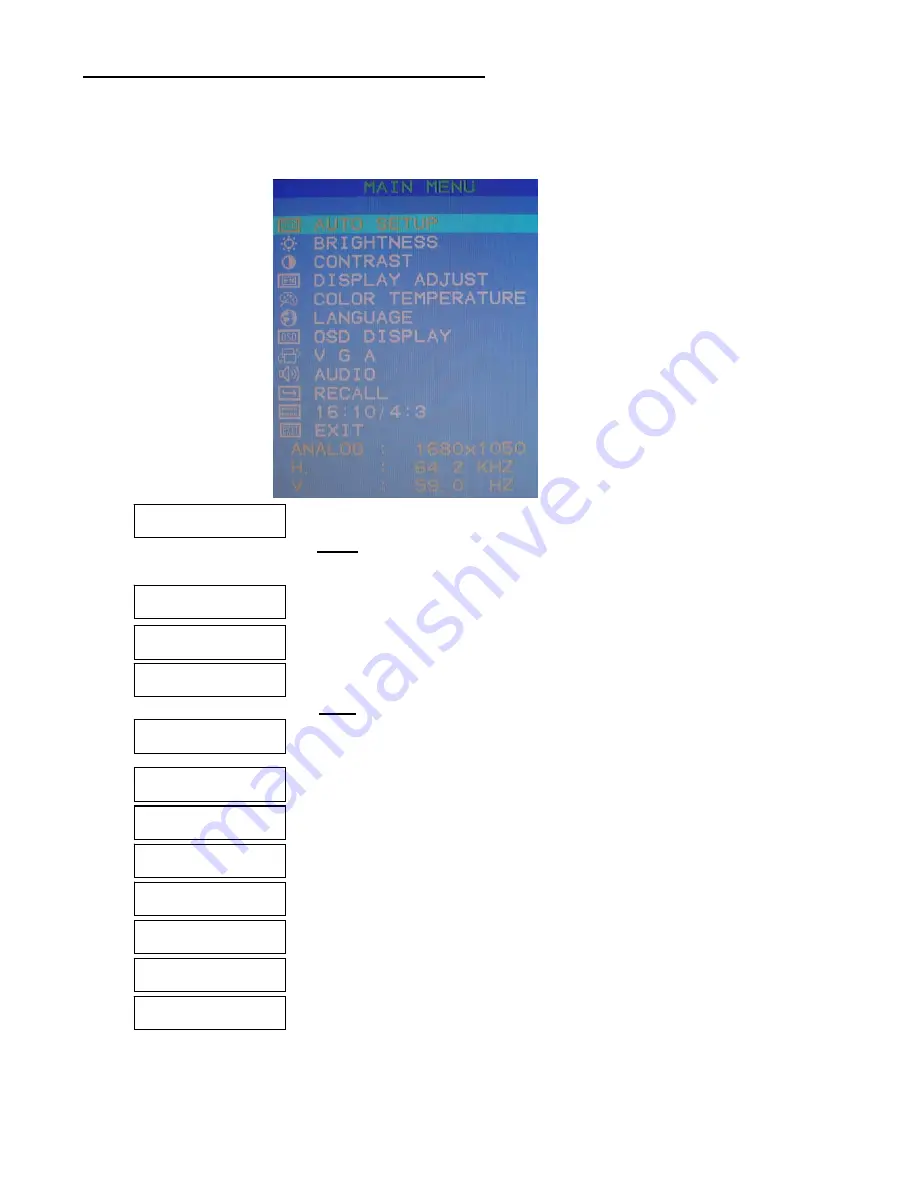
OSD (On-Screen Display) Menu Mode 

1.  Press the MENU button to access the OSD menu. 
2.  Press the DOWN or UP buttons to navigate through the submenus. 
3.  Select the desired option, by pressing the MENU button. 
4.  Use the DOWN or UP buttons to adjust the selected option value(s). 


CONTRAST 

Adjusts the contrast of the display 

DISPLAY ADJUST 

Adjusts the Horizontal and Vertical Position, Clock and Phase settings. 

(Note: This function is not available in DVI Mode.)


BRIGHTNESS 

Adjusts the brightness of the display.


AUTO SETUP 

Automatically adjusts to the factory default settings.  

(Note: This function is not available in DVI mode.)


COLOR TEMPERATURE 

Adjusts the color temperature. 9300K / 7500K / 6500K / USER


LANGUAGE 

Selects the 7 different display languages of the OSD Menu.


OSD DISPLAY 


Adjusts the horizontal and vertical position of the menu.


VGA / DVI 

Selects the Video source as either VGA or DVI. 


AUDIO 


Increases or decreases the sound volume.


RECALL 

Recalls the default setting.


16:10 / 4:3 


Allows you to toggle the aspect ratio of the screen from 4:3 to 16:10.


EXIT 

Saves the selected settings and exit the menu.


8

Summary of Contents for 11010223Y3

Page 1: ...6 in widescreen LCD Monitor Item Number 11010223Y3 Installation User s Manual Important Notice Please read this manual carefully All brand names and trademarks are the property of their respective own...

Page 2: ...Setup 4 Hardware Installation 5 Menu Control Buttons 6 On Screen Display OSD Menu Mode 7 8 Troubleshooting your DVI monitor connection 9 Display Modes 10 Specifications 11 Troubleshooting 12 Maintenan...

Page 3: ...tact with the LCD monitor screen that may cause damage to the screen 2 Align the pedestal with the easel stand of the monitor and attach the pedestal using the 3 thumb screws included Screwdriver Adju...

Page 4: ...0V 50 60Hz Pedestal Pedestal Screws with Screwdriver Hardware Setup Handle the LCD monitor with care Turn off the monitor s and computer s power before beginning setup Follow the installation instruct...

Page 5: ...mation 3 Carefully position your LCD monitor so that you can see all of the connection ports on the bottom of the monitor 4 A Plug one end of the 15 pin D Sub signal cable into the VGA connector e on...

Page 6: ...through the menu option selection 2 When not in the OSD Menu changes the signal source to from VGA DVI 6 UP 1 To navigate up right through the menu option selection 2 When not in the OSD Menu toggles...

Page 7: ...nitor is in sleep mode to save power please move the mouse or press any key on your keyboard to wake the monitor and return to working mode 4 Please check input diagrams and make sure the monitor has...

Page 8: ...ode BRIGHTNESS Adjusts the brightness of the display AUTO SETUP Automatically adjusts to the factory default settings Note This function is not available in DVI mode COLOR TEMPERATURE Adjusts the colo...

Page 9: ...the monitor and select DIGITAL INPUT The video card in your computer may have two types of connectors VGA and DVI Digital Visual Interface Many cards have both types of connectors Plug the monitor cab...

Page 10: ...75 03 79 98 1680x1050 60 00 65 30 1 We offer you 15 available modes compatible with Windows 2 Interference on your screen while you are modulating your PC or OSD is normal 3 For best quality resoluti...

Page 11: ...resistors Frequency FH 31 5 82 KHz FV 60 75 Hz Compatibility PC MAC Up to 1680X1050 60Hz Non interlaced Connector RGB Analog Audio Power Digital DVI D sub 15 pin Stereo Phone Jack External Universal...

Page 12: ...e A Make sure the power button is ON B Check whether the LCD monitor and computer power cords are connected and that there is a supply of power 4 No Signal Input A Check the signal connection between...

Page 13: ...or these chemicals can damage the LCD monitor 5 Screen To clean your LCD monitor screen or case use water or a mild cleaner as listed above Moisten a soft clean cloth or if possible use a special scre...

Page 14: ...extended period of time 6 Do not attempt to service this product yourself as opening or removing the cover may expose you to potential electric shock Only a qualified technician should service this p...

Page 15: ...ill not occur in television reception which can be determined by turning the equipment on and off Interference may be corrected by one or more of the following measures Reorient or relocate the receiv...

Page 16: ...complete unit including power cord and adapter in the original carton to the address below Include a copy of the original receipt for proof of purchase within 3 years Write the RA number on the outsi...

Page 17: ...iable for any costs such as lost profits or revenues cost of temporary replacements loss of data loss of equipment or use of equipment or any claims by third parties After 30 days from purchasing the...

Reviews: