This feature allows you to play a tape over and over.
1
Select main menu
by pressing [MENU].
2
Select "AUTO REPEAT"
by pressing [PLAY] or [STOP].
3
Begin auto repeat playback
by pressing [F.FWD] so that
[ON] appears next to "AUTO REPEAT".
• If the on-screen menu still remains, press [C.RESET/EXIT]
to exit the menu.
• To cancel the Auto repeat mode, press [F.FWD] at step [3]
so that [OFF] appears next to "AUTO REPEAT".
– 4 –
EN
1
Select main menu
by pressing [MENU].(If the clock is not
set, the CLOCK SET menu appears first. In this case, fol-
low step [3].)
2
Select "CLOCK SET"
by pressing [PLAY] or [STOP].
Then, press [F.FWD].
3
Set the clock.
• To go back one step, press [REW].
4
Start the clock
by pressing [C.RESET/EXIT] or [F.FWD].
1
Press [MENU]
until the main menu appears.
2
Select "LANGUAGE SELECT"
by pressing [PLAY] or
[STOP]. Then, press [F.FWD].
3
Select "ENGLISH" , "FRANCAIS" or "ESPAÑOL"
by
pressing [PLAY] or [STOP]. Then, press
[C.RESET/EXIT].
• If you accidentally select Spanish or French and need
English: Press [MENU] and choose SELEC. IDIOMA, or
SELECTION LANGUE. Press [F.FWD], and select ENG-
LISH. Finally, press [C.RESET/EXIT].
To Change the On-Screen Language
Clock Set Up
Auto Repeat Playback
Search Functions
PLAYBACK FUNCTION
Normal Playback
When the VCR automatically program the tuner to scan only the
channels you receive in your area, some channels may be
skipped due to weak signal. You can manually add the channel
in the VCR memory.
1
Press [MENU]
until the main menu
appears
.
2
Select "CHANNEL SET UP"
by
pressing [PLAY] or [STOP]. Then,
press [F.FWD].
3
Select "MANUAL SET UP"
by pressing [PLAY] or
[STOP]. Then, press [F.FWD].
4
Enter the desired channel number
by pressing [PLAY]
or [STOP].
5
Add or Delete it from memory
by pressing [F.FWD] or
[REW] so that "ADD" or "DELETE" flashes on the TV
screen accordingly.
6
Exit the Preset mode
by pressing [C.RESET/EXIT].
To Add/Delete Channels
1
Insert the prerecorded tape.
The VCR will
turn on. If the safety tab has been removed,
the VCR will start playback automatically.
2
Turn on the TV and set the TV to channel 3.
If channel
3 is already occupied for broadcasting, change the RF out-
put to CH 4, and change the TV channel to CH4.
(See “RF Output Channel” on page 3 for the detail.)
3
Begin playback by pressing [PLAY].
• Tracking adjustment will be set automatically (Digital
Tracking function) when you start playback. To adjust the
tracking manually, press [CHANNEL
]
on the VCR
.
• You cannot manually adjust the tracking of a Still picture.
However, you may press [CHANNEL
]
on the VCR
to
remove vertical jitter in a Still picture.
• When a tape has reached the end, the VCR will rewind the
tape to the beginning, eject the tape, and turn off the VCR
automatically.
4
To stop playback, press [STOP].
• You can reset the counter by pressing [C.RESET/EXIT] on the
remote control
You can freeze the picture on TV screen
by pressing
[PAUSE/STILL] during playback.
• You can advance the picture by one frame at a time by press-
ing [PAUSE/STILL] during the still mode.
• If the picture begins to vibrate vertically during the still mode,
stabilize the picture by pressing [CHANNEL
].
• If the picture is distorted or rolling vertically, adjust the vertical
hold control on your TV, if equipped.
You can see the slow motion
by pressing [SLOW] during play-
back or the still mode.
• If the noise bar appears on the TV screen, you can reduce it
by pressing [CHANNEL
].
• After the VCR has been in Still/Slow mode for 5 minutes, it will
stop automatically to protect the tape and the video head from
damage.
• To return playback, press [PLAY].
( )
( )
Still / Slow
Counter Reset
( )
( )
If you want to skip or repeat a scene during playback, press
[F.FWD] or [REW].
• Press it again and the VCR will now search in super high
speed. (in the LP/SLP modes only)
Picture Search
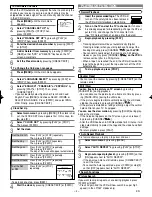
CLOCK SET
MONTH DAY YEAR
03 / 17 MON 2003
HOUR MINUTE AM/PM
05 : 40 PM AM
PM
Press [PLAY] or [STOP]repeatedly.
Then, press [F.FWD].
Press [PLAY] or [STOP] repeatedly.
Then, press [F.FWD].
The day of the week will appear automatically.
Press [PLAY] or [STOP] repeatedly.
Then, press [F.FWD].
Press [PLAY] or [STOP] repeatedly.
Then, press [F.FWD].
Press [PLAY] or [STOP]
repeatedly.
Press [PLAY] or [STOP] repeatedly.
Then, press [F.FWD].
Set the month
Set the day
Set the year
Set the hour
Set the minute
Set the AM
or PM
- MENU -
TIMER PROGRAMMING
AUTO REPEAT
CHANNEL SET UP
CLOCK SET
LANGUAGE SELECT
[OFF]
HD300.QX33 02.11.8 14:28 Page 4


