


7-11
Error Recovery and Troubleshooting
7. The terminal displays a range verification screen. For example:
RAM 0000 3FFF
NVM C839 DFFF
EMS None
Correct?
If the values are correct, press
<Enter>
. If the values are not correct, press
<Clear>
to
clear the fields and select new values.
8. Specify the baud rate. Use the
<UpArrow>
and
<DownArrow>
to scroll through the
list of baud rates until the correct rate is displayed, and press
<Enter>
. (Flow control
may be necessary at 38400 bps and higher.)
9. Specify the data bits. Press
<7
> or <
8>
, or use
<UpArrow>
and
<DownArrow>
to
display 7 or 8, and press
<Enter>
.
Note:
If you select 8 data bits, the program selects No parity and skips the
next screen.
10. Specify parity type. Use
<UpArrow>
and
<DownArrow>
to display a parity option,
or press the first letter of a parity option (
E
ven,
O
dd,
N
one,
S
pace, or
M
ark) and
press
<Enter>
.
11. Set flow control. Use
<UpArrow>
and
<DownArrow>
to display the flow control
options, or press the first letter of an option (
N
one,
X
on/Xoff, or
R
TS/CTS) and
press
<Enter>
.
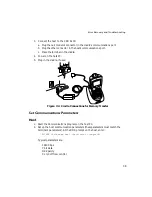
Start Communications
1. The terminal is ready to send the data to the host PC and displays:
Comm Parameters
Start? <ENT>
2. Verify that the host is ready to receive data.
3. Press
<Enter>
on the terminal.
While data is being transferred, the terminal displays a report of the 1 KB range being
transferred:
Memory Transfer
Sending: XXXX
Summary of Contents for PDT 6100
Page 1: ...PDT 6100 Series Product Reference Guide ...
Page 2: ...PDT 6100 Series Product Reference Guide 70 33222 02 Revision A June 2001 ...
Page 19: ...1 6 PDT 6100 Product Reference Guide ...
Page 31: ...3 8 PDT 6100 Product Reference Guide ...
Page 61: ...6 10 PDT 6100 Product Reference Guide ...
Page 75: ...7 14 PDT 6100 Product Reference Guide ...
Page 77: ...A 2 PDT 6100 Product Reference Guide ...
Page 93: ...D 2 PDT 6100 Product Reference Guide ...
Page 105: ...Index 6 PDT 6100 Product Reference Guide ...
Page 107: ......