background image

Installing hardware into
racks

This chapter includes the following topics:

Precautions - heavy equipment

Removing the protective film from the storage shelf

Installing the Symantec Storage Shelf guide rails

Installing the Symantec Storage Shelf into a rack

Installing the NetBackup appliance guide rails

Installing the NetBackup appliance into a rack

Precautions - heavy equipment

The heaviest devices in any equipment rack should be installed in the bottom of
the rack. If heavy devices are installed at the top of the rack, the rack may tip
over. Injury to personnel and damage to equipment is very possible. The Symantec
Storage Shelf is heavier than the appliance. Therefore, you must install the storage
shelf in the bottom of the rack. Install the appliance higher in the rack than the
storage shelves.

The following list describes dimensions of the storage shelf:

The rack rails that are provided for the Symantec Storage Shelf are extensible to
36” (914mm). This distance is the maximum depth that is allowed between rack
posts. If the distance between rack posts is longer than 36” (914mm) the rails and
the appliance cannot be properly installed. The width of the storage shelf is 19”
(482.6mm).

4

Chapter

Summary of Contents for NetBackup 5230

Page 1: ...Symantec NetBackup 5230 Appliance Hardware Installation Guide Release 2 6 1 2 21350324 ...

Page 2: ... decompilation reverse engineering No part of this document may be reproduced in any form by any means without prior written authorization of Symantec Corporation and its licensors if any THEDOCUMENTATIONISPROVIDED ASIS ANDALLEXPRESSORIMPLIEDCONDITIONS REPRESENTATIONS AND WARRANTIES INCLUDING ANY IMPLIED WARRANTY OF MERCHANTABILITY FITNESS FOR A PARTICULAR PURPOSE OR NON INFRINGEMENT ARE DISCLAIME...

Page 3: ...Symantec Corporation 350 Ellis Street Mountain View CA 94043 http www symantec com Printed in the United States of America 10 9 8 7 6 5 4 3 2 1 ...

Page 4: ... minute information Upgrade assurance that delivers software upgrades Global support purchased on a regional business hours or 24 hours a day 7 days a week basis Premium service offerings that include Account Management Services For information about Symantec s support offerings you can visit our Web site at the following URL www symantec com business support All support services will be delivered...

Page 5: ...ess support Customer service Customer service information is available at the following URL www symantec com business support Customer Service is available to assist with non technical questions such as the following types of issues Questions regarding product licensing or serialization Product registration updates such as address or name changes General product information features language avail...

Page 6: ...existing support agreement please contact the support agreement administration team for your region as follows customercare_apac symantec com Asia Pacific and Japan semea symantec com Europe Middle East and Africa supportsolutions symantec com North America and Latin America ...

Page 7: ...figuration 20 Chapter 3 Preparing for hardware installation 23 Tools 23 About hardware installation 24 Environmental specifications 25 ESD preventive measures 26 Ensuring rack readiness 26 Checking the shipping packages 27 Chapter 4 Installing hardware into racks 29 Precautions heavy equipment 29 Removing the protective film from the storage shelf 30 Installing the Symantec Storage Shelf guide rai...

Page 8: ...onfiguring the IPMI from the NetBackup Appliance Shell Menu 46 Accessing and using the Symantec Remote Management interface 48 Appendix A Adding storage shelves 51 About adding an additional Symantec Storage Shelf to an operational NetBackup 52xx appliance 51 Installing and connecting an additional Symantec Storage Shelf to an operational NetBackup 52xx appliance 52 Adding the disk space of additi...

Page 9: ...figuration Product documentation Product overview An option to use eight 3 TB storage disks in the appliance provides 14 TB of storage without a storage shelf Up to four storage shelves can be added to increase the storage capacity to 158 TB including the appliance Appliance front panel Up to four storage shelves can be used with one NetBackup 5230 Appliance 1 Chapter ...

Page 10: ...shes when in use at the rate of speed 6 NMI button This button triggers a nonmaskable interrupt All server data is lost 7 NIC1 eth0 activity LED on when linked flashes when in use at the rate of speed 8 NIC2 eth1 activity LED on when linked flashes when in use at the rate of speed 9 System status LED green when status is good amber when faults have occurred 10 Each hard disk drive has two LEDs whi...

Page 11: ...isk spins up Commands are processed Not lit Solid green Blinking green Blinking green occasionally Activity LED 2 See Appliance rear panel on page 11 Appliance rear panel The NetBackup Appliance rear panel provides access to the communication ports PCIe add in cards and the hot swappable power supplies The add in cards are installed at the factory before the appliance ships 11 Introduction Applian...

Page 12: ...e You can use standard grounding practices to connect grounding wires to the studs PCIe riser assemblies and slot numbers Each appliance contains two PCIe riser assemblies Each riser assembly can hold three PCIe add in cards The riser numbers and slot numbers determine which slot a card can occupy The following diagram shows the PCIe risers as R2 and R1 In the R2 riser the PCIe slots are numbered ...

Page 13: ...ppliance The following figure shows the remote management port or the IPMI port on the rear panel of a 5230 appliance IPMI port The IPMI is beneficial after an unexpected power outage shuts down the connected system In case the appliance is not accessible after the power is restored you can use a laptop or desktop computer to access the appliance remotely by using a network connection to the hardw...

Page 14: ...s and remote data center In case the appliance is not accessible using regular network interfaces you can access the NetBackup Appliance Shell Menu remotely using IPMI Note Only the NetBackup Appliance Shell Menu can be accessed by using the IPMI interface The NetBackup Appliance Web Console cannot be accessed by using the IPMI interface Reimage the appliance from the IPMI interface by using ISO r...

Page 15: ...le 1 5 NetBackup Appliance and Symantec Storage Shelf software related documentation Description Document Provides information to set up the appliance in your network and to create storage partitions Initial Configuration Guide Describes the aspects of the NetBackup appliance software and how to implement a storage pool across your company s network Administrator s Guide Lists the important inform...

Page 16: ...Introduction Product documentation 16 ...

Page 17: ... in case of failure Two power cords one per appliance and storage shelf are provided Connect each power cord to an independent AC power source This section describes the requirements of the appliance power supply Before installing the appliance check whether the power supply satisfies the conditions for proper running of the appliance If multiple appliances are to be installed on site check whethe...

Page 18: ...rcuit breakers must provide enough power and overload protection Separate the power supply from other large distribution loads or engines to prevent possible damage to the appliance Examples of systems that have a large power draw include air conditioners elevators or factory machines See Power supply overview on page 17 Heat dissipation This section describes heat dissipation requirements of the ...

Page 19: ...evices Air conditioning If the relative humidity is greater than 70 a dehumidifying device must be installed Examples of such devices include an air conditioner that provides a dehumidification function or a special purpose dehumidifier Water penetration dripping and condensation must all be prevented in the equipment room Moisture proofing If the temperature in the room is lower than the stated m...

Page 20: ... Heat dissipation on page 18 Prerequisites for IPMI configuration Verify the following configuration prerequisites Ensure that you have a dedicated network infrastructure The remote management port is 1 Gbps for NetBackup 5230 appliances The remote management port can auto negotiate its link speed of up to 1 Gbps for 5230 appliances Note If the IPMI is connected to a managed switch port Symantec r...

Page 21: ...have a private internal network remember to configure the settings accordingly in your network address translation NAT The remote management port must be configured as a DHCP or static address 21 Installation requirements Prerequisites for IPMI configuration ...

Page 22: ...Installation requirements Prerequisites for IPMI configuration 22 ...

Page 23: ...ures Ensuring rack readiness Checking the shipping packages Tools The following tools and supplies are required for hardware installation Phillips screwdrivers M3 M6 Knife for opening cartons ESD preventive wrist strap or gloves Cable labels Pen or pencil with which to write on labels Cable ties and diagonal cutting pliers optional Multimeter optional 3 Chapter ...

Page 24: ...between rack posts If the distance between rack posts is longer than 36 914mm the rails and the appliance cannot be properly installed The width of the storage shelf is 19 482 6mm Unpack the devices Install rack rails in the equipment racks for the NetBackup Appliance and Symantec Storage Shelf The storage shelf is heavier than the appliance All storage shelves should be installed at the bottom of...

Page 25: ...122 F Storage temperature 40 C to 60 C 40 F to 140 F Transportation temperature 10 to 80 Relative humidity operating range 10 to 90 Relative humidity storage range 5 to 90 Relative humidity transportation range 10 C 50 F per hour maximum Relative humidity operating gradient 15 C 59 F per hour maximum Relative humidity storage gradient 30 meters to 3 000 meters 98 4 FT to 9842 5 FT In altitudes fro...

Page 26: ...oves If you wear ESD preventive clothes be sure to fasten the buttons Wearing an ESD preventative wrist strap or band 1 Stretch your hand through the ESD preventive wrist strap or band 2 Fasten the ESD preventive wrist device to fully touch your skin 3 An ESD preventive wrist strap has a plug or metal clip Perform one of the following steps depending on your environment Insert the plug into the ES...

Page 27: ... Checking the shipping packages Before unpacking devices check that the packages are intact and undamaged Before you unpack the devices perform the following checks To check devices before unpacking 1 Verify that the quantity of the packages which were received matches the shipping documentation quantity 2 Check that the packages are intact If the packages are severely damaged or are wet perform S...

Page 28: ...Preparing for hardware installation Checking the shipping packages 28 ...

Page 29: ...ed at the top of the rack the rack may tip over Injury to personnel and damage to equipment is very possible The Symantec Storage Shelf is heavier than the appliance Therefore you must install the storage shelf in the bottom of the rack Install the appliance higher in the rack than the storage shelves The following list describes dimensions of the storage shelf The rack rails that are provided for...

Page 30: ... protective film on the top bottom and sides of the chassis You need to remove the film before you install the storage shelf into the rack The storage shelf does not install properly if the film is not removed The front panel and the rear panel do not include any film To remove the protective film Warning Make sure that another person is available to help lift the storage shelf 1 Peel the protecti...

Page 31: ...helf on which the storage system sits Extenders that are built into the rails let you adjust the rails for the depth of the rack Caution Due to the weight of the units Symantec recommends that storage shelves be installed at or near the bottom of the rack Requirements 19 inch equipment rack Available 3U slot Six M5 screws provided Six cage nuts provided Number 2 Phillips screwdriver Flashlight 31 ...

Page 32: ...cage nuts in the package in which the storage shelf was sent Identify the bottom third of the 3U section in the front and back of the rack where you want to install the storage shelf Note The mounting rails are 1U high The holes that are used to secure the rail in the rack are in the middle of that height From the inside of the rack insert snap in cage nuts in cutouts in the front and back where y...

Page 33: ...fy that the guide rails are properly installed and securely fastened in the rack 2 Insert snap in cage nuts in cutouts on both sides of the front of the rack to secure the storage shelf The snap in cage nuts must align with through holes in top third of each storage shelf when the storage shelf is installed 3 Slide the storage shelf along the mounting rails into the rack cabinet 4 Insert M5 screws...

Page 34: ...k 4 The silver peg is on the top of each rail The blue peg is on the bottom of each rail The blue peg and the square silver peg snap into the rack without screws or cage nuts To install the rack rails 1 Identify the one RU on each side of the rack where you plan to install the rails 2 Verify that there is one complete RU available under the RU used for rail installation Installing hardware into ra...

Page 35: ...on the front of the rail into the bottom hole in the RU 7 Repeat steps 3 to 6 for the rail on the right side of the rack 8 Verify that both rails are parallel and fastened securely See Installing the NetBackup appliance into a rack on page 35 Installing the NetBackup appliance into a rack The appliance should be installed above any storage shelves This configuration allows proper weighting of the ...

Page 36: ...rear panel facing towards the rear of the rack 5 Tilt the device down towards the back of the rack 6 Insert the two rear standoff pegs extending from the side of the device into the rail slots at the back of the rail extenders 7 Slowly drop the front of the device into the rail slots at the front of the rail extenders A peg in the middle and a peg at the front of the device fit into the rail slots...

Page 37: ...se the following cables Cables shipped with the product Power Distribution Unit PDU cords for connecting the devices to main AC power source Most NetBackup appliances and storage shelves ship with two PDU compatible cords C13 C14 AC power cables ship to limited specified countries SAS cables to connect the appliance to a storage device and to connect storage devices to each other Cables which the ...

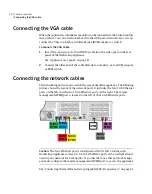
Page 38: ...ed on the rear panel of the appliance The following picture shows the layout of the network ports It includes the four 1 Gb Ethernet ports on the left and the two 10 Gb Ethernet ports on the right The remote management IPMI port is located to the left of the 10 Gb Ethernet ports NIC2 ETH1 NIC1 ETH0 NIC3 ETH2 NIC4 ETH3 IPMI NIC5 ETH4 NIC6 ETH5 Caution The first Ethernet port is configured as NIC1 e...

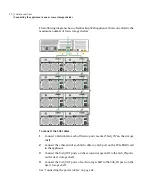
Page 39: ...age unit Therefore any storage shelves that ship with a NetBackup 5230 appliance with version 2 6 0 2 no longer have the yellow labels that identify a matched unit The first storage shelf is connected to the SAS RAID ports in the appliance PCIe RAID card The SAS_IN ports on the storage shelf must connect to the SAS RAID ports in the appliance 39 Cable connections Connecting the appliance to one or...

Page 40: ...e shelf 2 Connect the other end of each SAS cable to a SAS port on the PCIe RAID card in the appliance 3 Connect the SAS_OUT ports on the second storage shelf to the SAS_IN ports on the next storage shelf 4 Connect the SAS_OUT ports of each storage shelf to the SAS_IN ports on the next storage shelf See Connecting the power cables on page 42 Cable connections Connecting the appliance to one or mor...

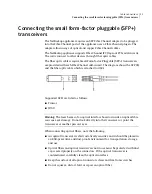
Page 41: ...listed as follows Finisar JDSU Warning The laser beams of an optical interface board or inside an optical fibre can cause eye damage Do not look directly into the transceiver or point the transceiver at another person s eyes When connecting optical fibers note the following An optical transceiver is electrostatically sensitive and it should be placed in an ESD preventive and dust proof environment...

Page 42: ...ve an optical fiber from its packaging 4 Remove the caps of the optical connectors 5 Plug an optical connector into the interface of the card 6 Ensure that the optical connector is securely inserted into the optical transceiver 7 Connect the other optical connector of the optical fiber to a Fibre Channel switch See About the cables on page 37 Connecting the power cables Caution The equipment shoul...

Page 43: ... the Symantec Remote Management interface Hardware verification and turning on the NetBackup 5230 appliance and storage shelf Note Do not attach external devices such as tape drives or SAN clients to the appliance until this process has been completed Warning Confirm that all power to the devices is turned off to prevent personnel injuries and to prevent damage to the devices Verify that the devic...

Page 44: ...een If they are not green contact Symantec Technical Support 5 Repeat this procedure for all storage shelves See Turning on the appliance on page 44 Turning on the appliance All devices must be correctly installed and all cables must be connected properly When turning on the NetBackup hardware do not remove or handle any disks optical fibers or network cables Otherwise data may be lost and equipme...

Page 45: ...olid amber LED indicates a disk fault A blinking amber LED indicates that a RAID rebuild is in progress The Activity LED 2 indicates the following The LED is not lit when the disk has spun down although power is on The LED is solid green when there is no disk activity although power is on The LED blinks green when the disk spins up The LED blinks green occasionally when commands are processed Revi...

Page 46: ...d reset button 5 Check the power supply module LEDs on the rear panel Each module has one LED See Hardware verification and turning on the NetBackup 5230 appliance and storage shelf on page 43 Configuring the IPMI from the NetBackup Appliance Shell Menu This section explains how to configure IPMI from the NetBackup Appliance Shell Menu Verifying the operation of the appliance and configuring IPMI ...

Page 47: ...Shell Menu 3 Enter the username and password for the appliance By default the user name is admin and the password is P ssw0rd where 0 is the number zero 4 At the Main_Menu prompt type Support to navigate to the Support menu 5 From the Main_Menu Support view enter the following command to configure the remote management port IPMI Network Configure IPAddress Netmask GatewayIPAddress where IP address...

Page 48: ...ropriate platform for information about initial configuration requirements and procedures Accessing and using the Symantec Remote Management interface The IPMI Web interface is known as Symantec Remote Management in NetBackup 5220 and later appliances You can use the Symantec Remote Management interface to log on to the NetBackup Appliance Shell Menu Before you use the Symantec Remote Management i...

Page 49: ...ears 3 Enter your login information The default user name is sysadmin The default password is P ssw0rd where 0 is the number zero Click Login 4 The RemoteControl section lets you remotely monitor and control the server Click Launch Console under the Console Redirection tab to launch the appliance NetBackup Appliance Shell Menu 49 Verifying the operation of the appliance and configuring IPMI Access...

Page 50: ...ng states that you do not have proper permissions and prevents appliance access from the IPMI port For information about how to resolve this issue refer to the following document http www symantec com docs TECH212531 6 You can now access and log on to the shell menu Enter the user name and password for the NetBackup appliance By default the user name admin has the password P ssw0rd where 0 is the ...

Page 51: ...Shell Menu About adding an additional Symantec Storage Shelf to an operational NetBackup 52xx appliance If you have a NetBackup 52xx appliance that currently includes one Symantec Storage Shelf you can expand the disk storage of the appliance by adding another Symantec Storage Shelf NetBackup appliance software versions 2 5 2 6 0 2 let you connect up to two Symantec Storage Shelf units Starting wi...

Page 52: ...mends that you schedule this task during low system activity Installing and connecting an additional Symantec Storage Shelf to an operational NetBackup 52xx appliance Use the following procedure to install and connect an additional Symantec Storage Shelf to an operational NetBackup 52xx appliance Note When you add a storage shelf to an operational system it is not necessary to shut down the applia...

Page 53: ...S In SAS In SAS In SAS In SAS Out SAS Out SAS Out SAS Out SAS Out SAS Out Storage Shelf 1 Storage Shelf 2 Storage Shelf 3 Storage Shelf 4 F Slot 5 RAID controller NetBackup 5220 On the first or the existing storage shelf in the leftmost I O module connect one end of an SAS cable into the SAS_OUT port The SAS_OUT port is labeled number 2 53 Adding storage shelves Installing and connecting an additi...

Page 54: ...om a power loss on any single power supply Symantec also recommends that you enable the Call Home feature to monitor the power status of each unit and to provide alerts if only one power supply is plugged in or has failed 4 To add the storage space of the new storage shelf units to the system refer to the following topics See Adding the disk space of additional Symantec Storage Shelf units to an o...

Page 55: ...or the new storage shelf units The new entries should have the following attributes Type Expansion Status New Available 7 In the Status column next to NewAvailable click Add to activate the storage in the RAID 8 In the Confirmation dialog box click Yes to start a scan When the process completes the following message should appear Storage operation completed Succeeded 9 Click OK to refresh the syst...

Page 56: ...s Enter Verify that the new storage devices appear If the new storage devices do not appear check the cable connections and make sure that the power is on 5 At the prompt type return to return to the Main menu 6 Perform a scan as follows At the Main_Menu prompt enter manage and press Enter Enter storage and press Enter Enter scan and press Enter The scan takes a couple of minutes to complete 7 Nav...

Page 57: ...sks is displayed as In Use and space in the Unallocated column is the disk space available for the new disk 57 Adding storage shelves Adding the disk space of additional Symantec Storage Shelf units to an operational NetBackup 52xx appliance from the NetBackup Appliance Shell Menu ...

Page 58: ...Adding storage shelves Adding the disk space of additional Symantec Storage Shelf units to an operational NetBackup 52xx appliance from the NetBackup Appliance Shell Menu 58 ...

Page 59: ...sions appliance 29 storage shelf 29 E environmental checklist 19 G grounding studs 12 H hardware preparation check packages 27 electrostatic discharge prevention 26 rack preparation 26 tools 23 heat dissipation 18 I install additional storage shelf 52 IPMI configuration 46 about 13 prerequisites 20 P ports NetBackup 5230 Appliance NIC1 eth0 38 power supplies 17 protective film removing from the st...

Page 60: ...V validation appliance 44 NetBackup 5230 hardware checks 43 storage shelf 44 Index 60 ...

Reviews: