background image

9

1

2

3

4

5

6

7

8

9

10

11

12

13

14

15

16

17

18

19

20

21

22

23

24

25

26

27

28

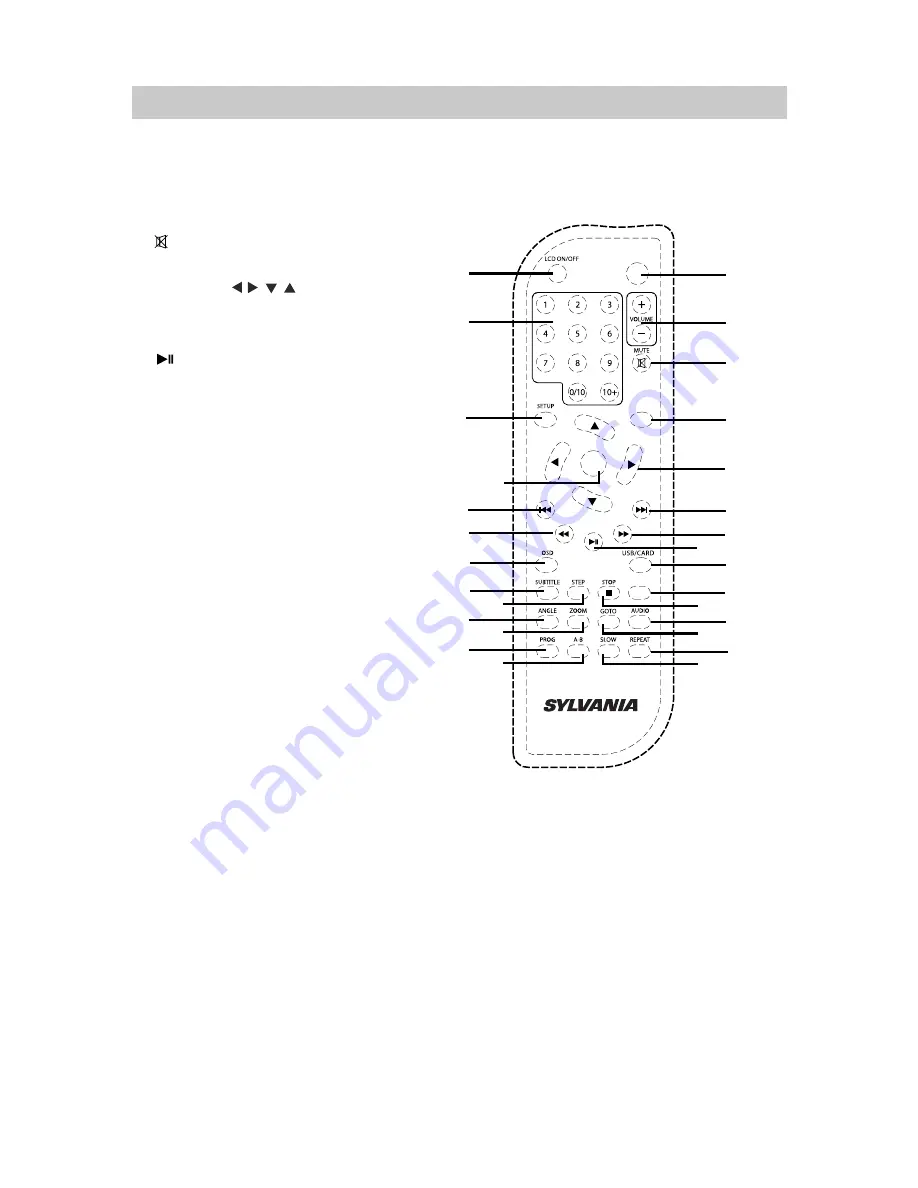
1. SOURCE Button

2. /– Buttons

4. MENU Button

Ż Ż

7.  

ǿ ŻŻ

6.          Button

12. 

15. SLOW Button

Button

16. LCD ON/OFF Button

17. Numeric Buttons

18. SETUP Button

19.        Button

ǿŻŻ

20.        Button

ŻŻ

21. OSD (On Screen Display  Button

22. SUBTITLE Button

23. ANGLE Button

24. PROG (Program  Button

26. STEP Button

27. ZOOM Button

28. A-B Repeat Button

9. 

TITLE Button

8. 

USB/CARD Button

10.

 AUDIO Button

REPEAT Button

13. 

11. 

14. 

GOTO Button 

OK

25. 

 Button

3. 

MUTE Button

5. Direction                   Buttons

 ( Play/Pause   Button

6723 %XWWRQ

Ŷ

MENU

TITLE

SOURCE

REMOTE CONTROL 

OK

Summary of Contents for SDVD7075-B-COMBO-BLACK

Page 1: ...PLEASE READ THIS INSTRUCTION CAREFULLY BEFORE OPERATION 7 Inch Swivel Screen PDVD USB Deluxe Bag with Matching Headphone MODEL SDVD7075 B COMBO BLACK ...

Page 2: ...R OR BACK NO USER SERVICEABLE PARTS INSIDE REFER SERVICING TO QUALIFIED SERVICE PERSONNEL The FCCWantsYou to Know This device complies with part Part 15 of the FCC Rules Operation is subject to the following two conditions 1 This device may not cause harmful interference and 2 this device must accept any interference received including interference that may cause undesired operation Thelightningfl...

Page 3: ...t the power cord from being walked on or pinched particularly at plugs convenience receptacles and the point where they exit from the apparatus 10 Only use attachments accessories specified by the manufacturer 11 Use only with the cart stand tripod bracket or table specified by the manufacturer or sold with the apparatus When a cart is used use caution when moving the cart apparatus combination to...

Page 4: ...s a When the power supply cord or plug is damaged b If liquid has been spilled or objects have fallen into the product c If the product has been exposed to rain or water d If the product does not operate normally by following the operating instructions Adjust only those controls that are covered by the operating instructions as an adjustment of other controls may result in damage and will require ...

Page 5: ...es the DVD player Please read the following carefully Moisture condensation occurs for example when you pour a cold drink into a glass on a warm day Drops of water form on the outside of the glass In the same way moisture may condense on the optical pick up lens inside this unit one of the most crucial internal parts of the DVD player Moisture condensation occurs during the following cases When yo...

Page 6: ...tes on Copyright It is forbidden by law to copy broadcast show broadcast on cable play in public and rent copyrighted material without permission DVD video discs are copy protected and any recordings made from these discs will be distorted This product incorporates copyright protection technology that is protected by method claims of certain U S Patents and other intellectual property rights owned...

Page 7: ...e operations 6 VOL Press to increase volume turn right 7 Press to turn downward 8 Press to skip to previous track 9 Press to fast backward 10 MENU Press to enter root menu 11 Press to fast forward 12 Press to skip to next track 13 Press to pause during playing press again to resume playing 14 Press to pre stop playing press again to stop playing completely 15 OPEN Press to open the disc door PRODU...

Page 8: ...Jack 10 AV IN Jack 11 POWER ON OFF Switch Slide to ON position to power on Slide to OFF position to shut off 12 DC IN Jack 12 6 8 9 10 11 13 14 13 Indicator 14 Remote Sensor Right Side View Front Side View 7 SD MMC CARD PRODUCT OVERVIEW PHONE DC IN ...

Page 9: ...meric Buttons 18 SETUP Button 19 Button ǿ Ż Ż 20 Button Ż Ż 21 OSD On Screen Display Button 22 SUBTITLE Button 23 ANGLE Button 24 PROG Program Button 26 STEP Button 27 ZOOM Button 28 A B Repeat Button 9 TITLE Button 8 USB CARD Button 10 AUDIO Button REPEAT Button 13 11 14 GOTO Button OK 25 Button 3 MUTE Button 5 Direction Buttons Play Pause Button 6723 XWWRQ Ŷ MENU TITLE SOURCE REMOTE CONTROL OK ...

Page 10: ...using a battery in this device 1 Use only the size and type of battery specified 2 Besure to follow the correct polarity when installing the battery as indicated in the battery compartment A reversed battery may cause damage to the device batteries to prevent damage or injury from possible battery leakage manufacturer s directions 6 Do not dispose of battery in fire Battery may explode or leak 7 C...

Page 11: ...le with NOT Charging by supplied Wall Power Adapter AC 100 240V 50 60Hz POWER SOURCE Charging by supplied Wall Power Adapter Connect the wall power adapter to the wall outlet having NOTE The wall power adapter is intended to be correctly orientated in a vertical or floor mount position There is a built in Lithium ion rechargeable battery in the unit Recharge it as follows Connect the small plug fr...

Page 12: ...E 1 Connecting to a TV or Video Player such like DVD VCR DVR Players with AV connection cable The default setting of the unit is AV Out if connect to external Video to turn back to DVD mode AV Out mode Player such like DVD VCR DVR Players press the Button on remote will appear on the screen Press again Using the earphone not included to listen privately SOURCE CONNECTIONS SD MMC CARD control to se...

Page 13: ...13 a d c b 180 The viewing angle of the swivel panel can be adjusted as below as desired SWIVEL PANEL ...

Page 14: ... point where disc was stopped When press Play Pause Button again playback will start from this point To stop playback completely or to start from the beginning press and hold the STOP Button twice For saving energy always power off the player by slide the Power ON OFF Switch on the player to OFF position or unplug the Wall Power Adaptor from player and wall outlet until all the repeat indicators d...

Page 15: ...the section to end the unit will then plays the selected section repeatedly and continuously Press the A B Button again to resume normal playback This function is not available on all discs During playback press the SLOW Button repeatedly to set the slow motion speed Press Play Pause Button to resume normal playback GOTO To select the desired Title and Chapter press the GOTO Button once the Title ...

Page 16: ...iod of time will not use power off the unit by slide the ON OFF Switch to OFF position ǿ Ż Ż Ŷ ǿ Ż Ż Press the or Button repeatedly to select and set the fast searching speed 16 2 In Power ON mode press the USB CARD Button the DVD MCR USB selection window will pop up on the screen Using the Direction Buttons to select and highlight the desired source then press the OK Button to confirm Press the O...

Page 17: ...set it OSD Lang On Screen Display Language is selected using the 3 If 4 If Screen Saver is selected using the Directionand Buttons to set menu will appear to Lt Rt Stereo If Speaker Setup is selected press the Button the sub setting 1 If Downmix is selected using the Direction and OK Buttons set it If set to Lt Rt the rear left or rear right channels will plays on both Left and Right Speakers If s...

Page 18: ...ating level as desired as follow Enter the six digit password default password is 8888 by pressing the Numeric Buttons Press the OK Button to save the settings and exit 1 Kid Saf Kid safe 3 Pg Parental Guidance 4 Pg 13 Parental Guidance less than 13 years old 5 Pgr Under 17 years old Parental Guidance suggested 7 Nc 17 17 years old or above Off Password is needed 4 If Password is selected press th...

Page 19: ...ter of the disc to the outer edge of the disc Never wipe in circular motions Discs should be stored in their cases after each use to avoid damage Do not expose discs to direct sunlight high temperatures or dust etc Prolonged exposure or extreme temperatures can warp the disc Do not stick or write anything on either side of the disc Sharp writing Instruments or the ink may damage the surface Cleani...

Page 20: ...1 x Remote Control SPECIFICATIONS 1 x Wall Power Adapter 1 x Car Power Adapter DVD VCD CD CD R CD RW DVD R DVD RW 1 x Carrying Bag Type of disc 12cm or 8cm Audio power 2Wx2 Power supply AC 100 240V 50 60Hz Input 12V 1A DC Output 1 x Headphone Battery build in 1400mAh battery Charging time about 170 minuts ...

Reviews: