background image

Télécommande

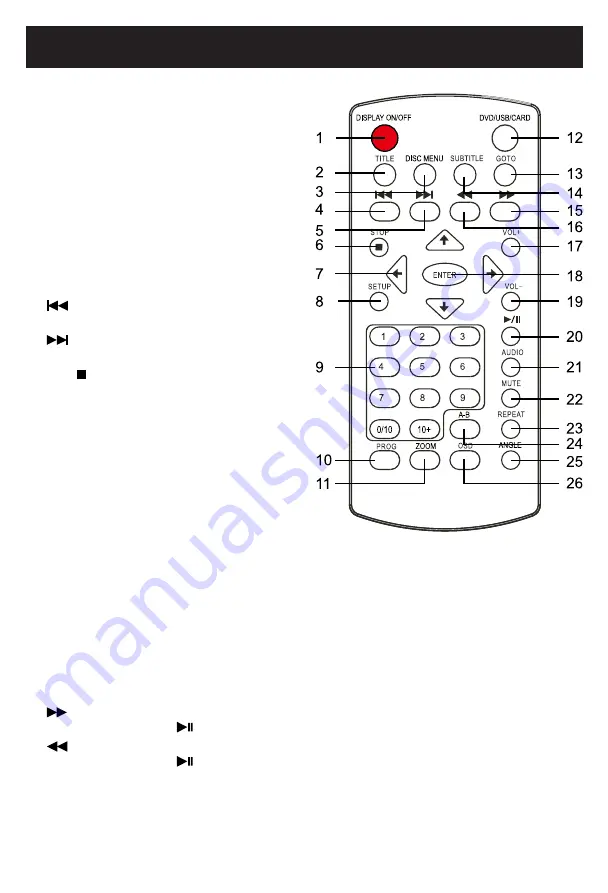
1.  DISPLAY ON/OFF : 

Appuyez pour activer 

ou désactiver l’écran.

2.  TITLE (Titre) :

 Affichage du menu du 

titre du disque en cours.  Utilisez les 
boutons de direction et ENTER (Entrer) 

pour sélectionner et effectuer la lecture 
du titre de votre choix. 

3.   DISC MENU (Menu du disque) : 

Affichage du menu du titre du disque en 
cours.  Utilisez les boutons de direction 
et ENTER (Entrer) pour sélectionner et 

effectuer la lecture du chapitre de votre 
choix. 

4. 

 Précédent :

 Appuyez de façon 

répétitive pour sauter vers l’arrière. 

5. 

 Suivant : 

Appuyez de façon 

répétitive pour sauter vers l’avant. 

6.  Stop 

 (Arrêt) : 

Appuyez pour arrêter. 

7.  Boutons de direction : 

Appuyez pour 

sélectionner les options sur le menu des 
configurations. 

8.  SETUP : 

Appuyez pour entrer ou quitter 

le menu des configurations. 

9.  Boutons numériques : 

Appuyez sur les 

boutons pour saisir les chiffres. 

10.  PROG (Programmation) : 

Appuyez pour 

afficher le menu des configurations pour 

la programmation. Utilisez les boutons 
numériques et ENTER (Entrer) pour configurer 


le programme en fonctions des instructions à l’écran.

11.  ZOOM :

 Appuyez de façon répétitive pour un zoom avant ou zoom arrière sur l’image.

12.  DVD/USB/CARD : 

Lorsque qu’un appareil USB et/ou une carte SD a été inséré, appuyez de 

façon répétitive pour sélectionner la source de lecture de votre choix. 

13.  GOTO : 

Appuyez pour accéder au menu GOTO. Utilisez les boutons numériques et ENTER 

(Entrer) pour sélectionner la piste à lire de votre choix. 

14. 

SUBTITLE (Sous-titres) : 

Appuyez de façon répétitive pour sélectionner la langue de votre 

choix pour les sous-titres, disponibles sur le disque. 

15. 

 (Avance rapide) : 

Appuyez de façon répétitive pour rechercher la section de votre choix. 

Appuyez sur le bouton 

 pour reprendre le cours normal de la lecture. 

16. 

 (Retour rapide) : 

Appuyez de façon répétitive pour rechercher la section de votre choix. 

Appuyez sur le bouton 

 pour reprendre le cours normal de la lecture. 

17.  VOL+ (Volume) : 

Appuyez pour augmenter le volume. 

18.  ENTER (Entrer) : 

Appuyez pour confirmer la sélection (configurations).

9

Summary of Contents for SDVD1037

Page 1: ...is User Manual carefully to ensure proper use of this product and keep this manual for future reference 10 1 DUAL SCREEN PORTABLE DVD PLAYER MODEL SDVD1037 INSTRUCTION MANUAL DISPLAY SETUP MUTE DISPLA...

Page 2: ...lar installation If this equipment does cause harmful interference to radio or television reception which can be determined by turning the equipment off and on the user is encouraged to try to correct...

Page 3: ...ding prong The wide blade or the third prong are provided for your safety If the provided plug does not fit into your outlet consult an electrician for replacement of the obsolete outlet 10 Protect th...

Page 4: ...an to perform safety checks to determine that the product is in proper operating condition 23 Wall or ceiling mounting The product should be mounted to a wall or ceiling only as recommended by the man...

Page 5: ...s the DVD player Please read the following carefully Moisture condensation occurs for example when you pour a cold drink into a glass on a warm day Drops of water form on the outside of the glass In t...

Page 6: ...In this case set the TV system to NTSC as specified Notes on Copyright It is forbidden by law to copy broadcast show broadcast on cable play in public and rent copyrighted material without permission...

Page 7: ...sor 8 Power Indicator Green indicator will turn on when the unit is powered on and turn off if the unit is powered off 9 DISPLAY ON OFF Press to turn the display ON or OFF 10 MUTE Press to turn the so...

Page 8: ...in jack 20 DC IN DC in jack connect to the DC out jack on main unit by the supplied DC connection cable 21 AV IN Audio video in jack connect to the AV OUT Jack on the main unit by the supplied AV con...

Page 9: ...am as on screen instructions 11 ZOOM Press repeatedly to zoom in out the picture 12 DVD USB CARD When USB device and or SD Card was inserted press repeatedly to select the playback source as desired 1...

Page 10: ...esh ones If the batteries in the device are consumed or the device is not used for a long period of time remove the batteries to prevent damage or injury from possible battery leakage Do not try to re...

Page 11: ...ercharge longer than 24 hours Excessive charging or discharging may shorten the battery s life Battery life naturally shortens slowly over time Charging by the supplied Car Adapter 1 Connect to the ci...

Page 12: ...V with A V connection cable Connected to the TV Audio Video Cable included Video input jack Yellow Audio left channel input jack White Audio right channel input jack Red Making Connections PHONE AV OU...

Page 13: ...y unit DC to DC cable included 3 5mm audio video cable included Note The secondary unit must be connected to the main unit it can not be operated independantly SECONDARY UNIT MAIN UNIT PHONE AV OUT US...

Page 14: ...n SECONDARY UNIT 1 Connect the secondary unit to the main unit by the supplied DC and AV connection cables as previous procedures 2 Slide the POWER ON OFF switch on the right side of unit to the ON po...

Page 15: ...Chapters tracks you want of the CD or DVD 3 Use the direction buttons to move to the next input Repeat step 2 until programming is completed Note Press to go to next page for programming track 11 to...

Page 16: ...the screen or the disc starts to play Press DVD USB CARD button to select the desired playback source Wait until the folder file list appears on the screen Use the direction buttons to select the desi...

Page 17: ...lay Language is selected use the Direction and buttons to set the OSD language as desired 4 If Captions is selected use the Direction and buttons to set it On or Off If set to On when multi language a...

Page 18: ...el will play on left speaker the rear right channel will play on right speaker IN DOLBY DIGITAL SETUP PAGE 1 If Dual Mono is selected use the Direction and button to set it to Stereo L Mono Play Left...

Page 19: ...on To adjust the color saturation level on a scale of 9 to 9 2 If Picture Quality is selected use the Direction and buttons to set the Sharpness Brightness Contrast Gamma Hue or Saturation of the vide...

Page 20: ...ress the button to enter the rating level list will appear Press the or button to select the desired level Press the button to enter password enter window will pop up Enter the digit password default...

Page 21: ...word setting menu will appear Enter the four digit old password The Column of New Password will be highlighted Enter the new four digit password The Column of Confirm Pwd will be highlighted Enter the...

Page 22: ...of the disc to the outer edge of the disc Never wipe in circular motions Discs should be stored in their cases after each use to avoid damage Do not expose discs to direct sunlight high temperatures o...

Page 23: ...AA size batteries Disc compatibility DVD VCD SVCD DVCD CD CD R CD RW DVD R DVD RW Power consumption 18W Max Battery charging time Approximately 8 hours Battery life full charge Approximately 3 hours S...

Page 24: ...LAY ON OFF OPEN LECTEUR DVD PORTABLE 10 1 POUCES AVEC CRAN DOUBLE MOD LE PDVD1037 MODE D EMPLOI Lisez ce mode d emploi avec attention pour garantir l utilisation correcte de ce produit et conservez le...

Page 25: ...insetl entretien r paration inclusesdansladocumentation accompagnantl appareil DANGER Pr sencederadiationlaserinvisibleetdangereuselorsque l appareilestouvert etl emboitageestincorrectou choue viter l...

Page 26: ...broche de mise la terre Cette fiche se branchera seulement une prise de courant de type mise la terre Il s agit d une mesure de s curit si la fiche fournie ne s ins re pas dans la prise consultez un...

Page 27: ...nement 23 Installation murale ou au plafond Le produit devrait tre install au mur ou au plafond uniquement en respectant les recommandations du fabricant 24 Dommages qui requi rent la r paration D bra...

Page 28: ...ations de ce produit REMARQUES SUR L HUMIDIT CAUSANT DE LA BU E La bu e endommage le lecteur DVD Veuillez lire attentivement les instructions ci dessous Veuillez lire les instructions suivantes avec p...

Page 29: ...d auteur La loi interdit de copier transmettre diffuser transmettre par c ble reproduire devant un public ou louer du mat riel prot g par des droits d auteur sans autorisation Les disques vid o DVD s...

Page 30: ...it sera plac e sous tension puis s teindra lorsque l unit sera plac e hors tension 9 DISPLAY ON OFF Appuyez pour activer ou d sactiver l cran 10 MUTE Sourdine Appuyez pour teindre le son Appuyez nouve...

Page 31: ...CC 20 DC IN Prise d entr e CC brancher la prise de sortie CC sur l unit principale en utilisant le c ble de connexion CC fourni 21 AV IN Prise d entr e audio vid o brancher la sortie audio vid o AV OU...

Page 32: ...onfigurations pour la programmation Utilisez les boutons num riques et ENTER Entrer pour configurer le programme en fonctions des instructions l cran 11 ZOOM Appuyez de fa on r p titive pour un zoom a...

Page 33: ...ne sont pas rechargeables elles pourraient surchauffer et exploser Respecter les consignes du fabricant des piles Ne pas jeter les piles au feu Les piles risqueraient d exploser ou de fuir Nettoyer le...

Page 34: ...ratures sont situ es entre 5 C et 35 C 40 F et 95 F Ne pas surcharger plus de 24 heures La recharge ou d charge excessive pourra r duire la dur e de vie de la pile La dur e de vie de la pile s puisera...

Page 35: ...de connexion A V Branch au t l viseur C ble audio vid o inclus Prise d entr e vid o Jaune Prise d entr e audio pour le canal de gauche Blanc Prise d entr e audio pour le canal de droite Rouge Effectu...

Page 36: ...t annexe C ble CC vers CC inclus C ble audio vid o 3 5 mm inclus Remarque L unit annexe doit tre branch e l unit principale Elle ne pourra pas fonctionner s par ment UNIT ANNEXE UNIT PRINCIPALE 13 PHO...

Page 37: ...tion OFF arr t UNIT ANNEXE 1 Branchez l unit annexe l unit principale en utilisant les c bles CC et audio vid o fournis comme sur l tape pr c dente 2 Faites glisser l interrupteur POWER ON OFF sur la...

Page 38: ...sez les boutons directions pour vous d placer sur l entr e suivante R p tez l tape 3 jusqu ce que la programmation soit termin e Remarque appuyez sur pour vous d placer sur la page suivante et effectu...

Page 39: ...sur la carte m moire 2 Placez l unit sous tension et attendez jusqu ce que NO DISC s affiche l cran ou que la lecture du disque d marre Appuyez sur le bouton DVD USB CARD pour s lectionner la source...

Page 40: ...cours le logo pour angle multiple s affichera l cran 3 Si OSD Lang Langue pour l affichage l cran est s lectionn utilisez les boutons de directions et le bouton pour configurer la langue de votre choi...

Page 41: ...ut parleur de gauche et le canal arri re droit sera diffus sur le haut parleur de droite PAGE DE CONFIGURATION DOLBY NUM RIQUE 1 Si le mode DUAL MONO Double mono est s lectionn utilisez les boutons de...

Page 42: ...Pour ajuster la saturation de la couleur sur une chelle de 9 9 2 Si PICTURE QUALITY Qualit de l image est s lectionn utilisez les boutons de directions et le bouton pour configurer la nettet la lumino...

Page 43: ...parentaux fortement recommand s pour les moins de 17 ans 7 Nc 17 Pour les 17 ans et plus 8 Adult Pour adultes uniquement 4 Si Password mot de passe est s lectionn appuyez sur le bouton pour entrer et...

Page 44: ...irculaire Les disques doivent tre entrepos s dans leurs bo tiers apr s chaque utilisation afin d viter de les endommager N exposez jamais le disque aux rayons directs du soleil une source de chaleur l...

Page 45: ...e 2 piles de type AAA CC 3 V Compatibilit avec les disques DVD VCD SVCD DVCD CD CD R CD RW DVD R DVD RW Consommation lectrique 18 W Max Temps de charge de la pile Environ 8 heures Autonomie de la pile...

Reviews: