Sylvania lc320ss8 Owner'S Manual Download Page 10

10

EN

C

ONNECTION

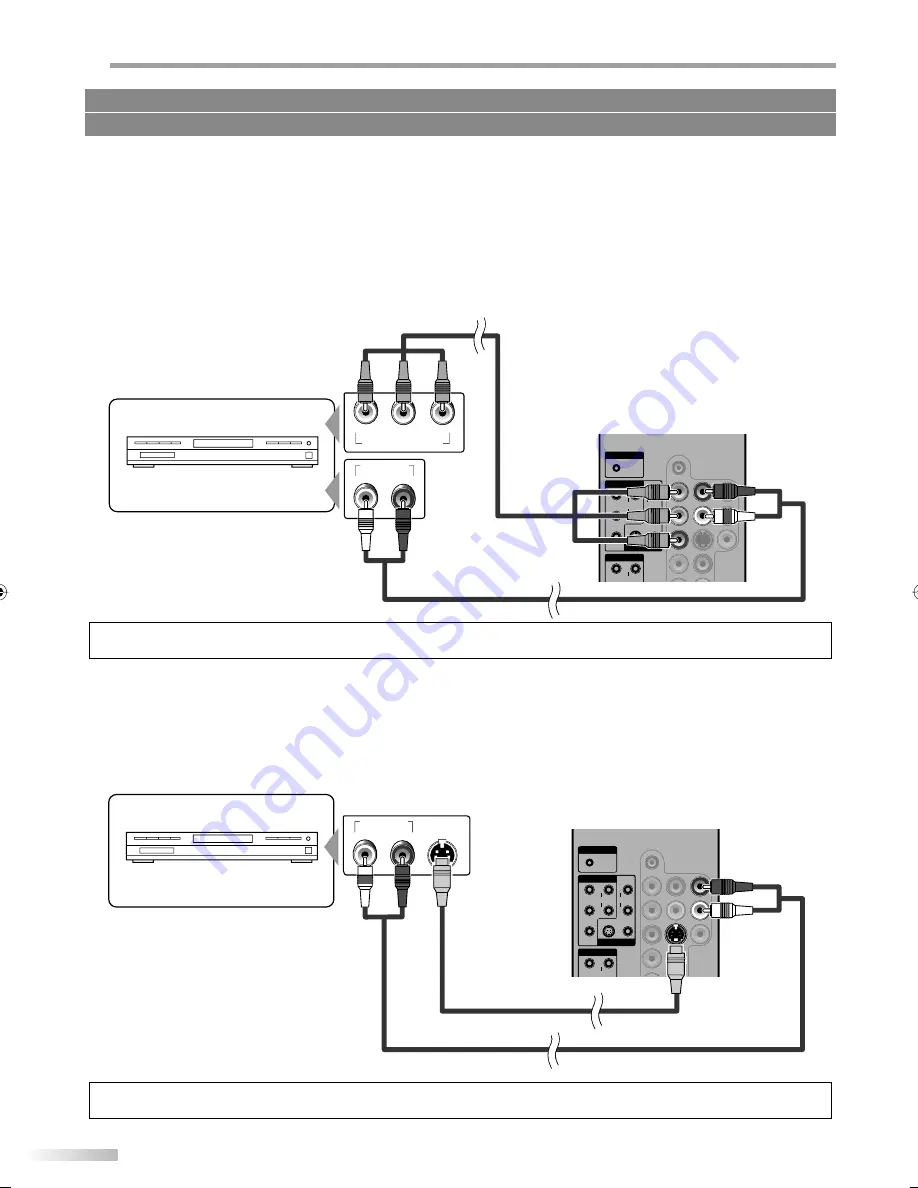
[Component Video Cable Connection]

Component video connection offers better picture quality for video devices connected to the unit.
Use a component video cable to connect the unit to external video devices equipped with component video output 
jacks.
If you connect to the unit’s COMPONENT 1 video input jack, connect RCA audio cables to the audio L/R jacks of 
COMPONENT 1.
If you connect to the unit’s COMPONENT 2 video input jack, connect RCA audio cables to the audio L/R jacks of 
COMPONENT 2.

COMPONENT VIDEO OUT

Pr

Pb

Y

AUDIO OUT

R

L

COMPONENT 1

VIDEO 1

PC-IN

AUDIO

AUDIO

Y

R

Pb

Pr

L

AUDIO

S VIDEO VIDEO

R

L

COMPONENT 2

AUDIO

Y

R

Note:

•  This unit accepts 480i / 480p / 720p / 1080i video signals.

[S-video Cable Connection]

S-video connection offers good picture quality for video devices connected to the unit.
Use an S-video cable to connect the unit to external video devices equipped with S-video output jack.
If you connect to the unit’s VIDEO 1 S-video input jack, connect RCA audio cables to the audio L/R jacks of VIDEO 1.
If you connect to the unit’s VIDEO 2 S-video input jack, connect RCA audio cables to the audio L/R jacks of VIDEO 2.

AUDIO OUT

R

L

S-VIDEO

OUT

COMPONENT 1

VIDEO 1

PC-IN

AUDIO

AUDIO

Y

R

Pb

Pr

L

AUDIO

S VIDEO VIDEO

R

L

COMPONENT 2

AUDIO

Y

R

Note:

•  If you connect to the S-video jack and the video jack at the same time, the S-video connection will have priority.

Cables not included.

Please purchase the necessary cables at your local store.

e.g.)

DVD player with the component 
video output jacks

component video cable

RCA audio cable

rear of this unit

(red)

(blue)

(green)

e.g.)

DVD player with the S-video output 
jack

rear of this unit

S-video cable

RCA audio cable

(red)

(blue)

(green)

A71F0UH_EN.indd   10

A71F0UH_EN.indd   10

2/9/2007   10:17:26 AM

2/9/2007   10:17:26 AM

Summary of Contents for lc320ss8

Page 1: ...alog LCDTV Owner s Manual LC320SS8 IF YOU NEED ADDITIONAL ASSISTANCE WITH SETUP OR OPERATING AFTER READING OWNER S MANUAL PLEASE CALL TOLL FREE 1 800 968 3429 OR VISIT OUR WEB SITE AT http www Sylvani...

Page 2: ...lar surface This TV should never be placed near or over a radiator or heat register This TV should not be placed in a built in installation such as a bookcase or rack unless proper ventilation is prov...

Page 3: ...ET POUSSER JUSQU AU FOND FCC WARNING This equipment may generate or use radio frequency energy Changes or modifications to this equipment may cause harmful interference unless the modifications are e...

Page 4: ...tification in case of theft LOCATION For safe operation and satisfactory performance of the unit keep the following in mind when selecting a place for its installation Shield it from direct sunlight a...

Page 5: ...nscribed downloaded or stored in any storage medium in any form or for any purpose without the express prior written consent of Funai Furthermore any unauthorized commercial distribution of this manua...

Page 6: ...t the audio mode 13 STILL button p17 Press to pause screen image 14 SCREEN MODE button p20 Press to select aspect ratio available for the TV screen 15 INFO button p19 Digital Mode DTV Press to display...

Page 7: ...nput jacks of an external device 5 DIGITAL AUDIO OUT COAXIAL jack p11 Digital audio coaxial cable connection for a decoder or an audio receiver Use digital audio input jack of an external device 6 ANT...

Page 8: ...receive analog TV it should also work for DTV reception Outdoor or attic antennas will be more effective than settop versions To easily switch your reception source between antenna and cable install...

Page 9: ...select Bitstream etc This TV only accepts signals compliant with EIA861 HDMI DVI Connection If your video device has a DVI output jack connect using a HDMI DVI conversion cable COMPONENT 1 PC IN COMP...

Page 10: ...offers good picture quality for video devices connected to the unit Use an S video cable to connect the unit to external video devices equipped with S video output jack If you connect to the unit s VI...

Page 11: ...R L COMPONENT 2 AUDIO Y R AUDIO OUT R L VIDEO OUT Note If you connect to the S video jack and the video jack at the same time the S video connection will have priority Audio Output Connection Digital...

Page 12: ...o your PC you can use this unit as a computer monitor COMPONENT 1 PC IN COMPONENT 2 COMPON Cables not included Please purchase the necessary cables at your local store e g PC To MONITOR jack To audio...

Page 13: ...and memorizing of channels start automatically Initial Setup Initial Setup Now the system is scanning for channels please wait Exit SETUP 5 Analog channels 1ch Digital channels 0ch When the scanning a...

Page 14: ...GUAGE You can change the language English Spanish French displayed on the main menu Refer to Language Selection on page 15 5 Auto Channel Scan If you switch wires e g between antenna and CATV or if yo...

Page 15: ...rsor K L to select English then press ENTER Press SETUP to exit the main menu With regard only to the digital channel even after the scanning is complete if you unplug the AC power cord before turning...

Page 16: ...rogram per major channel since digital broadcasting technology distinguishes between multiple channels broadcast by a single network 18 00 18 30 19 00 19 30 20 00 20 30 Note No Signal will appear on t...

Page 17: ...trol to the DTV ATSC and TV NTSC or to access an external device when they are connected to the unit Press INPUT SELECT or CH K repeatedly to cycle through the input modes or Video1 Video2 Component1...

Page 18: ...MONO STEREO Outputs stereo audio SAP Outputs second audio program MONO Outputs mono audio The current mode will automatically disappear in 4 seconds 5 DTV 1 Press AUDIO to display the currently select...

Page 19: ...nformation is displayed Maximum display of 4 lines 4 channel number 5 audio language Refer to Switching Audio Mode on page 18 6 effective scanning lines and scan mode 7 program format 8 program aspect...

Page 20: ...play the picture with its center at the original size and the edges stretched horizontally For 16 9 video signal Full Display a 16 9 picture at its original size Zoom Display a 16 9 picture at its max...

Page 21: ...time until shut off Sleep 120min You can set your unit to turn off after a set period of time from 30 to 120 minutes Each press of SLEEP will increase the time by 30 minutes After set up the sleep tim...

Page 22: ...ve then press ENTER Channel List Channel List DTV 8 DTV 8 9 9 DTV 48 DTV 48 58 58 DTV 6 DTV 6 27 DTV 67 Ch Select Watch Skip Back BACK ENTER Highlight channels for Ch Up Down key selection The channel...

Page 23: ...Autoscan function Register Ch Change 11 Back BACK 5 Press SETUP to exit Note If set up completes successfully Registered to the Channel List is displayed If external input is used it is not possible...

Page 24: ...Enter ENTER to decrease brightness to increase brightness Contrast Adjust Move Enter ENTER Contrast 60 to decrease contrast to increase contrast Color Adjust Move Enter ENTER Color 36 to decrease col...

Page 25: ...just Cursor s Cursor B Treble ENTER Adjust Treble Move Enter 0 to decrease higher pitched sounds to increase higher pitched sounds Bass ENTER Adjust Bass Move Enter 0 to decrease lower pitched sounds...

Page 26: ...de Once characters are stored in memory they are displayed all at once Roll up mode Displays the characters continuously by scrolling max 4 lines 6 Press SETUP to exit Note To show the closed caption...

Page 27: ...ed Caption V chip PC Settings HDMI1 Audio 4 Use Cursor K L to select DTV CC then press ENTER Closed Caption Closed Caption Off Off Conventional CC DTV CC CC Style 5 5 Use Cursor K L to select the desi...

Page 28: ...ENTER CC Style CC Style On Off Font Style Font Size Font Color Font Opacity Back Color Back Opacity Edge Color Edge Type User Setting Closed Caption 7 Use Cursor K L to select an item then press ENTER...

Page 29: ...ue Yellow Magenta Cyan Closed Caption User Setting Font Style Font Size Font Color Font Opacity Back Opacity Edge Color Edge Type Back Color Back Opacity Background opacity of the displayed caption ca...

Page 30: ...B TV Rating D page 31 C C New Password D page 32 Note When you select a rating and set it to Block the higher ratings will be blocked automatically The lower ratings will be available for viewing When...

Page 31: ...sted G General audience NR No rating 7 Press SETUP to exit Note Changing the category to Block or View automatically changes all its sub ratings to the same Block or View B TV Rating B TV Rating 5 Use...

Page 32: ...ll its sub ratings to the same Block or View C New Password C New Password Although the default code 0000 is supplied with the unit you can set your own password 5 Use Cursor K L to select New Passwor...

Page 33: ...ts the position clock and phase of the picture element The Horizontal Vertical position clock and phase of the PC screen are automatically adjusted Horizontal Position Vertical Position Use Cursor s B...

Page 34: ...t the desired sound input then press ENTER Detail Detail Closed Caption Auto Digital Analog V chip PC settings HDMI1 Audio HDMI1 Audio Auto Select if you have connected both digital device to the HDMI...

Page 35: ...trical interference from nearby appliances may affect picture quality View other TV channels The problem might be limited to the broadcasting station Picture blurred When the outside antenna is used c...

Page 36: ...behind the actual dialogue are common for live broadcasts Most captioning production companies can display a dialogue to a maximum of 220 words per minute If a dialogue exceeds that rate selective ed...

Page 37: ...ntrol is working Maintenance 5 ATSC Acronym that stands for Advanced Television Systems Committee and the name of the digital broadcasting standards Aspect Ratio The width of a TV screen relative to i...

Page 38: ...ithout our legal obligation If there is a discrepancy between languages the default language will be English 5 5 If you subscribe to cableTV the channels are displayed as 1 135 Cable companies often d...

Page 39: ...EN MEMO 39...

Page 40: ...E ASSEMBLY PARTS DEMO OR FLOOR MODELS FUNAI CORP AND ITS REPRESENTATIVES OR AGENTS SHALL IN NO EVENT BE LIABLE FOR ANY GENERAL INDIRECT OR CONSEQUENTIAL DAMAGES ARISING OUT OF OR OCCASIONED BY THE USE...

Reviews: