Preparations for installation
Carefully read the complete operating instructions and the safety information
before using the device in order to ensure its proper commissioning! In case
of doubt, have the installation and connection performed by a specialist.
•
The product must only be used when it is mounted in a fixed location. Install the product, for
example, in a suitable flush or wall mounted contact box.
• Connection may only be performed in a de-energised/currentless state. Otherwise there is a
risk of a fatal electric shock!
• Isolate all poles of the mains cable from the mains supply by removing the electric circuit fuse
or switching off the circuit breaker. Then turn off the earth leakage circuit breaker.
• Protect it against an unauthorised switch-on, e.g. with a danger sign.
• Check the mains connection for absence of voltage using a suitable tester.
• The product is only suitable for devices operating from the mains voltage.
• The power consumption of the connected consumers must not exceed the rated power of
the relay switch. The minimum connection values must be strictly observed. Refer to the
“Specifications” section.
• The relay switch must not be connected to a dimmer on the mains side! It may only be
connected directly to the mains voltage or through a conventional switch. The switch inputs
must not be connected to a dimmer.
Connection and installation
Refer to the “Preparations for installation” section.
The Wi-Fi relay switch with an additional app control is ideally suited as a supplement for a
conventional wall switch. This means that the existing wall switch remains in its place, but the
consumer (e.g. room lighting) that was previously switched with the wall switch can now also
be switched with the app.
However, there must be enough space in the flush mounted contact box to accommodate the
relay switch behind the wall switch.
The Wi-Fi relay switch can be operated either with a button or a toggle switch. We
recommend using a button. This makes operation easier in connection with the app.
In addition, you can use both a double switch and two individual switches.
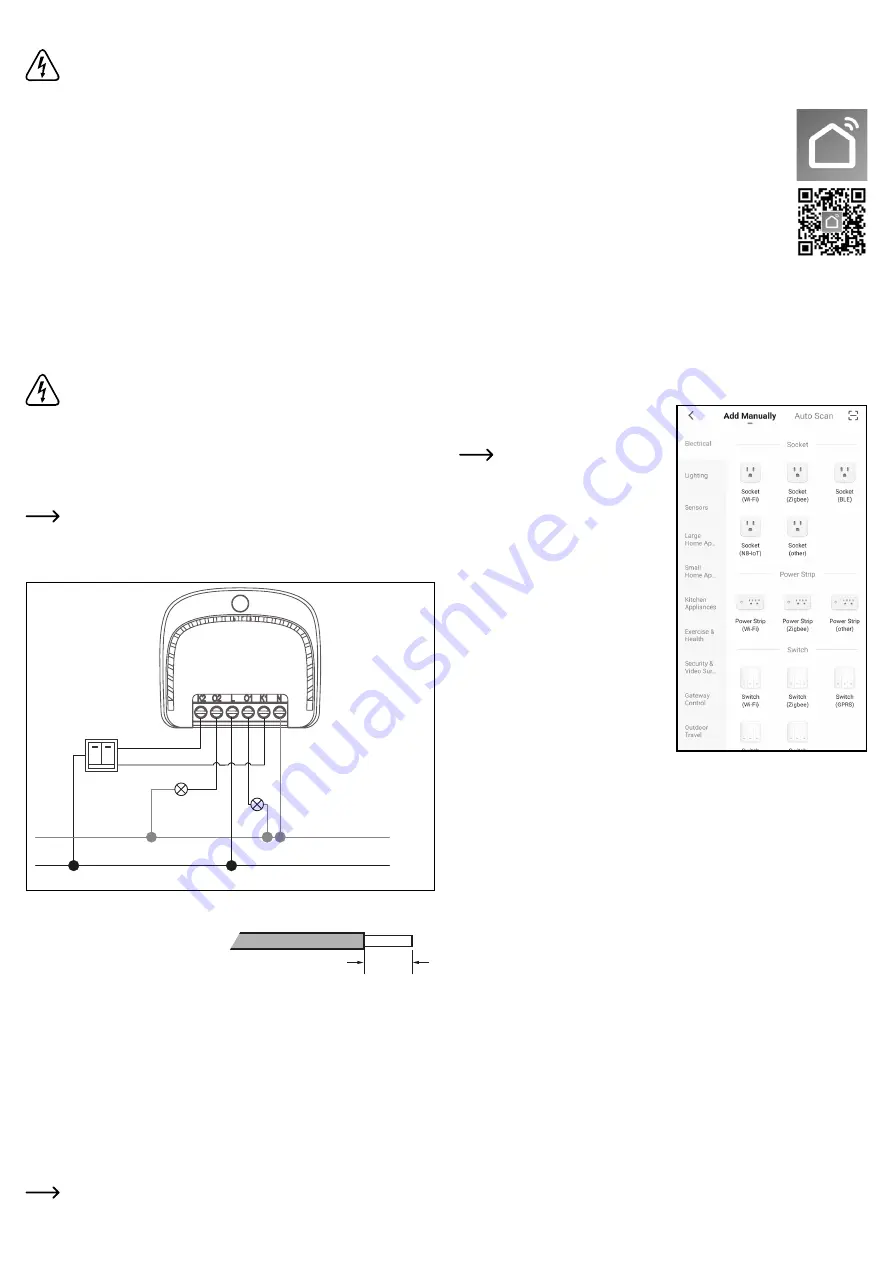
Wiring diagram
N
L
In order to use the relay switch with an existing wall switch, loosen the cover of the wall switch
and remove it from the flush mounted contact box.
All lines connected to the relay switch should
be stripped to 7 mm.
• Connect the
N
and
L
screw terminals to the mains voltage (“
N
” = neutral conductor, “
L
” =
phase).
•
Connect the first consumer line (e.g. lamp wire) to the “
01
” terminal. It is the output from the
first switched channel.
•
Connect the switch output of the first switch to the “
K1
” screw terminal (switch input for
channel 1).
• In order to connect a second consumer, connect the second consumer line to the “
02
”
terminal (output for channel 2).
• Connect the switch output of the second switch to the “
K2
” screw terminal (switch input for
channel 2).
•
Check all screw terminals again to make sure they are firmly tightened.
Be sure to connect the relay switch to the app first before putting it in the contact
box in order to be able to monitor the LED status during configuration. Refer to the
“Configuring the Wi-Fi relay switch in the app” section.
7 mm
•
With the relay switch connected to the app, put the relay switch in the flush mounted contact
box and then mount the wall switch.
Configuring the Wi-Fi relay switch in the app
a) Installing the app
• Open the respective app store on your smartphone. If you are using
Android
TM
, open “Google Play”. If you‘re using an Apple device, open
Apple‘s “App Store”.
• Search for the “
Smart Life - Smart Living
” app (house icon with blue
background) and install it.
• Alternatively, scan the QR code on this page. You will be directed to the
page of the appropriate store. The QR-code works on Android
TM
and
iOS devices.
b) First start of the app
• Open the previously installed “
Smart Life - Smart Living
” app.
• If you haven‘t created a free account yet, sign up now and follow all the instructions.
• Log in the app using your account.
•
If you are using several devices, it is highly recommended that you create a profile for
your home first. Then you can create several profiles, for example, for each room. The
corresponding settings page in the app can be accessed with the button at the bottom right.
c)
Configuring the Wi-Fi relay switch
•
To carry out configuration, your smartphone
should be connected to the same Wi-Fi
network as your relay switch.
Please note that only 2.4 GHz Wi-
Fi networks are supported.
• To add a new device, tap the “
+
” button in
the upper right corner of the app‘s main
page.
•
To add the relay switch in the app, first select
the top point in the left column (see upper
black square in the figure).
• Then select the switch to be connected to
Wi-Fi (see lower black square in the figure).
Tapping this square takes you to the next
configuration page.
• If your Wi-Fi network has not been applied
automatically, first select it (tap the double
arrow on the right) and then enter the Wi-Fi
password.
• Tap the blue button to save your selection
and continue.


