background image

Disable and re-enable a schedule

1.  Open the schedule dashboard.

2.  Touch the slider to toggle the rule on or off.

Modify a Schedule

1.  Open the schedule dashboard.

2.  Hold down the schedule you want to modify. 

Select 

Modify

 from the submenu.

3.  Modify the schedule as desired.

4.  Touch   to save.

Delete a schedule

1.  Open the schedule dashboard.

2.  Hold down the schedule you want to delete. 

Select 

Delete

 from the submenu.

3. 

Confirm with 

Yes

 to delete the schedule.

Summary of Contents for 1898921 RSL 433 MHz

Page 1: ...App Instruction Manual Sygonix Gateway Item No 1898921 RSL 433 MHz Item No 1898922 RS2W 868 MHz www conradconnect de 1898921_1898922_v1_0719_02_jh_m_app_en_1080x1920px_ 8 ...

Page 2: ...rad Connect Legal Notice Requirements Network Connection Security Subnetting Mobile App Get started Installation Deinstallation Install the App Notes on Deinstallation User Account Create a User Account Log in Switch Accounts Manage your Account Home Page Main Controls ...

Page 3: ...er Schedules Control Log Manage Gateways Rename a Gateway Replace a Gateway Delete a Gateway Add a Gateway to Another Account Add an End Node Device Add a 433 MHz device Add a 868 MHz device End Node Device Open the Device Menu Device Control Manual Control Timed Control Set a Timer Schedules Rules How rules work Manage one action rules ...

Page 4: ... View Log Clear Log Manage Devices Rename a Device Relearn a Device Delete a Device Data Charts View chart Troubleshooting Ghost triggers Resetting a device Pair type 1 433 MHz Pair type 2 868 MHz Pair type 3 868 MHz Pair type 4 868 MHz ...

Page 5: ...rs e g motor on the gateway The mobile app allows you to control and manage all devices in your smart network General Information Important Information Observe information in a red frame to avoid harming yourself or others and prevent product damage Give information in an orange frame special attention The blue frame provides tips on product use and features ...

Page 6: ... a publication by Conrad Electronic SE Klaus Conrad Str 1 D 92240 Hirschau www conrad com All rights including translation reserved Reproduction by any method e g photocopy microfilming or the capture in electronic data processing systems require the prior written approval by the editor Reprinting also in part is prohibited This publication represents the technical status at the time of printing C...

Page 7: ...ommended that you set up your WiFi Router WiFi Access Point AP to use the most secure encryption option it supports Subnetting If you subnetted your network the mobile device running the app and the devices of your smart network must be hosts on the same subnet ...

Page 8: ...first time user follow the below steps 1 Install the App 2 Create a User Account 3 Log in 4 Learn how to manage your account Go to Manage your Account 5 Learn how to add a gateway and manage it Go to Gateway 6 Learn how to add end node devices and manage them Go to Add an End Node Device and End Node Device ...

Page 9: ...oad the app named Sygonix RSL RS2W onto your mobile device Make sure your mobile device satisfies the minimum requirements as outlined on the app store download page Notes on Deinstallation When you uninstall the app the settings are retained Settings become available again as soon as you re install the app and log in with the same account ...

Page 10: ... form and confirm with Submit 4 A new account will be set up for you Wait until you receive the confirmation for successful setup Log in 1 Open the app 2 Provide user name and password 3 Confirm with Login 4 If you are logged in successfully the home page shows If you want to control smart devices from multiple mobile devices install the app on every mobile device you wish to use and log in with t...

Page 11: ... Exit and confirm the prompt 4 Log in with another account Manage your Account 1 Open the app homepage 2 Touch to open the account settings Personal settings Update your account details Change password Change your account password Connect to router Connect to a different network Privacy Notice Read the Privacy Notice Exit Log out ...

Page 12: ...home page lists all gateways that are under your account s control When you log in for the first time the device list is blank Main Controls Account settings Device list Gateway On Off Refresh device list Add gateway ...

Page 13: ...ess point AP A gateway cannot be linked to two accounts Adding a gateway to a second account will remove it from the first Make sure you know how to operate the gateway hardware before you start Refer to its hardware instructions if necessary 1 Connect your mobile device running the app to your WiFi network 2 Connect the gateway to a wall socket 3 Open the app home page 4 Touch 5 Follow the on scr...

Page 14: ...Open the Gateway Dashboard Select a gateway from the home page to open the gateway dashboard Gateway Dashboard End node devices Global control Gateway socket on off Add end node device ...

Page 15: ... touch to open the menu Control Before you start controlling devices note the following important points If the power supply to the gateway interrupts all end node device to cloud connections interrupt also The gateway s socket is controlled independently of linked end node devices If you turn off the gateway s socket the end node devices are left unaffected ...

Page 16: ...can manually control the gateway socket from three locations through the button Home page Gateway dashboard Device menu includes status Globally Control End node Devices Turn all linked end node devices excluding sensing devices e g temperature sensor on or off at the same time Do the following 1 Open the gateway dashboard 2 Touch ALL ON or ALL OFF respectively 3 Confirm the prompt to continue ...

Page 17: ...onding timer 4 Set the time 5 Touch to start After the timer expires the socket is turned on or off Schedules Set a Schedule Control the socket according to a preset schedule Do the following 1 Open the device menu 2 Select Schedule 3 Touch 4 Enter schedule details into the schedule panel Note On and Off cannot occur at the same time 5 Touch to save 6 The schedule is added to the schedule view You...

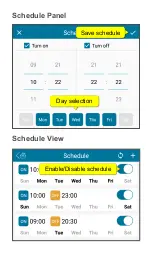
Page 18: ...Schedule Panel Save schedule Day selection Schedule View Enable Disable schedule ...

Page 19: ...e you want to delete 3 Select Delete from the menu 4 Confirm the prompt to delete the schedule Control Log The control log logs device activity The log shows you when and how the event was triggered e g manually through timer and what the action was e g turned off turned on View Log 1 Open the device menu 2 Select Control log 3 Touch to refresh the log 4 Read the log event handled successfully eve...

Page 20: ...3 Update the name and confirm your changes 4 Navigate to the app homepage so that the name refreshes across all views Replace a Gateway Replace an existing gateway with another one All linked end node devices and their settings are carried over Do the following 1 Open the device menu 2 Select Replace gateway from the menu 3 Follow the on screen instructions to complete the replacement ...

Page 21: ...t to delete the gateway The gateway and its linked end node devices are removed Add a Gateway to Another Account 1 Open the device menu 2 Select Delete from the menu 3 Confirm the prompt to delete the gateway 4 Perform a hardware reset on the gateway Refer to the hardware instructions 5 Add the gateway to another account ...

Page 22: ... device to more than one gateway to avoid unexpected behaviour Make sure you know how to put the end node device into learning mode before you start Refer to its hardware instructions if necessary Add a 433 MHz device There are two 433 MHz types you can add Auto code Fixed code you set the code manually Refer to the device hardware instructions to learn more Follow the procedure matching your devi...

Page 23: ...mode Refer to its hardware instructions 10 On the gateway dashboard touch next to the end node device to start the learning 11 Confirm the prompt with Ok 12 Gateway and end node device are learnt Sensing devices the prompt closes If learning fails will show Repeat the learning procedure Other devices the prompt stays open Wait at least 3 seconds then confirm with Done 13 Use the app to control the...

Page 24: ...ouch 4 Select Add fixed code device from the drop down menu 5 Enter the code set on the end node device 6 Confirm your settings with Gateway and end node device are learnt 7 Use the app to control the end node device to confirm proper functioning If you fail to control the device repeat the learning procedure ...

Page 25: ...dashboard 3 Touch 4 Select the device type 5 Name the edge device 6 Confirm the settings with 7 Confirm the prompt with Ok 8 Put your end node device into learning mode Refer to its hardware instructions 9 Gateway and end node device are learnt On success the end node device status shows If learning fails repeat the procedure ...

Page 26: ...ead data records Access the menu as follows 1 Open the app home page 2 Select the gateway that controls the end node device 3 On the gateway page select the end node device Device Control Generally end node devices offer one or more of the following control types Manual Control Timed Control Rules ...

Page 27: ...hin the gateway page for you to manually control their on off state Timed Control Attention Your device may not be designed for operation without supervision and thus present serious danger under certain conditions Never remote or autocontrol such a device ...

Page 28: ...imer expires the device is turned on or off Schedules Control the end node device according to preset schedules Not all end node devices support schedules Set a Schedule Control the device according to a preset schedule Do the following 1 Open the device menu 2 Select Schedule 3 Enter schedule details into the schedule panel Note On and Off cannot occur at the same time 4 Touch to save 5 The sched...

Page 29: ...Schedule Panel Save schedule Day selection Schedule View Enable Disable schedule ...

Page 30: ... the schedule you want to edit 3 Select Modify from the menu 4 Edit the schedule 5 Touch to save Delete a Schedule 1 Open the schedule view 2 Hold down the schedule you want to edit 3 Select Delete from the menu 4 Confirm the prompt to delete the schedule ...

Page 31: ...itions Never remote or autocontrol such a device Rule types and how they work A rule is a user defined condition action pair The action is executed when the condition is met There are two types of rules One action rules A one action rule controls an associated device when a condition is met Scheduled rules A scheduled rule is controlled through a schedule ...

Page 32: ...condition is met Example The motion sensor sensor is triggered and turns on the light through a switch associated device Set the rule 1 Open the device menu 2 Select Rule The rule panel opens 3 Enter condition and action 4 Touch to save 5 The rule is saved and activated Rule panel ...

Page 33: ...n do the following 1 Open the device menu 2 Select Rule 3 Tick Send email when triggered 4 Set Turn on device to Unselected 5 Touch to save Disable a rule To disable a rule do the following 1 Open the device menu 2 Select Rule 3 Untick Send email when triggered 4 Set Turn on device to Unselected 5 Touch to save ...

Page 34: ... a schedule You can set multiple rules If no schedule is set on a rule the rule is always active Access the rule dashboard 1 Open the device menu 2 Select Rule The rule dashboard opens If no rules are set the dashboard is blank Rule dashboard Enable Disable rule ...

Page 35: ...on and an action 4 Touch to save 5 The rule is saved activated and added to the rule dashboard Rule condition and action Disable and re enable a rule 1 Open the rule dashboard 2 Touch the slider to toggle the rule on or off Disabling a rule also disables any schedules set on the rule ...

Page 36: ...Hold down a rule 3 Select Schedule The schedule dashboard opens If no schedules are set the dashboard is blank Schedule dashboard Enable Disable schedule Set a schedule on a rule 1 Open the schedule dashboard of the rule for which you want to set a schedule 2 Touch 3 Define a time range and select the weekdays on which the rule is active 4 Touch to save 5 The schedule is added to the schedule dash...

Page 37: ...edule 1 Open the schedule dashboard 2 Hold down the schedule you want to modify Select Modify from the submenu 3 Modify the schedule as desired 4 Touch to save Delete a schedule 1 Open the schedule dashboard 2 Hold down the schedule you want to delete Select Delete from the submenu 3 Confirm with Yes to delete the schedule ...

Page 38: ...ually through timer and what the action was e g turned off turned on View Log 1 Open the device menu 2 Select Control log 3 Touch to refresh the log 4 Read the log event handled successfully event handling failed Clear Log 1 Open the device menu 2 Select Control log 3 Touch 4 Confirm the prompt to clear the log ...

Page 39: ...ws Relearn a Device In case your end node device does not behave as expected relearn it 433 MHz fixed code devices do not support this feature Instead delete and add the device again Relearn as follows 1 Open the device menu 2 Touch Relearn and confirm the prompt to start re learning 3 Wait until the process completes The device has been relearned and is ready for use again ...

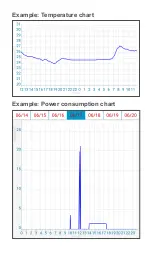
Page 40: ...elete from the menu 3 Confirm the prompt to delete the device The device is removed Data Charts End node devices that measure and record data offer a graphical representation of their records in chart format View chart 1 Open the device menu 2 Select Chart or similar The chart opens ...

Page 41: ...Example Temperature chart Example Power consumption chart ...

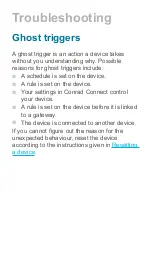
Page 42: ...schedule is set on the device A rule is set on the device Your settings in Conrad Connect control your device A rule is set on the device before it is linked to a gateway The device is connected to another device If you cannot figure out the reason for the unexpected behaviour reset the device according to the instructions given in Resetting a device ...

Page 43: ...n 1 Look up the resetting procedure see below that matches your pair type and device frequency 2 Follow the given procedure to reset the device 3 Add the device again through the app Pair type 1 433 MHz Transmitter Remote PIR Door sensor Thermometer Receiver Socket Dimmer Motor Switch 1 Hold down the button approx 3 seconds on the receiver until the LED flashes 2 Hold down the button again approx ...

Page 44: ...ED flashes 2 Hold down the buttons again approx 3 seconds until the LED goes out Resetting is complete Pair type 3 868 MHz Transmitter PIR Door sensor Thermometer Receiver Socket Dimmer Motor Switch 1 Hold down the button on the transmitter approx 3 seconds until the LED flashes 2 Hold down the button again until the LED flashes 7 times and goes out Resetting is complete ...

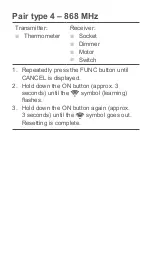
Page 45: ...ket Dimmer Motor Switch 1 Repeatedly press the FUNC button until CANCEL is displayed 2 Hold down the ON button approx 3 seconds until the symbol learning flashes 3 Hold down the ON button again approx 3 seconds until the symbol goes out Resetting is complete ...

Reviews: