background image


Page | 7  


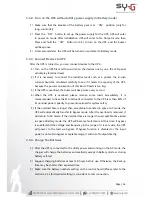
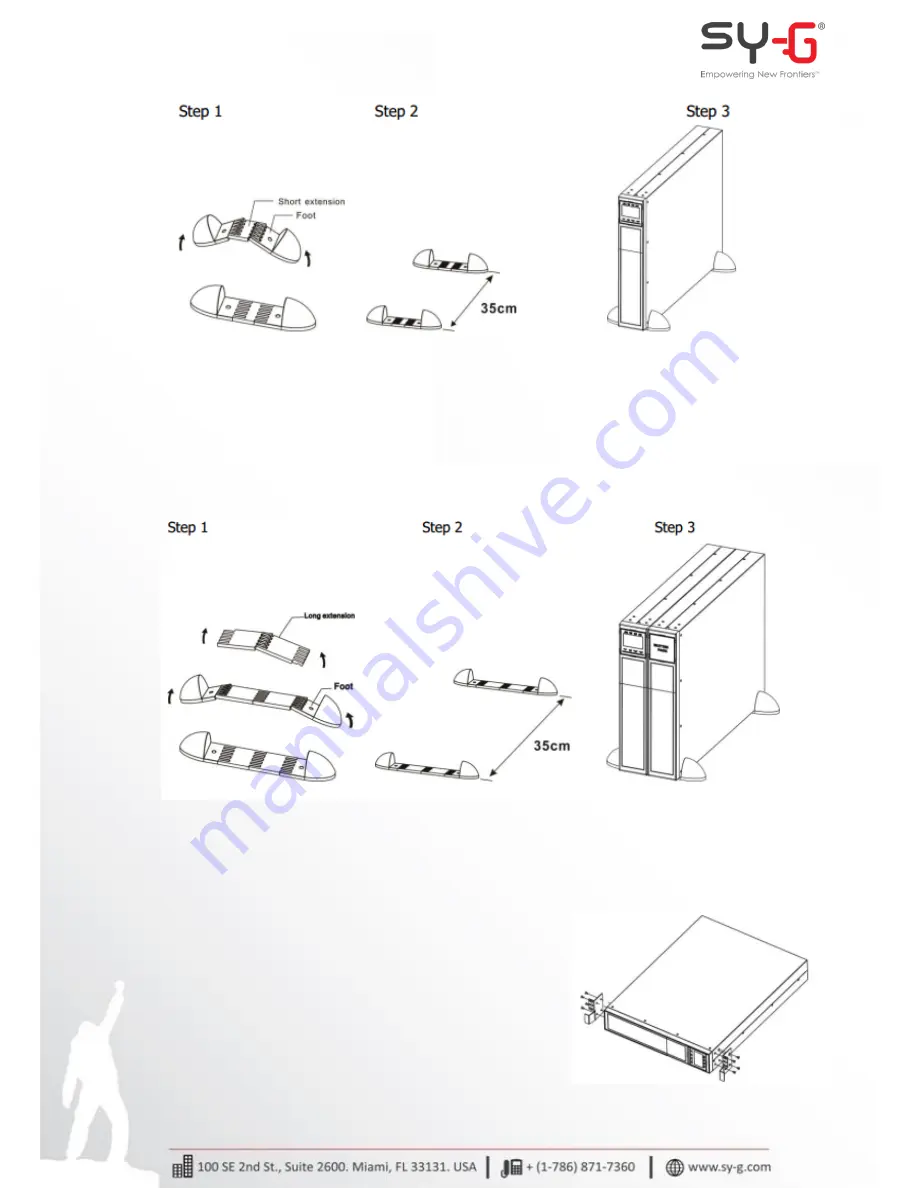
Install UPS module and one battery bank in 4 Units 


Assemble two feet and two long extensions as one tower stand shown in step 1. 
Align the two stands approximately 35cm apart in step 2. Then, put UPS module 
and battery bank in the stands as shown in step 3. 


2.4.


Rack Mount Installation 


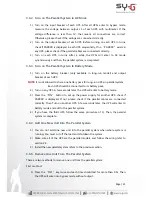
Please follow below steps to mount UPS into 19” rack or rack enclosure. 


Step 1:

 Attach mounting ears to the side mounting 

holes  of  UPS  using  the  screws  provided  and  the 
ears  should  face  forward. 

Please  refer  to  graphic 

of the right.


Summary of Contents for AVENGER 10K

Page 1: ...USER MANUAL Online UPS Avenger Series Rack Mount RM 220 VAC Capacity 6 KVA 10 KVA REVISION DESCRIPTION DATE Rev 1 1 Formal Release 2016 10 20 ...

Page 2: ...ill result in death or serious injury Warning Caution Unsafe practices that could endanger health safety and cause financial damage Important Any important technical and operating information on the equipment should not neglected Annotation Sy G reserves the right to alter the features of its products without prior notice ...

Page 3: ...are Installation 12 3 Operations 13 3 1 Button Operation 13 3 2 LED Indicators 13 3 3 LCD Panel 14 3 4 Audible Alarm 15 3 5 Single UPS Operation 15 3 5 1 Turn on the UPS in AC mode 15 3 5 2 Turn on the UPS in Battery mode 16 3 5 3 Connect Devices to UPS 16 3 5 4 Charge the Batteries 16 3 5 5 Battery mode Operation 17 3 5 6 Test the Batteries 17 3 5 7 Turn off the UPS in AC mode 17 3 5 8 Turn off t...

Page 4: ...allel in Battery mode 21 3 6 4 Add one new unit Parallel System 21 3 6 5 Remove one new unit Parallel System 21 3 7 Abbreviation Meaning in LCD 22 3 8 LCD Setting 23 3 9 Operating Mode Status Description 31 3 10 Faults Reference Code 34 3 11 Warning indicator 34 3 12 Warning Code 35 4 Troubleshooting 36 5 Storage and Maintenance 38 6 Technical Specifications 40 ...

Page 5: ...tall the UPS system where it would be exposed to direct sunlight or near heater o Do not block ventilation holes in the UPS housing 1 3 Installation o Do not connect appliances or devices which would overload the UPS system e g big motor type equipment to the UPS output sockets or terminal o Place cables in such a way that no one can step on or trip over them o Do not block air vents in the housin...

Page 6: ...current o This UPS should be connected with TN earthing system o The power supply for this unit must be single phase rated in accordance with the equipment nameplate It also must be suitably grounded o Use of this equipment in life support applications where failure of this equipment can reasonably be expected to cause the failure of the life support equipment or to significantly affect its safety...

Page 7: ...outlet o In order to fully disconnect the UPS system first press the OFF button to disconnect the mains commercial power o Ensure that no liquid or other foreign objects can enter into the UPS system o The UPS can be operated by any individuals with no previous experience 1 6 Standards Safety IEC EN 62040 1 EMI Conducted Emission IEC EN 62040 2 Category C3 Radiated Emission IEC EN 62040 2 Category...

Page 8: ...llation and operation of Parallel function will be described in detail in the following content 2 1 Unpacking and Inspection Unpack the package and check the package contents The shipping package contains o One UPS o One user manual o One monitoring software CD o One RS 232 cable option o One USB cable o One parallel cable only available for parallel model o One share current cable only available ...

Page 9: ...off function connector EPO connector Battery pack output circuit breaker External battery connector 2 3 Stand Alone Installation The UPS system is shipped with two sets of feet and 6 extensions 2 short extensions plus 4 long extensions that can be used to tower install the UPS module in 2U or UPS module with one battery bank in 4U Install UPS module in 2 Units Assemble two feet and one short exten...

Page 10: ...pproximately 35cm apart in step 2 Then put UPS module and battery bank in the stands as shown in step 3 2 4 Rack Mount Installation Please follow below steps to mount UPS into 19 rack or rack enclosure Step 1 Attach mounting ears to the side mounting holes of UPS using the screws provided and the ears should face forward Please refer to graphic of the right ...

Page 11: ...wer source for the UPS as its rated current is less than the UPS s maximum input current Otherwise the receptacle may be burned and destroyed 2 Switch off the mains switch in the building before installation 3 Turn off all the connected devices before connecting to the UPS 4 Prepare wires based on the following table MODEL WIRING SPEC AWG INPUT OUTPUT BATTERY GROUND 6K 10 10 10 6KL 10 10 10 10 10K...

Page 12: ...ut the terminal block cover back to the rear panel of the UPS Warning Only for standard model o Make sure the UPS is not turned on before installation The UPS should not be turned on during wiring connection o Do not try to modify the standard model to the long run model Particularly do not try to connect the standard internal battery to the external battery The battery type and voltage may be dif...

Page 13: ... highly attention to the polarity marking on external battery terminal block and make sure the correct battery polarity is connected Wrong connection may cause permanent damage of the UPS o Make sure the protective earth ground wiring is correct The wire current spec color position connection and conductance reliability should be checked carefully o Make sure the utility input output wiring is cor...

Page 14: ...el share current cable port on the UPS connect each UPS one by one with the parallel cable and share current cable and then screw the cover back again NOTE The parallel system can not use one battery pack Otherwise it will cause system permanent failure 6 Refer to the following wiring diagram ...

Page 15: ...nstall monitoring software 1 Insert the included installation CD into CD ROM drive and then follow the on screen instructions to proceed software installation If there no screen shows 1 minute after inserting the CD please execute setup exe file for initiating software installation 2 Follow the on screen instructions to install the software 3 When your computer restarts the monitoring software wil...

Page 16: ...battery while in AC mode or CVCF mode 1 o UP key Press this button to display next selection in setting menu Mute Down Button o Mute the alarm Press and hold the button more than 0 5 s to mute the buzzer Please refer to section 3 4 9 for details o Down key Press this button to display previous selection in setting menu Test Up Mute Down Button o Press and hold the two buttons simultaneous more tha...

Page 17: ...m is disabled Output Battery voltage information Indicates the output voltage frequency or battery voltage Vac output voltage Vdc battery voltage Hz frequency Load information Indicates the load level by 0 25 26 50 51 75 and 76 100 Indicates overload Mode operation information Indicates the UPS connects to the mains Indicates the battery is working Indicates the bypass circuit is working Indicates...

Page 18: ...ion At this time the fan is running and the UPS enter to power on mode for initialization several seconds later UPS operates in Bypass mode and supplies power to the loads via the bypass NOTE When UPS is in Bypass mode the output voltage will directly power from utility after you switch on the input breaker In Bypass mode the load is not protected by UPS To protect your precious devices you should...

Page 19: ...move some loads immediately It is recommended to have the11 total loads connected to the UPS less than 80 of its nominal power capacity to prevent overload for system safety 5 If the overload time is longer than acceptable time listed in spec at AC mode the UPS will automatically transfer to Bypass mode After the overload is removed it will return to AC mode If the overload time is longer than acc...

Page 20: ...tting backup time for 16 5 hours 990min in LCD setting menu 09 after discharging 16 5 hours UPS will shut down automatically to protect the battery This battery discharge protection can be enabled or disabled through LCD panel control Refer to 3 7 LCD setting section 3 5 6 Test The Batteries 1 If you need to check the battery status when the UPS is running in AC mode CVCF mode ECO mode you could p...

Page 21: ... details 3 5 10 Operation In Warning Status 1 When Fault LED flashes and the buzzer beeps once every second it means that there are some problems for UPS operation Users can get the warning code from LCD panel Please check the 3 11 warning code table and the trouble shooting table in chapter 4 for details 2 Some warning alarms can t be muted unless the error is fixed Please refer to section 3 3 fo...

Page 22: ...e for other functions 5 Modify the battery pack to meet the setting number in control board carefully 6 Modify charger voltage according to below table to meet the setting number in control board There are 5 jumpers on the charger board Please refer to the below table to modify charger voltage BATTERY NUMBER IN SERIES CHARGE VOLTAGE V JP01 JP02 JP03 JP04 JP05 16 218 0 0 0 1 0 17 232 0 0 1 0 0 18 2...

Page 23: ...respectively Refer to section 3 5 1 Then measure the output voltage of each UPS to check if the voltage difference between actual output and setting value is less than 1 5V typical 1V with multimeter If the difference is more than 1 5V please calibrate the voltage by configuring inverter voltage adjustment Refer to Program 15 section 4 7 in LCD setting If voltage difference remains more than 1 5V ...

Page 24: ...n parallel system Each UPS should be connected to its battery pack 2 Turn on any UPS A few seconds later the UPS will enter to battery mode 3 Press the ON button to set up the power supply for another UPS check if PARXXX is displayed If not please check if the parallel cables are connected correctly Then Turn on another UPS A few seconds later the UPS will enter to battery mode and add to the para...

Page 25: ... maintenance switches from UPS to BPS Turn off the input breakers and battery breakers 3 Remove the UPS that you want 4 Turn on the input breaker of the remaining UPSs and the system will transfer to Bypass mode 5 Set the maintenance switches from BPS to UPS and put the maintenance bypass covers back Turn on the remaining UPSs and finish the parallel system connection Warning Only for the parallel...

Page 26: ...setting options Refer to below table Parameter 2 is the setting value for each program Programs available list for PARAMETER 1 CODE DESCRIPTION Bypass No output AC ECO CVCF Battery Battery Test 01 Output voltage Y 02 Output frequency Y 03 Voltage range for bypass Y 04 Frequency range for bypass Y 05 ECO mode enable disable Y 06 Voltage range for ECO mode Y 07 ECO mode frequency range setting Y 08 ...

Page 27: ...ut voltage setting INTERFACE SETTING Parameter 2 Output voltage For 208 220 230 240 VAC models you may choose the following output voltage 208 presents output voltage is 208Vac 220 presents output voltage is 220Vac 230 presents output voltage is 230Vac 240 presents output voltage is 240Vac 02 Output Frequency INTERFACE SETTING 60 Hz CVCF mode Parameter 2 Output Frequency Setting the output frequen...

Page 28: ... Parameter 2 will show the current frequency NOTE If the UPS is set to CVCF mode the bypass function will be disabled automatically But when a single UPS without parallel function is powered on with mains and before the UPS finished the startup there will be a few seconds of voltage pulse same as the input voltage on the bypass output If you need to remove the pulse on this mode to protect your lo...

Page 29: ...the acceptable low frequency for bypass 50 Hz Setting range is from 46 0Hz to 49 0Hz 60 Hz Setting range is from 56 0Hz to 59 0Hz Default value is 46 0Hz 56 0Hz Pressing Enter key to confirm the setting value for low point Then it will show HS in parameter 1 Please set up high point in parameter 2 by pressing Up or Down key HS Set the acceptable high frequency for bypass 50 Hz Setting range is fro...

Page 30: ... 5 to 10 of the nominal voltage 07 Frequency range for ECO mode INTERFACE SETTING Parameter 1 2 Setting acceptable frequency range for ECO mode You have to set up the range by setting high and low points When it shows LLS in parameter 2 please press Enter key and it will show LS in parameter 1 Now you can set up low point in parameter 2 by pressing Up or Down key LS Set low frequency point for ECO...

Page 31: ...2 ENA Bypass enabled When selected Bypass mode is activated DIS Bypass disabled When selected automatic bypass is acceptable but manual bypass is not allowed Manual bypass means users manually operate UPS for Bypass mode For example pressing OFF button in AC mode to turn into Bypass mode 09 Battery backup time setting INTERFACE SETTING Parameter 2 000 999 Set the maximum backup time from 0min to 9...

Page 32: ...out battery 13 Battery voltage adjustment INTERFACE SETTING After it shows 13 in parameter 1 press Enter key first Then you may choose Ad or SU to adjust battery voltage in parameter 1 by pressing Up or Down key After pressing Enter key to confirm your selection it will jump to parameter 2 to set up the value Parameter 2 the voltage range is from 0V to 5 7V Default value is 0V 14 Charger voltage a...

Page 33: ...hoose Ad or SU to adjust inverter voltage in parameter 1 by pressing Up or Down key After pressing Enter key to confirm your selection it will jump to parameter 2 to set up the value Parameter 2 the voltage range is from 0V to 6 4V Default value is 0V 16 Output voltage calibration INTERFACE SETTING After it shows 16 in parameter 1 please press Enter key first Then you may choose Ad or SU to adjust...

Page 34: ...ll be default assigned as 001 and slave UPSs will be assigned as either 002 or 003 The assigned numbers may be changed dynamically in the operation Operating Mode Status AC mode Description When the input voltage is within acceptable range UPS will provide pure and stable AC power to output The UPS will also charge the battery at AC mode LCD display ...

Page 35: ...lay CVCF mode Description When input frequency is within 46 to 64Hz the UPS can be set at a constant output frequency 50 Hz or 60 Hz The UPS will still charge battery under this mode LCD display Battery mode Description When the input voltage is beyond the acceptable range or power failure UPS will backup power from battery and alarm will beep every 4 seconds LCD display ...

Page 36: ...d it will enter Bypass mode Alarm beeps every two minutes LCD display Battery test Description When UPS is in AC mode or CVCF mode press Test key for more than 0 5s Then the UPS will beep once and start Battery Test The line between I P and inverter icons will blink to remind users This operation is used to check the battery status LCD display ...

Page 37: ...lt 31 None Inverter soft start failure 11 None Parallel output current unbalance 36 None High Inverter voltage 12 None Over temperature 41 None Low Inverter voltage 13 None CPU communication failure 42 None Inverter output short circuited 14 Overload 43 Negative power fault 1A None Battery turn on failure 6A None Inverter over current 60 None PFC current failure in battery mode 6B None Inverter wa...

Page 38: ...NING CODE WARNING EVENT WARNING CODE WARNING EVENT 01 Battery unconnected 10 L1 IP fuse broken 07 Over charge 21 Line situations are different in parallel system 08 Low battery 22 Bypass situations are different in parallel system 09 Overload 33 Locked in bypass after overload 3 times in 30min 0A Fan failure 3A Cover of maintain switch is open 0B EPO enable 3D Bypass unstable 0D Over temperature 3...

Page 39: ...re fed directly by the electrical network via the Bypass Remove excess loads from UPS output After repetitive overloads the UPS is locked in the Bypass mode Connected devices are fed directly by the mains Remove excess loads from UPS output first Then shut down the UPS and restart it Fault code is shown as 43 The icon lights on LCD display and alarm beeps continuously UPS is overload too long and ...

Page 40: ... for at least 7 hours and then check capacity If the problem still persists consult your dealer Batteries defect Contact your dealer to replace the battery The icon and flash on LCD display and alarm beeps every second Fan is locked or not working or the UPS temperature is too high Check fans and notify dealer ...

Page 41: ...e disconnect the batteries and verify that no current is present and no hazardous voltage exists in the terminals of high capability capacitor such as BUS capacitors Only persons are adequately familiar with batteries and with the required precautionary measures may replace batteries and supervise operations Unauthorized persons must be kept well away from the batteries Verify that no voltage betw...

Page 42: ...em This could cause battery explosion The batteries must be rightly deposed according to local regulation Do not open or destroy batteries Escaping electrolyte can cause injury to the skin and eyes It may be toxic Please replace the fuse only with the same type and amperage in order to avoid fire hazards Do not disassemble the UPS system ...

Page 43: ... 130 1 sec 100 110 30 sec 110 130 10 sec 130 1 sec INPUT OUTPUT EFFICIENCY BATTERY Long run Model Overload Continuously sounding UPS unit 600 x 438 x 88 2U Sounding every 4 seconds Sounding every seconds Sounding twice every second Power Factor Frequency Range Harmonic Distortion THDi Output Voltage Voltage Regulation LCD Display 9 hours recover to 90 capacity 1 0 A Zero AC to DC Zero Inverter to ...

Page 44: ......
Reviews: