background image


SXT-SCOOTERS 

ASSEMBLY AND SET-UP

       WARNING: Always dis-

connect your scooter from 

the charger before cleaning 

with liquid.

Note: If your charger does 

not look like the one illust-

rated, your unit has been 

supplied with an alternate 

one. The specifications and 

charging procedure would 

not change.

The charger has a small 

window with one LED or two 

LEDs to indicate the charge 

status. Refer to the illustra-

tion on the charger unit for 

the actual „charging“ and 

„charged“ status indications 

for your charger model.

Chargers have built-in 

overcharge protection to 

prevent battery from being 

over-charged.

Charger will get warm during 

use. This is normal for some 

chargers and is no cause 

for concern. If your charger 

does not get warm during 

use, it does not mean that it 

is not working properly.

       WARNING: Failure to 

recharge the battery at least 

once a month may result in 

a battery that will no longer 

accept a charge.

Charging the battery

Your electric scooter may not have a fully charged battery. Therefore its a good idea to 

charge the battery prior to use.

• Initial charge time: 6 hours (Lead Acid)               • run time: up to 18 km (Lead Acid battery) 

                                 9 hours (Lithium) 

               up to 28 km (Lithium battery)

• When the scooter is not in regular use,               

  recharge the battery at least once a month           

  until normal use is resumed.

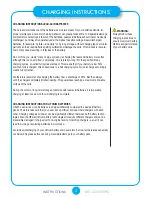
Turn OFF power switch 

before charging. Plug the 

charger into the charger 

port on the electric 

scooter

Plug the charger into a 

wall outlet. If the lights 

on the charger do not 

light up, check the power 

outlet. If neccessary try a 

different outlet.

Charger

Charger 

Port 

Charger 

Plug 

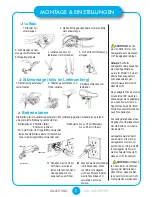
     Assembly and set-up

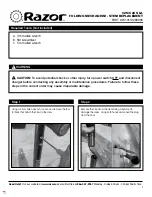
1. fold down 

kickstand

2. Pull the folding lever located between left 

and right handle bar

3. unfold handle bar pole 

and lock folding lever

5. insert fuse before use

4. adjust handle bar height 

and tighten screws

     Seat assembly (if included)

1. lock seat holder on the 

scooter

3. put the saddle and tighten 

screws

2. place seat pole and adjust  

suitable height

            INSTRUCTIONS


6

Summary of Contents for H800 EEC

Page 1: ...SXT SCOOTERS Produkthandbuch Bedienungsanleitung Operating instructions SXT H800 EEC SXT H800...

Page 2: ...nnen sich ohne vorherige Ank ndigung ndern Bitte lesen Sie diese Anleitung vor der ersten Inbetriebnahme aufmerksam durch Sicherheitshinweise 1 Reparatur Wartung 8 Vor der ersten Fahrt 5 Fehlerdiagno...

Page 3: ...ng betr gt 15 Jahre und lter Jeder Fahrer der auf Grund seiner Statur und K rper gr e den Roller nicht verwenden kann sollte dies auch nicht versuchen Die Entscheidung von Erwachsenen ob ihre Kinder d...

Page 4: ...n ebenso gesetz lich in Ihrer Region vorgeschrieben sein Wir empfehlen ebenfalls Ellbogen und Knieprotektoren lang rmelige Oberbekleidung lange Hosen sowie Handschuhe Tragen sie stets festes Schuhwerk...

Page 5: ...b das Nachladen der Akkus ab einer Entladung von 25 Dann aber immer solange bis das Ladeger t den Ladevorgang vollst ndig abgeschlossen hat So gew hr leisten sie eine h chstm gliche zul ssige Spannung...

Page 6: ...ndige Montagearbeiten Der Roller wird aus verpackungstechnischen Gr nden nur teilweise montiert geliefert Pr fen Sie alle Bauteile auf Besch digungen bevor Sie die Endmontage vornehmen Sollten Sie Sch...

Page 7: ...thiumvariante f r die Erstladung des Akkupacks VOR DER ERSTEN FAHRT ACHTUNG VERWENDEN SIE AUSSCHLIESSLICH ORIGINAL ERSATZ UND ZUBEH RTEILE Dieser Roller wurde nach strengen Vorgaben und Spezifikatione...

Page 8: ...mehr geladen werden kann Batterie laden Die Batterie ist im Auslieferungszustand nicht vollst ndig geladen Deshalb ist es ratsam eine komplette Erstladung durchzuf hren Erstladedauer 6 Stunden Blei R...

Page 9: ...d Knie protektoren werden empfohlen Tragen sie stets festes Schuhwerk z B geschn rte Sportschuhe mit Gummisohle fahren sie niemals barfuss oder in Sandalen und Halten Sie die Schn rsenkel fern von bew...

Page 10: ...ck LADEGER T Das Ladeger t welches sie zusammen mit dem Roller geliefert bekommen sollte regel m ig auf Besch digungen am Netzstecker Kabel und Ladestecker berpr ft werden Im Falle einer solchen Besch...

Page 11: ...Stellen sie sicher dass die Steckdose in der Wand Strom liefert Auch trotz korrekter Pflege und Wartung h lt ein Akku nicht ewig Die durchschnittliche Lebensdauer eines wiederaufladbaren Bleiak kus be...

Page 12: ...subject to change without notice Read and understand this entire manual before riding Safety warnings 1 Repair and Maintenance 8 Before you begin 5 Troubleshooting Guide 9 Assembly and Set Up 6 Hardw...

Page 13: ...le to fit comfortably on the scooter should not attempt to ride it A parent s decision to allow his or her child to ride this product should be based on he child s maturity skill and ability to follow...

Page 14: ...uch as an approved safety helmet with chin strap securely buckled A helmet may be legally required by local law or regulation in your area Elbow and kneepads a long sleeved shirt long pants and gloves...

Page 15: ...ingly means full cycle then We therefore recommend recharging the battery from a discharge of 25 But then always until the charger completely finished loading This guarantees reaching a maximum allowa...

Page 16: ...ed in the box partially assembled for shipping purposes Before doing any final assembly do an inspection of all components to insure that nothing was damaged during shipment If you see any damage or s...

Page 17: ...ime Allow up to 6 hours Lead Acid 9 hours Lithium for initial charge WARNING DO NOT USE NON ORIGINAL PRODUCTS WITH YOUR ELECTRIC SCOOTER The scooter has been built to certain design specifications The...

Page 18: ...t will no longer accept a charge Charging the battery Your electric scooter may not have a fully charged battery Therefore its a good idea to charge the battery prior to use Initial charge time 6 hour...

Page 19: ...llbow pads and knee pads are recommended Always wear athletic shoes lace up shoes with rubber soles never ride barefoot or in sandals and keep shoelaces tied and out of the way of the wheels motor and...

Page 20: ...CHARGER The charger supplied with the electric scooter should be regularly examined for damage to the cord plug enclosure and other parts and in the event of such damage the scooter must not be charge...

Page 21: ...tightly plugged into the charging port and that the charger is plugged into the wall Make sure power flow to the wall is on Even with proper care a rechargeable battery does not last forever Average b...

Page 22: ...W razie jakichkolwiek pyta zach camy do kontaktu z autoryzowanym sprzedawc SXT Polska Skandynawia i Europa rodkowo Wschodnia F r Deutschland Schweiz und sterreich POL Planet e K Marco Schuler Bahnhof...

Reviews: