background image

Page 1

1. Required Hardware & Software Checklist

1.

Growatt MIN TL-X 2.5-6.0

2.

Eastron SDM230-Modbus

3.

SwitchDin Residential Droplet

4.

GPO for SwitchDin Droplet

5.

Sets of cables - ethernet, DB9 cable
(male) and DB9 (female) to USB adaptor

6.

SwitchDin App:

www.switchdin.com/app

2. Onsite, wire up Smart Meter on grid or load configuration. Refer

OTR Wiring Information and

Diagram

3. Pre-Installation Note

The Droplet needs to be on the latest Firmware version prior to installation.
To update, Do one of the following;

1. Plug the Droplet to internet via ethernet cable and leave it overnight prior to installation

day. The update will occur automatically at ~10:30 PM AEST
OR

2. Plug the Droplet to internet and contact SwitchDin support at

[email protected]

with Droplet ID.

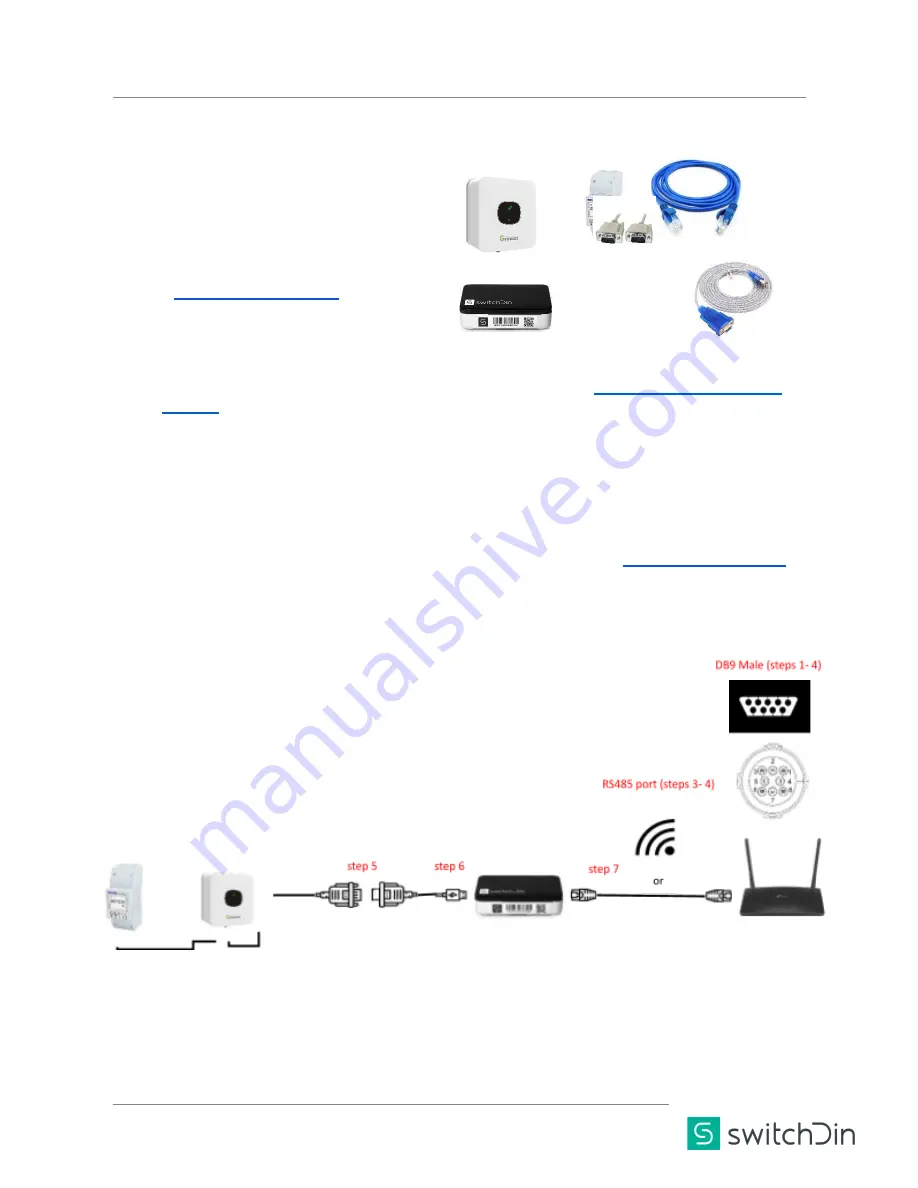
4. Wiring the Droplet to the inverter

1. Cut the DB9 (male) cable into half, strip the cable and identify pin 2 and 3 on the DB9 cable.
2. Safely terminate all the unused cables.
3. Connect pin 1 on the DB9 cable to pin 3 on the RS485 port.
4. Connect pin 2 on the DB9 cable to pin 4 on the RS485 port.
5. Connect the male side of DB9 cable to the DB9 (female) USB adaptor.
6. Connect the USB adaptor to any of the USB port on the Droplet.
7. Connect the Droplet to the internet via ethernet cable (preferred) or WiFi

Document Number: QRG-Growatt Quick Reference Guide
Revision: Issue 1.0

Summary of Contents for Droplet

Page 1: ...Quick Reference Guide Droplet Growatt Installation For SA Power Networks Flexible Exports Prepared by SwitchDin Pty Ltd 91 Parry Street Newcastle West 2302 ...

Page 2: ...it overnight prior to installation day The update will occur automatically at 10 30 PM AEST OR 2 Plug the Droplet to internet and contact SwitchDin support at support switchdin com with Droplet ID 4 Wiring the Droplet to the inverter 1 Cut the DB9 male cable into half strip the cable and identify pin 2 and 3 on the DB9 cable 2 Safely terminate all the unused cables 3 Connect pin 1 on the DB9 cable...

Page 3: ...o set the export limit settings as shown below Do the following steps Click the control button until Set parameter is displayed in the display window Double click Click the control button once to highlight advanced Double click Document Number QRG Growatt Quick Reference Guide Revision Issue 1 0 ...

Page 4: ...control button until the export limit shows in the display window Click once to highlight On Double click Click the control button until CT is highlighted Double click Click the control button until 100 shows for the export limit rate Double click Document Number QRG Growatt Quick Reference Guide Revision Issue 1 0 ...

Page 5: ...ommunicates using pins 3 4 of SYS COM port Connection A is preferred to connection B Set Default Slave ID to 1 4 RS485 from Growatt to USB into the Droplet The compatible Digitech adaptor is Document Number QRG Growatt Quick Reference Guide Revision Issue 1 0 ...

Page 6: ...these below mentioned steps 1 Cut and expose the cable to identify pin 1 and 2 2 Remove pinouts from the Inverter Unscrew and expose the connection Document Number QRG Growatt Quick Reference Guide Revision Issue 1 0 ...

Page 7: ...Page 6 3 Identify pin 3 and 4 and connect cable 1 and 2 and Close pinout 4 Connect to the Inverter Document Number QRG Growatt Quick Reference Guide Revision Issue 1 0 ...

Page 8: ...es below Connect the RS485 serial line into the Growatt as per the instructions above Plug the other end of the RS485 cable into a USB adapter Connect the adapter to any USB port on the SwitchDin Droplet Plug the Droplet in to a GPO Connect it to the internet through an ethernet cable or Wi Fi to the router Document Number QRG Growatt Quick Reference Guide Revision Issue 1 0 ...

Page 9: ...de on the side of the Droplet follow the prompts and select to connect via ethernet or Wi Fi 3 Add a device by clicking the icon on the bottom right of the screen 4 Select the discovery option 5 Click on the USB port number where the cable is plugged 6 Then select Growatt from the device list 7 Click back on the top left corner Document Number QRG Growatt Quick Reference Guide Revision Issue 1 0 ...

Page 10: ...iguration button for the inverter the message Configured appears 9 Close the Add device window click Next 10 Select the option Flexible Export program SAPN Document Number QRG Growatt Quick Reference Guide Revision Issue 1 0 ...

Page 11: ...10 11 Enter NMI click next 12 The screen indicates if the connection and registration is successful Click done 6 Add Invite End Customers Document Number QRG Growatt Quick Reference Guide Revision Issue 1 0 ...

Page 12: ...et connected Configure via SwitchDin app SDin SwitchDin comms Cannot see SwitchDin Connected to SwitchDin N A Devs Devices attached No devices Devices detected N A SwitchDin Installation video https youtu be WOPVaUhS9no Warranty claims support support switchdin com General enquiries info switchdin com Support 61 0 2 4786 0426 Document Number QRG Growatt Quick Reference Guide Revision Issue 1 0 ...

Reviews: