background image

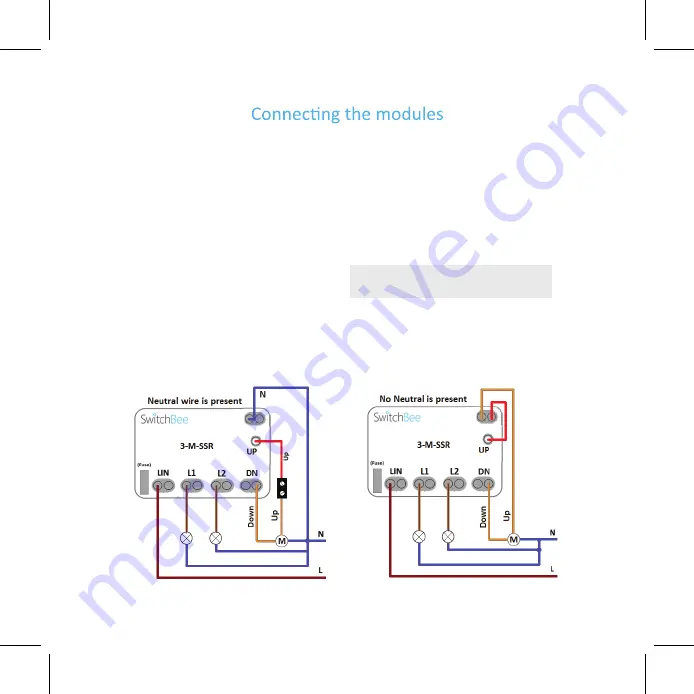
3-M-SSR (Op�on 1) with NEUTRAL

Motor module with 2 light controls:

If there is a Neutral wire present: 

Connect Live to 

LIN

, Motor-Down

to 

DN

. Connect Motor-Up to the

red wire

. Connect the returns/lamps 

into 

L1

 and 

L2

. Connect any Neutral 

wires to N. 
We Recommend this type of 

connec�on unless there is no Neutral 
– see Op�on 2

3-M-SSR (Op�on 2) with NO NEUTRAL

Motor module with 2 light controls:

If there is NO Neutral wire present: 

Connect Live to 

LIN

, Motor-Down to 

DN

.

Connect Motor-Up to N, connect the red 
wire to the same N connector.

WARNING: If there is a neutral wire 

present do not follow the steps above.

Summary of Contents for 1-M-SSR

Page 1: ......

Page 2: ...to your home router Status Ready Status of the Central Unit Status Start up So ware is loading system is not ready Status Start up Ini alizing Status Ready Looking for internet connec on Status Ready Looking for remote access Works with CU Ver 1 3 3 4 Android App Ver 1 3 3 3 and IOS Ver 1 3 5 ...

Page 3: ...o the same WiFi network as your router and Central Unit 1 2 3 4 5 Open the App The App iden fies the central unit and displays the registra on form Enter name and e mail and press register A er the welcome screen enter a name for your smart home The pairing screen is displayed Download the App ...

Page 4: ...e switch can be tested before moving onto the next switch to the main screen 6 7 8 9 10 Follow on screen instruc ons to select the switch type configura on switch name switch room and switch icon To pair more switches at a later stage press EDIT ADD SWITCH ...

Page 5: ...nt we recommend to connect it to N 1 SW SSR 1 way module light control Connect the live wire into LIN and the return or lamp to L1 2 SW SSR 2 way module light control Connect the live wire into LIN and the returns lamps into L1 and L2 ...

Page 6: ...R16 D Power switch control module Connect the live wire into LIN and the return or load into L1 Connect the neutral wire into N In some boiler switches there are 2 neural wires The power switch control module MUST have a neutral wire connected If there is a neutral wire present we recommend to connect it to N ...

Page 7: ... Up to L2 2 M SSR 2 Motor control module Connect Live to LIN Motor1 Down to D1 Motor1 Up to U1 Motor2 Down to D2 and Motor2 Up to the red wire If there is no neutral bridge U2 to N just like 3 M SSR Op on 2 If there is a neutral wire present we recommend to connect it to N ...

Page 8: ...to L1 and L2 Connect any Neutral wires to N We Recommend this type of connec on unless there is no Neutral see Op on 2 3 M SSR Op on 2 with NO NEUTRAL Motor module with 2 light controls If there is NO Neutral wire present Connect Live to LIN Motor Down to DN Connect Motor Up to N connect the red wire to the same N connector WARNING If there is a neutral wire present do not follow the steps above ...

Page 9: ... 2 Obtain a special TW module from your supplier and install as in Picture2 Pair the TW module as the 2 way switch 3 If the primary switch is connected to the lamp and one of the secondary switch bu ons is also connected to a lamp Picture 3 Pair L1 on the 2 SW SSR module as a Two Way No new wiring needed 1 If the primary switch is connected to the lamp and the secondary switch has no lamp load and...

Page 10: ...the wall outlet 1 1 First setup the socket as a regular Socket and only then as an IR Device 2 Using the applica on pair the socket EDIT Add Switch select standard dimmer or med socket Use a meaningful name for this socket example AC Socket 3 Once the socket is paired we now add an IR Device Using the applica on press EDIT Add Switch Fill in the detais and select OK ...

Page 11: ...cket then press SAVE To teach the socket new IR commands select LEARN NEW ACTION Bring the remote of the AC to a distance of at least 20cm from the smart socket and transmit the required command do a short bu on press on the remote control At this point the IR socket will blink to confirm receipt of the command ...

Page 12: ...nter descrip on and select Regular Icon or Text Icon If you select Text Icon you can create your own Icon as in Picture 3 below 23 cool or even add an EMOJI We recommend not to create an icon for or but rather to create an icon for a complete scenario Such as AC at 23 degrees with fan speed at Med and Cooling selected Prepare all this first on the remote and then teach the socket the ON command thi...

Page 13: ...st to the module at N Connect Live Phase to LIN on the module Connect the two orange wires to the INPUT of the device you want to control Select the module to work as a med or as an ON OFF switch via the App A aching a capacitor Using a connector block a ach the capacitor in parallel on the light fi ng side with one leg connected to the Live and one leg connected to the Neutral ...

Page 14: ...nter backup name select backup to USB The system makes a daily backup automa cally Restoring the system parameters Connect the USB s ck Flash drive you used to backup the system onto In the applica on press on Menu se ngs and slide down to Backup Central Unit Data Press on Restore Restore from USB or Restore from daily backup Small repeater Press on EDIT Add Switch now plug in the repeater into a ...

Page 15: ...ter and the antenna at the back of the central unit short 1 seconds 2 Factory Reset Warning All the configura on data will be deleted Make a long press using a pin or paper clip in the factory reset hole between the power adapter connector and the antenna at the back of the central unit long 5 seconds 3 A factory Reset can also be done through the applica on It clears all the system parameters Ente...

Page 16: ...info switchbee com www switchbee com Technical guidelines by Simchi ...

Reviews: