background image

6

First steps

Gigaset S68H / SWZ PTT en / A31008-M1956-F151-2-2X19 / main.fm / 22.4.08

Ve

rs

ion 4,

 16

.09.

2005

Setting up the handset for use

The display is protected 

by a plastic film. 

Please remove the 

protective film!

Instructions on how to connect the charg-

ing cradle and mount it on the wall (if 

required) can be found at the end of this 

user guide.

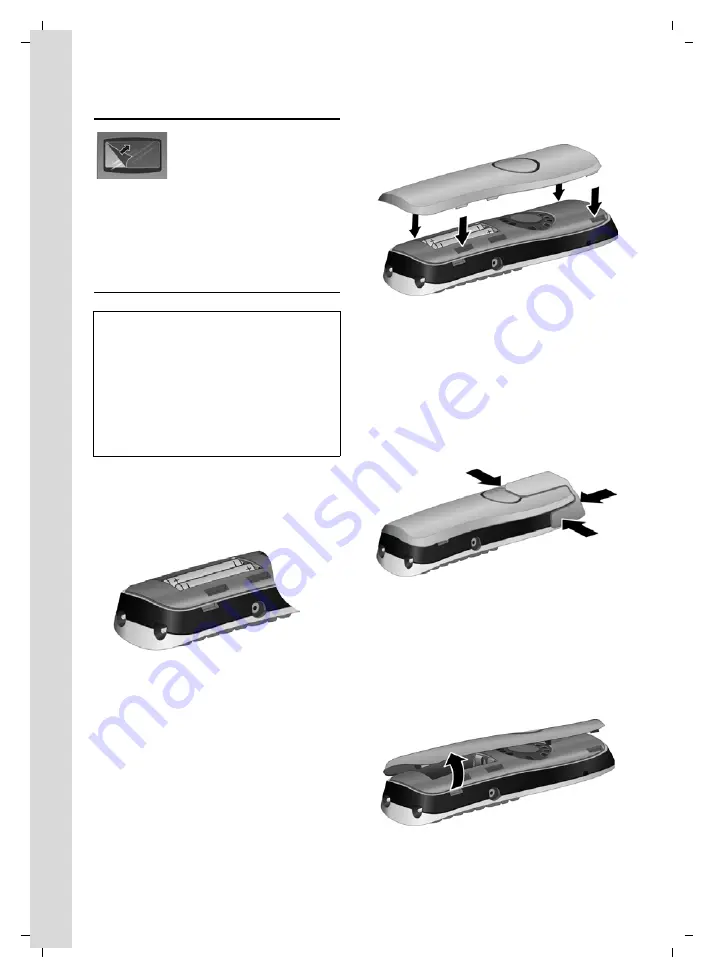
Inserting the batteries 

¤

Insert the batteries the right way round 

(see figure).

The polarity is indicated in/on the bat-

tery compartment.

Closing the battery cover 

¤

First, align the notches on the side of 

the battery cover with the protrusions 

on the inside of the housing.

¤

Then press the cover until it clicks into 

place.

Attaching the belt clip

There are notches for attaching the belt 

clip on the side of the handset at the same 

height as the display.

¤

Press the belt clip onto the back of the 

handset so that the protrusions on the 

belt clip engage with the notches. 

Opening the battery cover

¤

If fitted, remove the belt clip.

¤

Place your fingertip in the cavity on the 

casing and pull the battery cover 

upwards. 

Warning: 

Use only the rechargeable batteries recom-

mended (page 31). Never use a conventional 

(non-rechargeable) battery or other battery 

types as this could result in significant health 

risks and personal injury. For example, the bat-

teries could explode. The phone could also 

malfunction or be damaged as a result of using 

batteries that are not of the recommended 

type.

Summary of Contents for Aton CL308

Page 1: ...Happarat indd 1 8 2 2008 8 34 07 Uhr Bedienungsanleitung Mode d emploi Istruzioni per l uso Aton CL308 CLT308 Handapparat Combin Telefono portatile A3 1 0 0 8 M1 9 5 6 F 1 5 1 2 2 X1 9 Aton CL308 CLT3...

Page 2: ...Keypad lock on off press and hold in idle status Toggle between upper lower case and digits press and hold 8 Microphone 9 Star key Ringer tones on off press and hold With an open connection switch be...

Page 3: ...set as a room monitor 17 Handset settings 19 Shortcuts for functions and numbers 19 Changing the display language 20 Setting the display 20 Setting the screensaver 20 Setting the display backlight 21...

Page 4: ...n find out about by contacting your local authority or the dealer you purchased the product from The operation of medical appliances may be affected Be aware of the technical conditions in your partic...

Page 5: ...ance with regulations governing the return taking back and disposal of electrical and electronic devices ORDEA The materials can be recycled as indicated By recycling materials and reusing or utilisin...

Page 6: ...ents page 24 and anniversaries page 16 in your phone and it will remind you of them in advance u You can use Bluetooth for wireless communication with other devices e g headsets that also use this tec...

Page 7: ...sing Then press the cover until it clicks into place Attaching the belt clip There are notches for attaching the belt clip on the side of the handset at the same height as the display Press the belt c...

Page 8: ...with the internal number 6 is in idle status Manual registration of the handset If the handset does not activate automati cally when the batteries are fitted you must first charge the batteries You mu...

Page 9: ...s u After a while the charge capacity of the batteries will decrease for technical rea sons Setting the date and time Set the date and time so that the correct date and time can be assigned to incom i...

Page 10: ...Open the list of handsets t Call up the menu for setting the handset s call volume page 21 ringer tones page 21 and advisory tones page 23 In the main menu and in input fields You can use the control...

Page 11: ...s vwith the handset in idle status to open the main menu The main menu functions are shown in the display with colour icons and names To access a function i e to open the cor responding submenu next m...

Page 12: ...egistered and it is in the base station eco range is always acti vated automatically In this case the transmission power of the base station is reduced to the minimum You can use your handset to reduc...

Page 13: ...key c Pressing the handsfree key d If the handset is in the charging cradle and the Auto Answer function is activated page 21 the handset will take a call automatically when you lift it out of the cr...

Page 14: ...lect handset c Press the talk key Calling all handsets group call u Initiate internal call Press the star key All handsets are called Ending a call a Press the end call key Using the directory and lis...

Page 15: ...s C Open the directory You have the following options u Use s to scroll through the entries until the required name is selected u Enter the first character of the name in the directory first character...

Page 16: ...nsfer is cancelled if the phone rings or if the memory of the receiving handset is full Transferring the directory as a vCard with Bluetooth In Bluetooth mode see page 26 you can transfer directory en...

Page 17: ...Annivers line v Select On Change multiple line input Anniversary Date Enter day month year in 8 digit format Annivers Time Enter the hour minute for the reminder call in 4 digit format Annivers Signa...

Page 18: ...ory page 14 Delete Entry as in the directory page 14 Delete List as in the directory page 15 Opening lists with the message key An advisory tone sounds as soon as a new message arrives in a list The m...

Page 19: ...The room monitor function will deactivate after the call ends There will be no further room monitor calls The other room moni tor settings e g no ringer tone on the handset will remain activated until...

Page 20: ...Quick Dial Assign key to a number from the direc tory The directory is opened Select an entry and press OK If you delete or edit an entry in the directory this has no effect on the assignment to the d...

Page 21: ...e screensaver You can set a picture from the Resource Dir page 22 to be displayed as a screen saver when the handset is in idle status This will replace the idle status display It may conceal the date...

Page 22: ...e different levels In idle status t Handset Volume r Set the earpiece volume s Scroll to the Handsfree Volume line r Set the handsfree volume Save Press display key if necessary to save the setting Se...

Page 23: ...ess and hold the star key The icon appears in the display Re activating the ringer tone Press and hold the star key Deactivating the ringer tone for the current call Silence Press the display key Acti...

Page 24: ...ture You have selected an entry Options Open menu If a picture cannot be deleted these options are not available Depending on the situation you can select the following functions Delete Entry The sele...

Page 25: ...off During a call the wake up call is signalled by a short tone Deactivating the wake up call repeating after a pause snooze mode Precondition A wake up call is sounding OFF Press the display key The...

Page 26: ...You have the following options View Entry View selected appointment Open the Options menu for editing deleting and activating deactivating Edit Entry Edit selected appointment Delete Entry Delete sel...

Page 27: ...You will find a description of how to oper ate your Bluetooth devices in the user guides for these devices Activating deactivating Bluetooth mode v Data Transfer Bluetooth Activation Press OK to activ...

Page 28: ...ntry Select and press OK a Back press and hold key Changing the name of a Bluetooth device Open list s select entry Options Press the display key Rename Select and press OK Change name Save Press the...

Page 29: ...ngs You can reset any individual settings and changes that you have made Entries in the directory the call by call list the call history the SMS lists depending on base station and the handset s regis...

Page 30: ...The display is blank 1 The handset is not turned on Press and hold the end call key a 2 The battery is flat Charge or replace the batteries page 6 The keys of a handset do not respond when pressed Th...

Page 31: ...the fault action is charged route lump sum price as well as time expenses The repair costs are additional outside the warranty period Batteries Battery cells are considered consumed material which is...

Page 32: ...user guide This is illustrated below using the example of Setting the contrast for the display The things you have to do are explained in the boxes Capacity mAh approx 600 800 1000 1200 Standby time h...

Page 33: ...fol lowed by lower case letters You can call up the table of special charac ters when writing an SMS using the key Select the required character and insert it with Insert Writing an SMS name without p...

Page 34: ...e dis play keys as soon as you press a key The letter you are most likely looking for is shown in reversed highlights and is at the beginning of the selection line It is copied into the text panel 1 R...

Page 35: ...h Outlook or copy contact details to the handset u download CLIP pictures bmp from the computer to the handset u download pictures bmp for the screensaver from the computer to the handset During the t...

Page 36: ...ommended batteries 31 tone 23 Beep see Advisory tones Birthday see Anniversary Bluetooth answering a call 12 changing device name 27 28 deregistering devices 27 list of known devices 27 registering de...

Page 37: ...ing from the directory 16 End call key 1 12 Ending call 12 Ending see deactivate Entry selecting menu 31 selecting from directory 14 Error tone 23 Example menu input 31 multiple line input 32 F FAQs 2...

Page 38: ...ctory 15 My stuff 23 Menu end tone 23 menu guidance 10 menu input 31 opening 9 Message key 1 opening lists 17 Microphone 1 Missed anniversary 25 appointment 25 Multiple line input 32 Muting the handse...

Page 39: ...time 8 Setting up handset 6 Signal strength 5 Snooze mode 24 Sound see Ringer tone Specifications 31 Star key 1 T Talk key 1 12 Troubleshooting 29 V VIP directory entry 14 Volume earpiece 21 earpiece...

Reviews: