background image

9

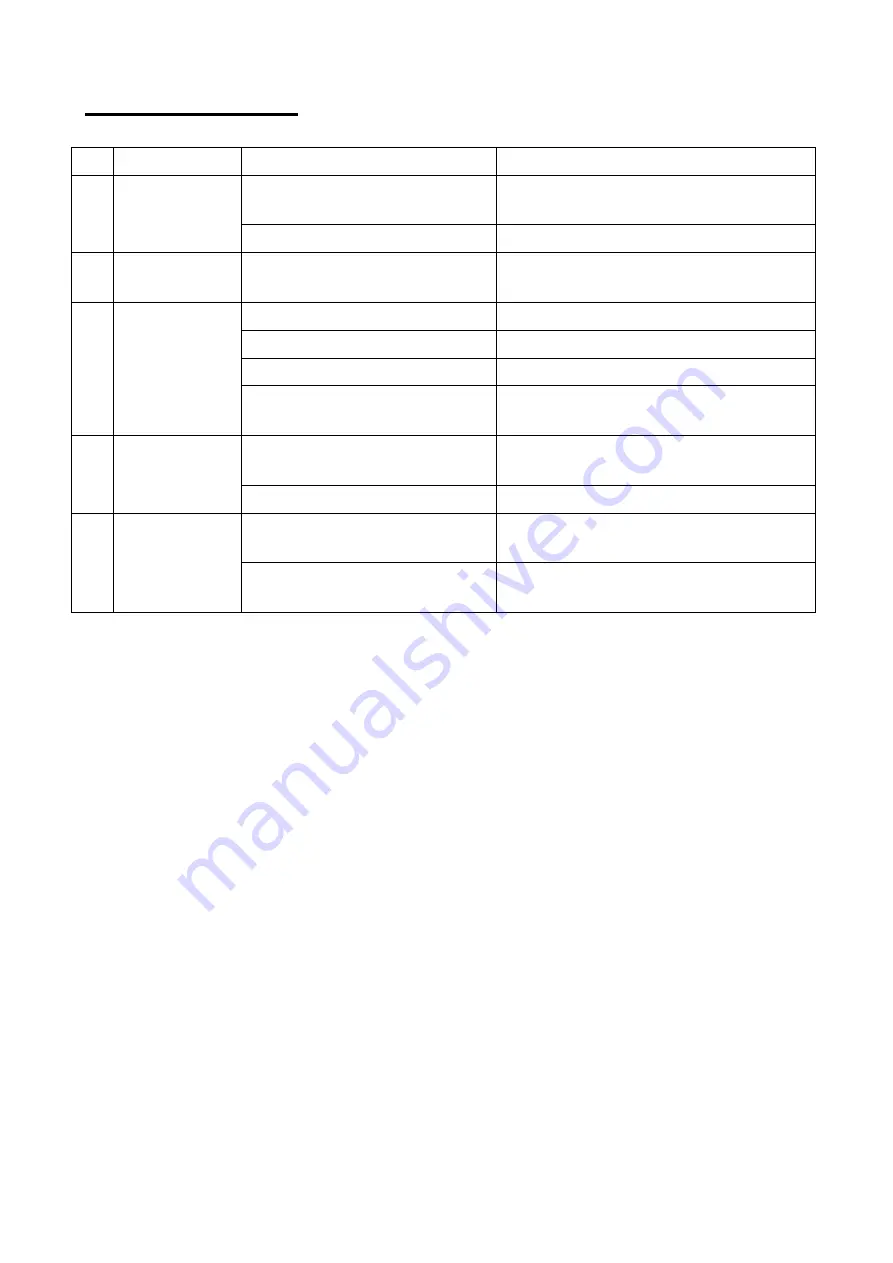
Troubleshooting

No.

Problem

Possible Cause

Solution

1

Difficult to
cover.

The sealing ring is not correctly
positioned.

Place the sealing ring in a correct position.

Floating valve stuck to the bar.

Push the bar lightly.

2

Difficult to
uncover.

The floating valve is not in place.

Press the valve lightly with wooden sticks.

3

Steam leaking

Sealing ring is not in place.

Put in the sealing ring.

Dirt in the sealing ring.

Clean the sealing ring.

Damaged sealing ring.

Replace the sealing ring.

The lid is not secured properly.

Attach the lid in line with the standard
position.

4

Floating valve

leaking

Dirt in the sealing ring or floating
valve.

Cleaning the seal ring of the float valve.

Damage to the sealing ring.

Replace the sealing ring.

5

The floating

valve cannot be

raised

Insufficient food in the pressure
cooker.

Add food and water according to the
correct directions.

Leakage in the lid or pressure
displaying.

Send it back to the seller.

Summary of Contents for SP-PC.5LE

Page 1: ...1 Electric Pressure Cooker Model No SP PC 5LE Instruction manual Manuel d utilisation Bedienungsanleitung Manuale di istruzioni Gebruikershandleiding Manual de usuario ...

Page 2: ...2 TABLE OF CONTENTS English 3 Français 10 Deutsch 17 Italiano 24 Nederlands 31 Español 38 ...

Page 3: ... This appliance generates heat and releases steam during use Proper precautions should be taken to avoid the risk of burns fire or other damage to persons or property 13 This appliance generates steam Do not let it operate uncovered 14 Do not leave this appliance unattended during use 15 This appliance is for household use only Only use this appliance for its intended purpose 16 Do not place or co...

Page 4: ... pressure Limited pressure Keep warm temperature Preset timer 1000W 220 240v 40 70kPa 90kPa 60 80 0 24hr Steam condensation collector Pressure discharge value Floating value Lid handle Inner pot Detachable power cord Outer pot Measuring cup Ladle Control panel ...

Page 5: ... is in the down position see figure 9 10 6 Plug the pressure cooker into a grounded outlet The screen will show 0000 7 Press the selected menu button For example press rice to cook rice The indicator lights up and the display shows 0010 The preset cooking time hold pressure for rice is 10 minutes The indicator will flash 5 times and then start cooking or it will start counting down if you have set...

Page 6: ...ed chicken 13 mins 10mins 18mins Baked pork rib 18 mins 13mins 25mins Baked shrimp with black pepper 13 mins 11mins 17mins Optional 2 mins 1 min 99 mins For example if you want to cook soup press the soup button and the green numbers will show 25 the suggested pressure hold time To increase this to 32 minutes repeatedly press the soup button until the green numbers display 32 Note Press the warm c...

Page 7: ...with warm soapy water Clean the inside of the pressure cooker including the sealing ring pressure relief valve anti blocking housing steam relief line and float valve with warm soapy water Use a non metallic sponge or a soft cloth to clean the inner pot Clean the seal of the pressure limiting vent valve and the water drain hole with a small brush so that the water can drain freely Precautions 1 Ne...

Page 8: ... not intended for use by persons including children with reduced physical sensory or mental capabilities or lack of experience and knowledge Unless they have been given supervision or instruction concerning use of the appliance by a person responsible for their safety Children should be supervised to ensure that they do not play with the appliance 15 If the power cord is damaged it must be replace...

Page 9: ...Put in the sealing ring Dirt in the sealing ring Clean the sealing ring Damaged sealing ring Replace the sealing ring The lid is not secured properly Attach the lid in line with the standard position 4 Floating valve leaking Dirt in the sealing ring or floating valve Cleaning the seal ring of the float valve Damage to the sealing ring Replace the sealing ring 5 The floating valve cannot be raised ...

Page 10: ...il contenant des liquides chauds 11 Pour débrancher l appareil retirez la fiche de la prise murale 12 Attention Cet appareil génère de la chaleur et dégage de la vapeur lors de son utilisation Des précautions appropriées doivent être prises pour éviter les risques de brûlures d incendie ou d autres dommages aux personnes ou aux biens 13 Cet appareil génère de la vapeur Ne le laissez pas fonctionne...

Page 11: ...on de l appareil par une personne responsable de leur sécurité PRINCIPALES CARACTÉRISTIQUES Spécifications techniques Du pouvoir Capacité La pression de travail Pression limitée Maintenir la température au chaud Minuterie préréglée 1000W 220 240v 40 70kPa 90kPa 60 80 0 24h Collecteur de condensation de vapeur Valeur de décharge de pression Valeur flottante Poignée du couvercle Pot intérieur Cordon...

Page 12: ...ournez le dans le sens antihoraire jusqu à ce qu il s enclenche voir figure D7 et D8 5 Réglez la soupape de surpression sur la position d étanchéité voir figure 9 Assurez vous que la soupape à flotteur est en position basse voir figures 9 10 6 Branchez l autocuiseur dans une prise mise à la terre L écran affichera 0000 7 Appuyez sur le bouton de menu sélectionné Par exemple appuyez sur riz pour cu...

Page 13: ...nutes 30 min 50 minutes Riz 12 minutes 10 minutes 16 minutes Bouillie de riz 15 minutes 10 minutes 25 minutes Viande 40 minutes 20 minutes 60 minutes Des haricots 40 minutes 35 minutes 60 minutes Riz au curry 10 minutes 8 minutes 16 minutes Légumes avec sauce à la viande 12 minutes 10 minutes 18 minutes Pomme de terre au four 15 minutes 12 minutes 20 minutes Poulet au four 13 minutes 10 minutes 18...

Page 14: ...e le couvercle soit en position desserrée et retirez le couvercle voir figure D1 D2 14 La nourriture est maintenant prête à servir Utilisez des ustensiles en bois ou en plastique au moment de servir pour éviter de rayer la surface antiadhésive du bol Nettoyage Débranchez le cordon d alimentation avant de nettoyer Essuyez le fond de l autocuiseur avec une éponge ou un chiffon Ne vaporisez jamais d ...

Page 15: ...t recommandée 13 Une grande quantité de vapeur sortant des bords du couvercle pendant l utilisation est anormale et signifie que la soupape de décharge ne fonctionne pas correctement Retirez la fiche de la prise laissez la refroidir et vérifiez si l autocuiseur est correctement assemblé 14 Cet appareil n est pas destiné à être utilisé par des personnes y compris les enfants ayant des capacités phy...

Page 16: ... étanchéité Saleté dans la bague d étanchéité Nettoyez la bague d étanchéité Bague d étanchéité endommagée Remplacer la bague d étanchéité Le couvercle n est pas bien fixé Fixez le couvercle en ligne avec la position standard 4 Vanne flottante qui fuit Saleté dans la bague d étanchéité ou la soupape flottante Nettoyage de la bague d étanchéité de la soupape à flotteur Endommagement de la bague d é...

Page 17: ...icht mit heißen Oberflächen in Berührung 10 Seien Sie äußerst vorsichtig wenn Sie das Gerät mit heißen Flüssigkeiten bewegen 11 Um das Gerät vom Stromnetz zu trennen ziehen Sie den Stecker aus der Steckdose 12 Achtung Dieses Gerät erzeugt während des Gebrauchs Wärme und setzt Dampf frei Es sollten geeignete Vorkehrungen getroffen werden um die Gefahr von Verbrennungen Feuer oder anderen Schäden an...

Page 18: ...n bestimmt Es sei denn sie wurden von einer für ihre Sicherheit verantwortlichen Person beaufsichtigt oder in die Verwendung des Geräts eingewiesen HAUPTMERKMALE Technische Spezifikationen Leistung Kapazität Arbeitsdruck Begrenzter Druck Warme Temperatur halten Voreingestellter Timer 1000W 220 240V 40 70kPa 90kPa 60 80 0 24 Std Kondensatsammler für Dampf Druckentlastungswert Floating Wert Deckelgr...

Page 19: ...hnellkochtopfs und drehen Sie ihn gegen den Uhrzeigersinn bis er einrastet siehe Abbildung D7 und D8 5 Stellen Sie das Druckentlastungsventil auf die Dichtungsposition siehe Abbildung 9 Stellen Sie sicher dass sich das Schwimmerventil in der unteren Position befindet siehe Abbildung 9 10 6 Schließen Sie den Schnellkochtopf an eine geerdete Steckdose an Auf dem Bildschirm wird 0000 angezeigt 7 Drüc...

Page 20: ...inuten 20 Minuten Fische 5 Minuten 3 Minuten 10 Minuten Rindfleisch t endon 40 Minuten 30 Minuten 50 Minuten Reis 12 Minuten 10 Minuten 16 Minuten Reisbrei 15 Minuten 10 Minuten 25 Minuten Fleisch 40 Minuten 20 Minuten 60 Minuten Bohnen 40 Minuten 35 Minuten 60 Minuten Reis mit Curry 10 Minuten 8 Minuten 16 Minuten Gemüse mit Fleischsauce 12 Minuten 10 Minuten 18 Minuten Ofenkartoffel 15 Minuten 1...

Page 21: ...n der gelösten Position befindet und entfernen Sie den Deckel siehe Abbildung D1 und D2 14 Das Essen ist nun servierfertig Verwenden Sie beim Servieren Utensilien aus Holz oder Kunststoff um die Antihaftbeschichtung der Schüssel nicht zu zerkratzen Reinigung Ziehen Sie vor der Reinigung das Netzkabel ab Wischen Sie den Boden des Schnellkochtopfs mit einem Schwamm oder Tuch ab Sprühen Sie niemals W...

Page 22: ...en 13 Eine große Menge Dampf die während des Gebrauchs aus den Deckelkanten austritt ist anormal und bedeutet dass das Entlastungsventil nicht richtig funktioniert Ziehen Sie den Stecker aus der Steckdose lassen Sie ihn abkühlen und prüfen Sie ob der Schnellkochtopf richtig zusammengebaut ist 14 Dieses Gerät ist nicht für die Verwendung durch Personen einschließlich Kinder mit eingeschränkten körp...

Page 23: ...ring ein Schmutz im Dichtring Dichtring reinigen Beschädigter Dichtungsring Tauschen Sie den Dichtungsring aus Der Deckel ist nicht richtig befestigt Bringen Sie den Deckel gemäß der Standardposition an 4 Schwimmerven til undicht Schmutz im Dichtring oder Schwimmerventil Reinigung des Dichtrings des Schwimmerventils Beschädigung des Dichtrings Tauschen Sie den Dichtungsring aus 5 Das Schwimmerven ...

Page 24: ...cchio rimuovere la spina dalla presa a muro 12 Attenzione questo apparecchio genera calore e rilascia vapore durante l uso Devono essere prese adeguate precauzioni per evitare il rischio di ustioni incendi o altri danni a persone o cose 13 Questo apparecchio genera vapore Non lasciarlo funzionare scoperto 14 Non lasciare questo apparecchio incustodito durante l uso 15 Questo apparecchio è solo per...

Page 25: ...he Potenza Capacità Pressione di lavoro Pressione limitata Mantieni la temperatura calda Timer preimpostato 1000W 220 240V 40 70kPa 90kPa 60 80 0 24 ore Collettore di condensazione vapore Valore di scarico della pressione Valore variabile Manico del coperchio Pentola interna Cavo di alimentazione staccabile Pentola esterna Misurino Mestolo Pannello di controllo ...

Page 26: ...are la valvola limitatrice di pressione sulla posizione di tenuta vedi figura 9 Assicurarsi che la valvola a galleggiante sia in posizione abbassata vedi figura 9 e 10 6 Collegare la pentola a pressione a una presa con messa a terra Lo schermo mostrerà 0000 7 Premere il pulsante del menu selezionato Ad esempio premere riso per cuocere il riso L indicatore si accende e il display mostra 0010 Il tem...

Page 27: ...o 12 minuti 10 minuti 16 minuti Farinata Di Riso 15 minuti 10 minuti 25 minuti La carne 40 minuti 20 minuti 60 minuti Fagioli 40 minuti 35 minuti 60 minuti Riso al curry 10 minuti 8 minuti 16 minuti Verdure al ragù 12 minuti 10 minuti 18 minuti Patate al forno 15 minuti 12 minuti 20 minuti Pollo al forno 13 minuti 10 minuti 18 minuti Costata di maiale al forno 18 min 13 minuti 25 minuti Gamberi al...

Page 28: ...D2 14 Il cibo è ora pronto per essere servito Utilizzare utensili in legno o plastica quando si serve per evitare di graffiare la superficie antiaderente della ciotola Pulizia Scollegare il cavo di alimentazione prima della pulizia Pulisci il fondo della pentola a pressione con una spugna o un panno Non spruzzare mai acqua sulla pentola a pressione elettrica né immergerla in acqua Rimuovere e puli...

Page 29: ...vapore che fuoriesce dai bordi del coperchio durante l uso è anormale e significa che la valvola di sfiato non funziona correttamente Togliere la spina dalla presa lasciarla raffreddare e verificare che la pentola a pressione sia montata correttamente 14 Questo apparecchio non è destinato all uso da parte di persone compresi i bambini con ridotte capacità fisiche sensoriali o mentali o con mancanz...

Page 30: ...nuta Sporcizia nell anello di tenuta Pulire l anello di tenuta Anello di tenuta danneggiato Sostituire l anello di tenuta Il coperchio non è fissato correttamente Fissare il coperchio in linea con la posizione standard 4 Perdita della valvola galleggiante Sporcizia nell anello di tenuta o nella valvola galleggiante Pulizia dell anello di tenuta della valvola a galleggiante Danni all anello di tenu...

Page 31: ...t verplaatsen van het apparaat dat hete vloeistoffen bevat 11 Om het apparaat los te koppelen haalt u de stekker uit het stopcontact 12 Let op Dit apparaat genereert warmte en geeft stoom af tijdens gebruik De juiste voorzorgsmaatregelen moeten worden genomen om het risico van brandwonden brand of andere schade aan personen of eigendommen te voorkomen 13 Dit apparaat genereert stoom Laat het niet ...

Page 32: ... over het gebruik van het apparaat door een persoon die verantwoordelijk is voor hun veiligheid BELANGRIJKSTE KENMERKEN Technische specificaties Stroom Capaciteit Werk druk Beperkte druk Warm houden temperatuur Vooraf ingestelde timer 1000W 220 240V 40 70kPa 90kPa 60 80 0 24 uur Stoom condensatie collector Drukontlastingswaarde Zwevende waarde Deksel handvat Binnenpot Afneembaar netsnoer Buitenpot...

Page 33: ...et overdrukventiel in de seal stand zie figuur 9 Zorg ervoor dat de vlotterklep in de onderste stand staat zie figuur 9 10 6 Steek de stekker van de snelkookpan in een geaard stopcontact Het scherm toont 0000 7 Druk op de geselecteerde menuknop Druk bijvoorbeeld op rijst om rijst te koken De indicator licht op en het display toont 0010 De vooraf ingestelde kooktijd houddruk voor rijst is 10 minute...

Page 34: ... 16 minuten Groenten met vleessaus 12 minuten 10 minuten 18 minuten Gebakken aardappel 15 minuten 12 minuten 20 minuten Gebakken kip 13 minuten 10 minuten 18 minuten Gebakken varkensribbetjes 18 minuten 13 minuten 25 minuten Gebakken garnalen met zwarte peper 13 minuten 11 minuten 17 minuten Optioneel 2 minuten 1 minuut 99 minuten Als u bijvoorbeeld soep wilt koken drukt u op de soepknop en de gro...

Page 35: ...elkookpan schoon met een spons of doek Sproei nooit water op de elektrische snelkookpan en dompel deze nooit onder in water Verwijder en reinig de wateropvangbak en was deze met warm zeepsop Reinig de binnenkant van de snelkookpan inclusief de afdichtring het overdrukventiel de anti blokkeringsbehuizing de stoomontlastingsleiding en het vlotterventiel met warm zeepsop Gebruik een niet metalen spon...

Page 36: ...goed in elkaar zit 14 Dit apparaat is niet bedoeld voor gebruik door personen inclusief kinderen met verminderde fysieke zintuiglijke of mentale vermogens of gebrek aan ervaring en kennis Tenzij ze onder toezicht staan of instructies hebben gekregen over het gebruik van het apparaat door een persoon die verantwoordelijk is voor hun veiligheid Kinderen moeten onder toezicht staan om ervoor te zorge...

Page 37: ...zijn plaats Plaats de afdichtring Vuil in de afdichtring Reinig de afdichtring Beschadigde afdichtring Vervang de afdichtring Het deksel zit niet goed vast Bevestig het deksel in lijn met de standaardpositie 4 Drijvende klep lekt Vuil in de afdichtring of vlotter Reinigen van de afdichtring van de vlotterklep Beschadiging van de afdichtring Vervang de afdichtring 5 De vlotterklep kan niet worden v...

Page 38: ...e el enchufe de la toma de pared 12 Precaución Este aparato genera calor y libera vapor durante su uso Se deben tomar las precauciones adecuadas para evitar el riesgo de quemaduras incendios u otros daños a las personas o la propiedad 13 Este aparato genera vapor No permita que funcione sin cubrir 14 No deje este aparato desatendido durante su uso 15 Este aparato es solo para uso doméstico Utilice...

Page 39: ...écnicas Energía Capacidad Presión de trabajo Presión limitada Mantener la temperatura caliente Temporizador preestablecido 1000W 220 240V 40 70 kPa 90kPa 60 80 0 24 horas Colector de condensación de vapor Valor de descarga de presión Valor flotante Asa de la tapa Olla interior Cable de alimentación desmontable Olla exterior Taza medidora Cucharón Panel de control ...

Page 40: ...as D7 y D8 5 Coloque la válvula de alivio de presión en la posición de sellado vea la figura 9 Asegúrese de que la válvula de flotador esté en la posición hacia abajo ver figura 9 y 10 6 Enchufe la olla a presión en un tomacorriente con conexión a tierra La pantalla mostrará 0000 7 Pulse el botón de menú seleccionado Por ejemplo presione arroz para cocinar arroz El indicador se enciende y la panta...

Page 41: ...minutos 50 minutos Arroz 12 minutos 10 minutos 16 minutos Gachas De Arroz 15 minutos 10 minutos 25 minutos Carne 40 minutos 20 minutos 60 minutos Frijoles 40 minutos 35 minutos 60 minutos arroz con curry 10 minutos 8 minutos 16 minutos Verduras con salsa de carne 12 minutos 10 minutos 18 minutos Papa horneada 15 minutos 12 minutos 20 minutos Pollo al horno 13 minutos 10 minutos 18 minutos costilla...

Page 42: ... del reloj hasta que la tapa esté en la posición de desbloqueo y retire la tapa vea las figuras D1 y D2 14 La comida ya está lista para servir Use utensilios de madera o plástico cuando sirva para evitar rayar la superficie antiadherente del tazón Limpieza Desenchufe el cable de alimentación antes de limpiar Limpia el fondo de la olla a presión con una esponja o un paño Nunca rocíe agua sobre la o...

Page 43: ...a 6 horas 13 Una gran cantidad de vapor que sale de los bordes de la tapa durante el uso es anormal y significa que la válvula de alivio no funciona correctamente Retire el enchufe de la toma deje que se enfríe y compruebe si la olla a presión está correctamente montada 14 Este aparato no está diseñado para ser utilizado por personas incluidos niños con capacidades físicas sensoriales o mentales r...

Page 44: ...o de sellado Suciedad en el anillo de sellado Limpie el anillo de sellado Anillo de sellado dañado Reemplace el anillo de sellado La tapa no está bien asegurada Coloque la tapa en línea con la posición estándar 4 Válvula flotante con fugas Suciedad en el anillo de sellado o válvula flotante Limpieza del anillo de estanqueidad de la válvula de flotador Daños en el anillo de sellado Reemplace el ani...

Reviews: