background image

Thank you for purchasing the SwellPro Spry+. We have designed and manufactured the 
Spry+ to the highest quality standards. Like any marine equipment, long-life and trouble-free 
operation relies on due care and maintenance. With proper care and maintenance you 
should enjoy your drone for many years. After flying in salt or contaminated water, always 
thoroughly rinse and dry your Spry+ in fresh water immediately after use or before salt and 
sediment can dry inside moving parts. 

It is important to familiarize yourself with the features of this unique drone by carefully 
studying this manual and particularly the priority sections indicated in the Table of Contents. 
Before the first use, it is recommended to watch tutorial videos listed on official website or 
youtube channel.

Check www.swellpro.com for the latest manuals, software and tips. Refer to the Version 
Information section at the end of this manual, which details additions and corrections to this 
manual. 

Other Information

Visit and subscribe to SwellPro’s YouTube channel for instructional videos and product 
information

.

www.facebook.com/swellpro/

Summary of Contents for Spry+

Page 1: ...User Manual V1 1 Check www swellpro com for the latest version of this manual and firmware updates for your drone PIONEERS OF THE WATERPROOF DRONE The world s only waterproof sport drone ...

Page 2: ...dry inside moving parts It is important to familiarize yourself with the features of this unique drone by carefully studying this manual and particularly the priority sections indicated in the Table of Contents Before the first use it is recommended to watch tutorial videos listed on official website or youtube channel Check www swellpro com for the latest manuals software and tips Refer to the Ve...

Page 3: ...ly Preparation Before your First Flight or in a new location Gyroscope Calibration Compass Calibration Remote Controller Battery Product Overview Charging Remote Controller Battery Low Battery Alarm Remote Controller Operation Remote Controller Pairing Camera Camera Settings and Use Camera Indicator 05 05 06 07 08 08 10 11 11 12 13 13 14 14 14 15 15 15 17 18 19 20 20 20 21 21 22 Drone Indication L...

Page 4: ...ter Take off and Landing Take off and Landing from a Boat APP Control Tap to Fly Flight Path Setting Specifications Warranty After Sale Service Flight Safety Battery Related Maintenance Trouble Shooting Disclaimer and Warning Appendix Version Information 23 23 24 25 25 27 28 29 30 30 32 33 33 35 35 36 37 ...

Page 5: ...helps avoid excessive glare 7 Intelligent Follow Me The Spry uses a built in motion algorithm to follow the position of the remote controller The follow me functions supports leading or following camera positions 8 Target orbit the Spry can perform an autonomous orbit around a moving object 9 Auto return The Spry constantly monitors the location of the remote controller so that it can return to th...

Page 6: ...ropeller 05 CCW Motor 06 CCW Propeller Nut 07 Drone Status Lights 08 CW Motor 09 CW Propeller Nut 10 CW Propeller 11 Power Button 12 GPS Pod Drone Illustration 01 03 06 04 05 07 08 09 10 12 11 02 02 02 04 06 14 13 15 05 07 02 03 08 10 09 13 Waterproof Membrane 14 Battery Cover 15 Battery Cover Lock ...

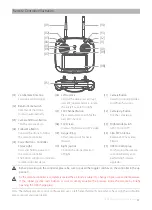
Page 7: ...on Used for controlling Video and Photo functions 12 Camera Up Button Tilts the camera up 13 Flight Mode Switch GPS Circle ATTI 14 5 8G FPV Antenna Receives FPV live video 5 8GHz 15 USB Port Vent plug For charging the remote controller battery and performing firmware upgrades Remote Controller Illustration 01 03 02 04 05 06 07 15 09 08 10 11 12 13 14 Before powering on the controller please be sur...

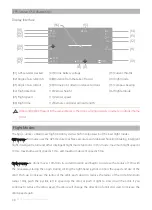
Page 8: ... the circle minimum radius 10m push the joystick left to speed up the orbit or push it right to slow down the orbit If you continue to reduce the orbit speed the drone will change the direction of orbit and start to increase the orbit speed again Flight Modes P 02 R 01 M O D T GPS 049 096 H R 332 N 15 03 90 H 0000 0 0 00 0 00 00 12 3 FPV Screen OSD Illustration Display Interface If 04 and 09 both ...

Page 9: ...ow me mode the aircraft will slowly circle the remote control with a radius of 10 meters when the aircraft switches from the Follow me mode to Circle Follow me mode the drone will fly to a radius of 10 meters and start to circle It is recommended the Follow Me speed is under 2 m s beyond this speed it is possible to lose the aircraft In the GPS mode the drone will not arm unless there are sufficie...

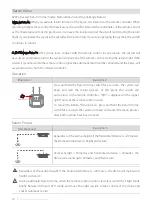
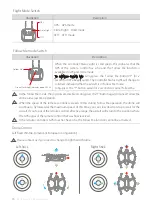
Page 10: ...ns from the remote controller Return Home Operation Description Illustration Press and hold the Return Home switch for 2 seconds the system will beep and start the return process At this point the aircraft will auto return to the remote controller RTH is displayed in the upper right corner of the remote control screen To cancel the Return Home process press and hold the Return Home switch for 2 se...

Page 11: ...rizontal calibration Drone power on off Alternating Red Green slow flashing Aircraft initializing horizontal calibration Red Drone Nose Lights Green Status lights Green Status lights GPS Status Green Slow Flashing Green ON Poor GPS signal Good GPS signal Compass Calibration Green Fast Flashing Green Slow Flashing Horizontal calibration Vertical calibration Red Fast Flashing Remote control connecte...

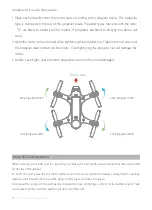
Page 12: ... to prevent the card from ejecting too fast out of the slot Micro SD Card Installation Drone nose CW propeller 6045R CCW propeller 6045 CW propeller 6045R CCW propeller 6045 1 Place each propeller onto the motor hubs according to the diagram below The propeller type is stamped on the top of the propeller blade Propeller types that end with the letter R are fitted to clockwise CW motors If propelle...

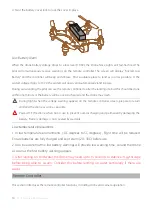
Page 13: ...tatus indicators show the level of charge 25 50 75 and 100 When all 4 lights are permanently ON the battery is fully charged Battery 1 Twist open the battery hatch lock Grasp the forward end of the battery cover with the provided tool and pull the battery cover up 2 Insert the battery vertically into the drone with the contacts towards the back of the drone and press down until it is properly seat...

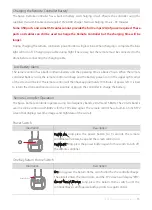
Page 14: ...ind a suitable place to land as soon as possible If the aircraft voltage drops to 10 7V the aircraft will slowly and automatically land in place During auto landing the pilot can use the remote controller to alter the landing site but this should be done within one minute or the battery will be over discharged and the drone may crash 1 In low temperature environments 0C degrees to 5C degrees fligh...

Page 15: ...screen will be red The remote control will then have approximately 10 minutes of power left It is best to return the drone and land as soon as possible or plug in the controller to charge the battery The Spry Remote Controller operates using two frequency bands 2 4GHz and 5 8GHz The 2 4GHz band is used for drone control and 5 8GHz is for the FPV video signal The remote control has a built in 4 3 i...

Page 16: ...emote control s effective range the aircraft will return to the position where the GPS signal of the remote control that was final received If the remote controller s GPS does not have a fix the Follow Me function cannot be activated When the Controller Status Light is solid green this indicates that the GPS of the remote control has a fix and the Follow Me function is available in GPS and Circle ...

Page 17: ...pairing has completed the Controller Status Light will turn green 4 Long press the FPV channel button CH The FPV screen will display RF SEARCHING and automatically find the best FPV channel There are 8 FPV channels available Long press the FPV channel button CH and the system will automatically search for channels You can also use short press to adjust frequency manually Description Illustration C...

Page 18: ...eos and 12 megapixel still images With its inbuilt WiFi function you can also use a mobile app to change settings and download videos and photos This section introduces camera parameters and use The Spry will automatically save longer video files into chapter files of 4GB Always stop video recording before powering off the Spry or your video will be lost Camera Settings WiFi switch Description Ill...

Page 19: ...store Settings 2 0 1 7 1 3 1 0 0 7 0 3 0 0 0 3 0 7 1 0 1 3 1 7 2 0 AUTO cloudy sunny Incandescent lamp Fluorescent lamp ON OFF Global metering Center weighted spot Confirm Cancel firmware details Confirm Cancel Picture Settings Video Settings Camera Settings Picture Button Record Button Playback Button Record Time Time Stamp Memory card capacity Turn off the camera s WIFI before flight by pressing...

Page 20: ... cause the aircraft to react slowly or become uncontrolled In these situations you can turn off the remote control for the aircraft to return automatically or restart the remote control which can assist re establishing control 4 When your drone is new calibrate and fly several times over land to adapt the aircraft to the local environment before flying over water 5 When flying at altitudes above s...

Page 21: ...led and the membrane on the top of battery cover is in good condition 12 Unless it is an emergency NEVER Lock or STOP the motors in flight as this will cause the drone to fall to the ground and crash 13 When the low battery level warning is activated plan to return the drone and land safely before the battery reaches a critical level 14 If any obstacles are in the flight path of the drone during a...

Page 22: ... Calibration Compass Calibration When doing gyroscope calibration ensure that the aircraft is placed is not subject to any vibration or movement Gyro calibration on board a ship or on a moving platform will not succeed Calibrate before boarding The compass sensor is used by the drone to control its direction in flight Due to the Earth s magnetic fields it is necessary to calibrate the compass sens...

Page 23: ...e horizontal surface free of vibration Power on the remote controller and the drone Wait for initialization to complete 2 Push the left joystick up to the highest position and then fast flick the right joystick left and right continuously until INITIALIZING appears on the FPV screen 3 The drone will now perform IMU calibration Do not move or disturb the drone during this process When the INITIALIZ...

Page 24: ... Power on the remote control followed by the drone 3 Wait for the FPV screen to display the camera s live video and the OSD flight data Check that the flight display is normal 4 Place the drone on a flat open surface or on the surface of the water 5 Check the following flight data Battery voltage 12 5volts Satellites 9 Compass indicates the drone s current compass direction 6 For safety you should...

Page 25: ... recalibration 5 After landing on water if the drone does not hover well land the drone and dry the membrane as it may have become saturated 6 Always rinse the drone thoroughly after use on water and before salt crystalizes Salt remaining on membrane will severely affect the performance of the aircraft Water Take off and Landing 7 The control distance of the remote control is affected by how far a...

Page 26: ...e water for take off It is safer and easier to land the Spry on the water beside a boat rather than landing on a rocking boat or where there is not enough space for a safe landing If the boat is rocking the Spry may not arm its motors in GPS mode In this case carefully take off in ATTI mode and then switch to GPS mode if there are sufficient satellites For safety it is not recommended to launch or...

Page 27: ...ck the drone and start flying with the remote controller or click the takeoff button on the APP set the take off altitude and then slide to unlock the drone will ascend automatically and hover When flying indoors or in enclosed spaces the lack of a strong GPS signal will affect the positioning stability of the aircraft Do not use the APP to control the aircraft at this time If the aircraft is lost...

Page 28: ...o set hover return home flight paths follow me tap to fly etc 2 Tap to Fly Click the Point to fly button and then click the target points on the map and click the Upload button The drone will start flying to the point and hover there If you need to set the parameters manually you can tap on the flight point GPS 11 2V 10 Point Edit Altitude 66m Cancel Ok Lat 113 860667 Ing 22 704291 FlySpd 4 0m s H...

Page 29: ...tap the map to set the flight path double tap the flight point to delete it tap the Delete button to delete all flight paths Tap the flight point again to edit b After completing the setup click the Upload button and the drone will fly according to the flight path 1 According to provisions of the International Civil Aviation Organization and many national air traffic regulations drones must be ope...

Page 30: ...nt a successful return home function in the event of an emergency 10 Please be well prepared before each flight avoid any violent or excessive operations 11 Please maintain strict compliance with the local laws any flying in NO FLY ZONEs is prohibited 12 Any invasion violation against another person s right of privacy is not allowed Before using this product it remains the duty of the drone pilot ...

Page 31: ...cuit against each other 11 Do not drop or strike batteries 12 Do not continue to fly the drone after the low battery alarm has been activated this will result in over discharging the battery and potentially could damage the battery cells 1 Always use a Swellpro approved charger to charge the battery of the drone Swellpro takes no responsibility if the battery is charged using a non Swellpro charge...

Page 32: ... sustained periods of time as this can raise the internal temperature of the drone to well above the operating temperature range 3 Please check propellers before each flight Distorted or damaged propellers should be replaced immediately 4 After flying over the sea sand or water the Spry drone and remote controller must be thoroughly washed with fresh water within 2 hours and dried especially the m...

Page 33: ...is not a toy and should only be operated by persons over the age of 15 Please keep it out of reach of children and pay particular attention to the possible scenarios of children s unexpected appearance during flight operation Be sure to read this document carefully before using the product to fully understand your legal rights responsibilities and safety instructions Failure to do so may cause pro...

Page 34: ... ingress caused by abusing or modifying the original drone structure 10 Damage or injuries caused by using broken ageing components 11 Damage or injuries caused by continuing to fly the drone even if the low battery alarm is activated 12 Damage or injuries caused by failure to wash the components with fresh water after flying over or near the sea corrosive waters 13 Damage or injuries that have oc...

Page 35: ...y 220g About 90mins 5 8G 8CH 500m 15 17mins 800m from remote controller 200m 18m s 3m s 10m s GPS GLONASS Automatic takeoff automatic hover automatic return home point to fly circling flight flight path setting camera control 0 5m 10m s 10 40 18 Avoid flights in or around the strong magnetic fields This includes wireless electricity emission towers high voltage transmission lines transformer subst...

Page 36: ...e Resolution Brightness 5645 5965HMZ 8 4 3inches 800X480Pixels 600 cd m Camera FPV Monitor Image Sensor Lens Angle ISO Range Picture Resolution Video Resolution Max Video Bit Rate Picture Format Video Format Storage 1 2 3 CMOS 12M F4 53mm f 2 65 92 6 100 1600 12MP 16 9 3840 2160 30P 2704x1524 30P 1920 1080 30P 60P 120P 1280 720 240P 64mbps JPEG MOV MP4 Class 10 or UHS 1 and above specifications Mi...

Page 37: ...rsion of this manual may contain information relating to a release of the equipment different from your own new information is added constantly which is relevant to ALL customers Version Information Version Comments 1 0 New Manual for Spry 1 1 Added Waterproof Membrane Maintenance ...

Page 38: ...User Manual 2019 11 ...
Reviews: