background image

Main Operations

Turning On And Off

Press Power button on the remote control 

or the On/Off button on the control 
buttons. The product will turn on and will 

be ready to be used.

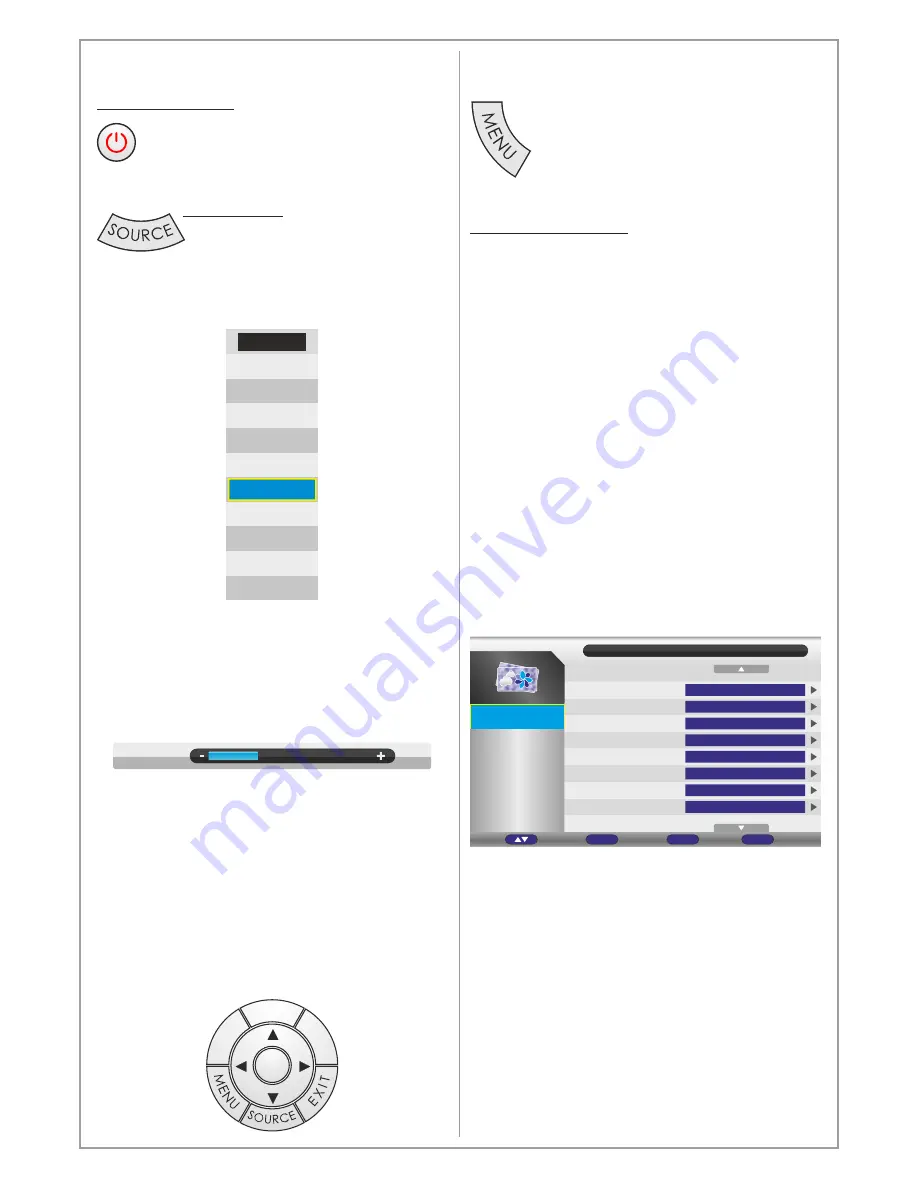
Select Source

Press Source button on the remote 
control. Then you can see the 

source list menu shown to the right. 

Press Navigation Up/down button on the remote 
control to select the source and confirm by 
pressing Enter.

Volume Control

Press VOL+ / VOL- button on the remote control 
to adjust the 
volume level.
Press MUTE button on the remote control when 
you need to mute the sound.

OSD Menu Structure

• 

OSD (On Screen Display) allows users to 

control or adjust various features and 

settings in accordance with his/her 

preferences.

•Press the MENU button on the 

remote control to see the main 

OSD menu.

OSD Menu Operation:
• 

Main Menu: Press the MENU button on the 

remote control to enter the main OSD menu.
First, choose Main menu item you need with 
the buttons ◄ & ►. 
To select a Main menu items, just press Enter 
or Navigation button 

 on the Remote 

Control.

• 

Sub Menu: Each menu item has its own sub 

menu items to set.

• 

Sub Menu items:


A: If there is no value to adjust it means there 

is a sub menu which you can access by 
pressing Enter and modify the menu values.
Select sub-menu item with 

 & 

 buttons on 

the remote control and press Enter button to 
enter the submenu or change the value.


B: If there is no ► part, the item has 

adjustable values. Use the ◄ & ► buttons to 
adjust the values.


C: If the sub-menu item is grey colored, it 

means this item is not available in the 
particular mode.

OSD Menu Operation

• 

Press 

MENU

 button on the remote control to 

access the OSD Menu. Pressing the same 
button again will move you backward in the 
OSD structure.

• 

Press 

ENTER

 button to confirm/select.

• 

Use 

LEFT

 & 

RIGHT

 buttons to navigate or 

change the parameters of the current


sub-menu.

• 

Use 

UP 

DOWN 

buttons to navigate in the 

OSD Menu.

• 

Press 

EXIT

 button to exit the OSD Menu.

G

P

E

FA

V

OK

. LI

H

ST

C

9

Input

DTV

ATV

AV

SCART

YPBPR

HDMI 3

PC

Media

HDMI 2

HDMI 1

Volume

15

Picture

Picture

Sound

Channel

Feature

Setup

Picture Mode

Brighness

Contrast

Sharpness

Colour

Tint

Colour Temperature

Aspect Ratio

Standard

50

50

5

50

50

Standard

16:9

Return

Menu

Exit

Exit

Enter

Ok

Move

Design and specifications are subject to change without notice.

Summary of Contents for SS-42K13

Page 1: ...Design and specifications are subject to change without notice User s Guide SS 42K13 SS 50K13 SS 58K13 SS 42K14 SS 50K14 SS 58K14 www swedx com ...

Page 2: ...ce SWEDX wave SWEDX TV Stand ﻣﻧزﻟﯾﺔ ﺳﯾﻧﻣﺎ SWEDX Direct SWEDX Blade Kiosk Display SWEDX shelves SWEDX Soundbar Matrix Video wall SWEDX offers a wide range of LED TVs and digital signage products and its accessories For more information please visit www swedx com ...

Page 3: ...control buttons 8 Main Operations 9 Volume Control 9 OSD Menu Operations 9 OSD Menu Structure 9 Menu Picture 10 Menu Sound 10 Menu Channel 11 Menu Feature 13 Text TV Teletext 15 EPG 16 Media USB Media Player 16 Supported File formats and codecs 17 Wall mount assembly 18 Product base assembly 19 Troubleshooting 20 Warranty and Service 21 How to get service 22 Limitation of liability 22 ...

Page 4: ...e coupler is used as a disconnect device the disconnect device shall remain readily operable Battery shall not be exposed to excessive heat such as sunshine fire or the like Excessive sound pressure from earphones and headphone can cause hearing loss Please install the product at proper position such as wall or ceiling Please install it under the guidance of professional staff This device complies...

Page 5: ...wall mount check that it is steady Do not place any material on the product Do not block or cover the ventilation openings on the product The product must be plugged with a tension source of 110 240 volts and 50 60 Hz Power cord and cables must be properly routed and protected to prevent from stepping on them Keep the power cord away from any heat source Possible fire hazard Heating sources and hu...

Page 6: ...for digital audio signal coaxial 13 Component Input for component sources YpBpR 14 AV Input for audio video sources Component and AV shares the same audio input 6 Power Input AC 100 240 V 50 60 Hz PC Audio DTV ATV CI Module USB Player PC HDMI1 SCART HDMI2 YPBPR HDMI3 AV Digital Audio Head Phone Contents Included items 2 x CR2025 Battery N o tic e In fo rm a tio n G P E F A V O K IN FO 9 C H VO L A...

Page 7: ... lit red and in Infrared mode the LED lamp will lit blue When the remote is in 2 4 GHz mode it can be used without targeting the screen because the receiver is built in Each screen has a paired remote control meaning that if you have several screens the remote control will apply to the paired screen only and will not apply to any other screen If for some reason you need to pair the remote with the...

Page 8: ...22 Shortcut to USB 23 Shortcut to HDMI1 2 3 24 Mute the built in speakers 25 Previous TV channel in DTV TV 26 Display favorite channels list 27 Confirm activate button 28 Navigation adjust button RIGHT 29 Exit the OSD 30 Navigation button DOWN 31 Next channel When the channel list is displayed it scrolls down to next page in the list 32 Previous channel When the channel list is displayed it scroll...

Page 9: ...enu item has its own sub menu items to set Sub Menu items A If there is no value to adjust it means there is a sub menu which you can access by pressing Enter and modify the menu values Select sub menu item with buttons on the remote control and press Enter button to enter the submenu or change the value B If there is no part the item has adjustable values Use the buttons to adjust the values C If...

Page 10: ... Standard 50 50 5 50 50 Standard 16 9 Return Menu Exit Exit Enter Ok Move Sound Picture Channel Feature Setup Sound Mode Bass Treble Balance Surround AVL SPDIF Standard 50 50 0 On Off PCM 16 9 Sound Return Menu Exit Exit Enter Ok Move Sound Mode Choose between predefined settings Standard Suitable for normal programs Movie Suitable for movies Music Suitable for music program Speech Suitable for sp...

Page 11: ...tv No Program Name Type Swap Skip Lock Del Tv01 Tv02 Tv03 Tv04 Tv05 Tv06 Tv07 Tv08 Page CH Move To lock a channel choose it and press GREEN button on the remote control An ICON will be displayed for locked channels To unlock a channel choose it a press GREEN button again The lock icon will disappear When you have locked the channels press MENU to exit and update the channel list You can skip chann...

Page 12: ... Favorite 2 Favorite 3 Favorite 4 Type Fav1 Fav2 Fav3 Fav4 F A V Favorite List Favorite 1 0001 0005 0006 0007 Tv01 Tv05 Tv06 Tv07 Enter OK Move dtv dtv dtv dtv Rename Fav Type 0008 Tv08 dtv TV Connection Options Air Cable Choose the signal type provided Choose AIR for terrestrial signal DVB T or CABLE for cable signal DVB C Auto Search Options All DTV ATV Use all to search for both digital and ana...

Page 13: ...the remote control Feature Picture Channel Feature Lock Language Clock Sleep Timer Auto Power Off Hearing Impaired CI Info ENTER ENTER ENTER Off Off Off ENTER Sound Return Menu Exit Exit Enter Ok Move PVR Timeshift ENTER Setup AUDIO SUB DTV Teletext Language Choose the language for Teletext in DTV mode to be displayed in ATV Teletext Language Choose the language for Teletext in ATV mode to be disp...

Page 14: ... Timeshift Timeshift Buffer Timer Record List Record Start ENTER Auto Auto ENTER ENTER ENTER Sound Return Menu Exit Exit Enter Ok Move Setup Menu Setup OSD Timer Options 5 10 15 20 25 30 Never Choose the time duration for the OSD menu to be visible when you press the MENU button on the remote Auto Scart Options On Off When activated the product will recognize the scart signal when it is connected ...

Page 15: ...he hidden text answers to quiz games for example To display normal screen press it again MIX Press to activate teletext mode after selecting the channel providing the teletext service Press it twice to overlap the teletext with the current broadcasting screen HOLD Used to hold the display on a given page if the selected page is linked with several secondary pages which follow on automatically To r...

Page 16: ...YELLOW to view bookmark list BLUE to edit the play list EPG Electronic program guide EPG displays television radio and other media applications information with continuously updated menus displaying broadcast programmes or scheduling information for current and upcoming programmes In EPG you can view the information in Daily mode or Weekly mode You can also add a reminder for a certain programme w...

Page 17: ...080 px JPEG 3000x3000 px 1920x1080 px PNG 3000x3000 1920x1080px Audio WAVE WMA AAC Supported file formats and codecs The built in media player USB mode supports the following file formats 1920x1080 TS ASF WMV3 WVC1 MP4S M4S2 FLV MPEG REAL AUDIO OGG DTS FLAC WMA STD WMA Prof Mp1 MP2 MP3 AAC LC HE ACC VORBIS DTS FLAC All trademarks and registered trademarks are the property of their respective owners ...

Page 18: ...otice Wall mount assembly SWEDX offers several wall mount devices which can be purchased from your dealer or www swedx com See the Wall mounting parameters in the illustrations 42 inch 50 inch 200 mm 200 mm 200 mm 400 mm 58 inch 300 mm 400 mm 400 mm 400 mm 18 ...

Page 19: ... Metal part C M6 screw 4 pcs 10mm Part No 064 0178 00 D M6 screw 4 pcs 16mm Part No 064 0147 00 Assemble the base with the LED TV according to the following illustrations A B C D D C Wall mount assembly SWEDX offers several wall mount devices which can be purchased from your dealer or www swedx com Below is the Wall mounting parameters D B A C 19 ...

Page 20: ...our set into a different mains socket Blurred or snowy picture distorted sound l Check the direction location and connections of your aerial l This interference is often due to the use of an indoor aerial Remote control malfunctions l Replace the remote control batteries l Clean the upper edge of the remote control transmission window l Check the battery terminals l Turn off the TV and unplug the ...

Page 21: ...eterioration or malfunction resulting from A Accident misuse neglect fire water lightning or other acts of nature unauthorized product modification or failure to follow instructions supplied with the product B Repair or attempted repair by anyone not authorized by SWEDX C Any damage of the product due to shipment D Removal or installation of the product E Causes external to the product such as ele...

Page 22: ...ams are subject to change without prior notice Limitation of liability If your SWEDX product fails to work as warranted above your sole and exclusive remedy shall be repaired or replaced SWEDX s maximum liability under this limited warranty is expressly limited to the lesser of the price you have paid for the product or the cost of repairing or replacement of any hardware components that malfuncti...

Page 23: ...Design and specifications are subject to change without notice ...

Reviews: