background image

13

   User Manual

Commissioning

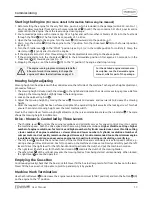
Starting the Engine 

(For more detail information follow engine manual)

Mowing height adjusting

Emptying the Grass Box

Machine Work Termination

Drive - Mower is Controlled by Three Levers

1. Before starting the engine for the very first time, pour oil, which is included in the package (oil SAE 30 - can No. 1), 

into the yellow plug hole (front and rear holes are identical) 

15

 (A or B). The can contains 0.4 l of oil, pour its entire 

contents into the engine. Check the level using a closure gauge.

2. Pour unleaded gasoline with octane rating 98 or higher and with low-ethanol blends of 5% into the fuel tank 

through the filler 

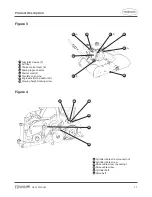
3

 (B). The fuel tank has a capacity of 1.6 litres.

3. Open the fuel supply to the engine. Turn the lever 

17

 (C) downwards to the position „on“.

4. Start – turn the button 

23

 (D) on the engine to the “I” position. Turn the choke lever 

19

 (E) to the forward position 

(see Fig. 3).

5. Turn the throttle lever 

5

 to the “START” position (see Fig. 4) or in the middle position for cold start. Grasp the 

starter cord 

21

 (F) and yank it to start the engine.

6. If the engine fails to start after three attempts, check adjustments according to the above points.
7. If the engine starts, turn the choke lever 

19

 (E) to the intermediate position. After approx. 30 seconds, turn the 

choke lever 

19

 (E) towards you (see Fig. 3).

8. Stopping the engine – set the button 

23

 (D) to the “0” position. The engine shall stop running.

•  The throttle lever 

5

 controls the engine revolutions and primarily serves for speed control. Use it to control 

the machine speed - both the drive speed and the mowing blades revolutions. Higher throttle setting = higher 
number of engine revolutions = faster drive and higher number of cylinder revolutions. Lower throttle setting 
= lower number of engine revolutions = slower drive and lower number of cylinder revolutions. Number of 
cuts per meter and cut quality remain unchanged. However, it is not recommended to use the minimum engine 
revolutions that could cause an excessive engine load, in particular during verticutating or scarifying.

•  The left lever 

8

 controls the sensitive clutch of the machine drive and secondarily serves for speed control, e.g. 

during a change in travel direction. Push it to speed up the machine and vice versa. Slowly and softly push the left 
lever of drive (the right lever for the left-hand control) to activate the clutch and put the machine in motion.

•  The right lever (the left lever for the left-hand control) 

9

 controls the clutch of the mowing blades.

•  The safety lock 

6

 of the cylinder prevents the mowing blades from being started unintentionally. When locked, 

the right lever 

9

 cannot be operated.

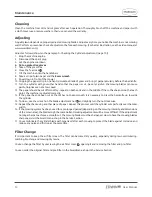
Mowing height can be adjusted with the control lever on the left side of the machine. To change the height adjustment, 
proceed as follows:
1. The mowing height is locked with the screw 

24

 in the right-hand side plate; the screw moves along a groove. Before 

changing the mowing height, slightly loosen the locking screw.

2. Loosen the quick-acting bolt 

13

.

3. Adjust the mowing height by moving the lever 

12

 forwards to decrease and rearwards to increase the mowing 

height.

4. After the required height has been achieved, retighten the quick-acting bolt as well as the locking screw. This shall 

ensure the constant mowing height over the total machine width.

Next to the control lever for mowing height adjustment, there is an orientation scale with an indicator 

14

. The scale 

shows the mowing height in millimeters.

Continuously visually check that the box is not full. Never fill the box to allow grass to fall from the box onto the lawn. 
Never fill the box so as not to be able to pick it up and empty it by yourself. 

Use the throttle lever 

5

 to decrease the engine revolutions to minimum (START position) and turn the button 

23

 (D) 

on the engine to the “0” position.

The engine running-in process is completed after 
8 hours of work. It is necessary to change the 
engine oil. Follow the instructions on page 14.

For the detailed engine maintenance 
description, see the Kawasaki engine 
manual, which is part of the package.

Summary of Contents for EDWIN 2.0

Page 1: ...USER MANUAL Cylinder Lawn Mower ...

Page 2: ...our Swardman mower We developed it with love to beautiful healthy and precisely cut lawns I believe that Swardman cylinder mower will significantly contribute to making your lawn your pride and to bringing joy for everyone around you Tomas Sena CEO and founder of Swardman ...

Page 3: ...rmation 5 Contents of Package 6 General Safety Instructions for Hand Held Cylinder Lawn Mower 7 Technical Data 9 Product Description Explanations 10 Commissioning 12 Maintenance 14 Acknowledgements 15 Troubleshooting 16 Warranty Information 17 Declaration of Conformity 18 Accessories and Manufacturer Information 19 ...

Page 4: ...t read and understood this User Manual sufficiently are not allowed to work with this machine To ensure that they do not play with the product persons with limited physical or mental abilities are only allowed to use this product under the direct supervision of a competent person KEEP YOUR ARMS AND FEET AWAY FROM THE BLADES MAGNET DANGER FLYING OBJECTS KEEP BYSTANDERS AT A SAFE DISTANCE GUARANTEED...

Page 5: ...lawn mowers are exclusively designed for mowing lawns in private gardens and gardens around the house having the area less than 2 000 m2 or for their being in operation for 100 running hours per year The use for any other purpose is considered inconsistent with the intended purpose The manufacturer does not assume any liability for injury or damage to the machine thereof and these risks are uncond...

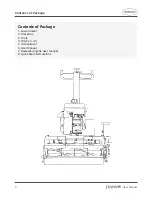
Page 6: ...6 User Manual Contents of Package Contents of Package 1 Lawn mower 2 Grass box 3 Tools 4 Oil 2 x 0 4 l 5 Oil aspirator 6 User Manual 7 Kawasaki engine user manual 8 Quick Start Instructions ...

Page 7: ...h any additional accessories not authorised by Swardman Failure to observe this instruction may void the warranty This lawn mower must not be used for mowing areas that are not covered by grass or contain more than 20 plants that are not grasses Never mow if there are other persons nearby especially children or animals Before as well as during each mowing make sure there are no foreign or undesira...

Page 8: ...ng position never start it while it is lying on its side When starting the mower always make sure your hands and feet are at a safe distance from the mowing blades Never touch the mowing blades while the engine is running Never adjust or clean the mowing blades while the engine is running Stop the engine and remove the spark plug connector every time you check clean or adjust any part of the machi...

Page 9: ...ber of cuts per meter 5 blade cylinder 60 60 Grass box volume l 40 50 Weight kg 52 59 Maximum overall width cm 54 64 Declared sound pressure level A on the operator s side1 LpAd dB 77 1 79 2 Guaranteed sound power level2 A LWA G dB 92 94 Declared aggregate value of acceleration of vibrations transferred to the operator s hand arm3 ahvd mps 2 3 1 1 6 2 9 1 5 Serial number See specifications on the ...

Page 10: ...xhaust 5 Throttle lever 6 Safety lock of cylinder 7 Handlebar body 8 Drive control lever 9 Control lever for mowing blades 10 Handlebar body position adjusting 11 Handlebar height 12 Setting control lever for mowing height 13 Quick acting bolt 14 Mowing height indicator 15 Oil tank cap A B 16 Rear roller with differential A B 15 15 16 ...

Page 11: ...20 Spark plug connector 21 Starter cord F 22 Throttle on engine 23 Engine start stop button D 24 Mowing height locking screw 27 Cylinder cable screw counternut 28 Cylinder cable screw 29 Drive cable screw counternut 30 Drive cable screw 31 Cylinder belt 32 Drive belt 17 18 19 20 21 22 23 24 E F D C 27 28 29 30 31 32 ...

Page 12: ...em by approx 10 If required repeat the procedure 2 Close the petrol supply 3 Tilt the machine onto the handlebars for only necessary time period High possibility of oil spillage 4 Insert a piece of paper in front of the bed knife 26 and carefully turn the cylinder with your other hand 5 If the paper has been cut by all the blades in whole width the cylinder is adjusted A light touch of cylinder bl...

Page 13: ... the minimum engine revolutions that could cause an excessive engine load in particular during verticutating or scarifying The left lever 8 controls the sensitive clutch of the machine drive and secondarily serves for speed control e g during a change in travel direction Push it to speed up the machine and vice versa Slowly and softly push the left lever of drive the right lever for the left hand ...

Page 14: ... the 8 mm wrench 9 Kneel down in front of the mower 10 Gripping the paper strip in one hand simulate a blade of grass and bring it perpendicularly before the bed knife 11 Turn the cylinder with your other hand so that the paper is cut be very careful the mowing blades can cause painful injuries even at a low speed 12 The paper should be cut off smoothly repeat on both ends and in the middle If the...

Page 15: ...llowing 1 Thoroughly clean the machine Remove all stuck grass especially from the area around the engine cooling fins also see the Engine Operation Manual 2 Check the mechanical mowing parts see Counter Blade Adjustment and slightly lubricate the blades with a biological oil 3 Make sure all the bolts and nuts are tightened 4 Drain all the petrol out of the fuel tank see the Engine Operation Manual...

Page 16: ...le Engine cannot be stopped Malfunction of the ignition switch Disconnect the cable connector from the spark plug to stop the engine Contact your Swardman dealer Cylinder does not rotate 1 Incorrect adjustment of the cylinder 2 The cylinder cable is too loosened 3 Worn belt 1 Loosen adjusting screws of the cylinder 25 and readjust the cylinder 2 Tighten the cable by loosening the counternut 27 scr...

Page 17: ...wardman original spare parts The warranty does not cover a damage resulting from using spare parts not manufactured or approved by Swardman This warranty does not affect your statutory rights in connection with defective products When the time comes to dispose of the product please consider the environment and recycle the product For information on where to properly dispose of the product please c...

Page 18: ...18 User Manual Declaration of Conformity ...

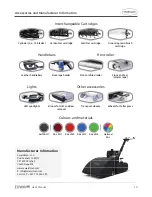
Page 19: ...aha 4 Czech Republic www swardman com E info swardman com Service T 420 774 365 599 Cylinder 5 6 10 blades Grooming lawn brush cartridge Scarifier cartridge Verticutter cartridge Interchangeable Cartridges LED spotlights Lights Leather handlebars Beverage holder Handlebars Front profiled roller Front and rear roller scraper Front roller Colours and materials ANTRACIT RAL 3011 RAL 3020 RAL 5015 RAL 6...

Page 20: ...Swardman s r o Pod Svahem 1582 12 147 00 Praha Czech Republic www swardman com info swardman com 420 608 272 722 passion for lawns ...

Reviews: