background image

1

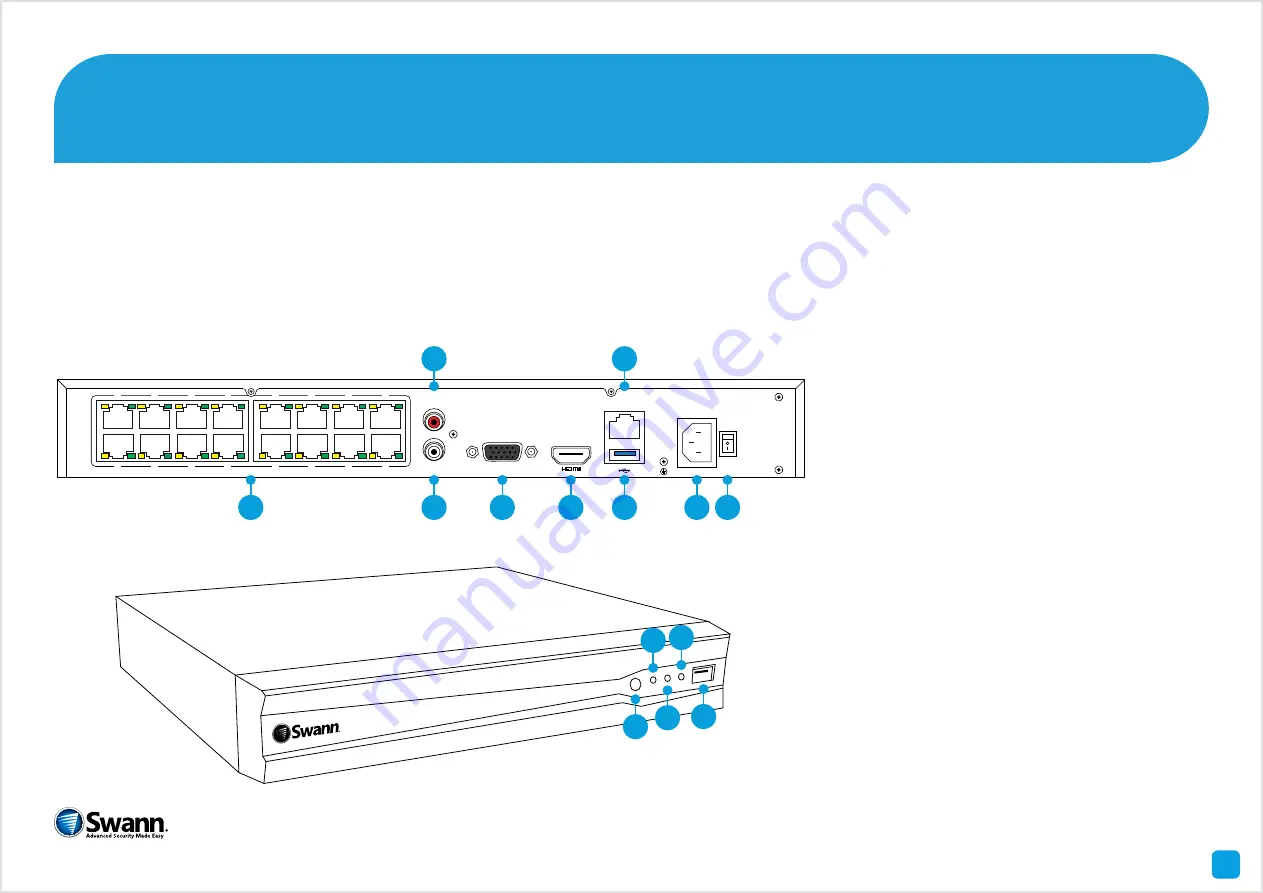
Congratulations on the purchase of your Swann NVR. This quick start guide will assist you on getting your NVR and PoE 

switch up and running as soon as possible. To make sure that nothing was damaged during shipping, we recommend 

that you connect all the components and give it a try before you do a permanent installation. On the other side is a 

detailed connection map which illustrates the various connections on the NVR and PoE switch.

1)

 Camera In-

puts

2) 

Audio In

3)

 Audio Out

4)

 VGA

5)

 HDMI

6)

 LAN

7)

 USB

8)

 Power

9)

 Power Switch

10) 

IR Receiver

11)

 Power LED

12)

 HDD LED

13)

 LAN LED

14)

 USB

Getting to know your NVR

QHNV243MP290615E | © Swann 2015

11 13

12 14

10

4

3

2

1

9

10

11

12

5

6

7

8

16

15

14

13

AUDIO OUT

AUDIO IN

VGA

LAN

POE

1

3

2

4

5

6

7

8 9

Summary of Contents for NVR

Page 1: ... try before you do a permanent installation On the other side is a detailed connection map which illustrates the various connections on the NVR and PoE switch 1 Camera In puts 2 Audio In 3 Audio Out 4 VGA 5 HDMI 6 LAN 7 USB 8 Power 9 Power Switch 10 IR Receiver 11 Power LED 12 HDD LED 13 LAN LED 14 USB Getting to know your NVR QHNV243MP290615E Swann 2015 11 13 12 14 10 4 3 2 1 9 10 11 12 5 6 7 8 1...

Page 2: ... 6 LAN Connect this to your home network so your NVR can connect to the Internet 7 USB Connect the mouse here 8 Power This is where you connect the power cable 9 Power Switch Press the switch to turn on the NVR 10 IRReceiver Receives a signal from a remote control 11 Power LED This LED will turn on when the NVR has power 12 HDD LED This LED will flash when the hard drive is working 13 LAN LED This...

Page 3: ...onnection Getting to know your PoE Switch 1 Status LEDs The LEDs will indicate that the cameras are connected to your network and will flash when there is network activity 2 CameraInputs Connect anyadditionalcamerasthat you have purchased here 3 Uplink Connect the supplied Ethernet cable to the Uplink port then connect the other end to a spare port on your router or wireless access point 4 Power C...

Page 4: ...ts on the back of the NVR It doesn t really matter which input you use as they are quite versatile and will be configured in a later step Please note the Ethernet cable is the same at both ends so it doesn t matter which end plugs into the camera or NVR The reset button is used toperformafactoryreset 1 4 3 2 1 9 10 11 12 5 6 7 8 16 15 14 13 AUDIO OUT AUDIO IN VGA LAN POE Locking Ring LAN Reset Eth...

Page 5: ...oint It s important that you do this as this allows you to access the NVR from your smartphone or tablet and to send you email notifications It also allows the NVR to connect to the Internet to update its internal clock Connect the NVR to your Local Network 2 5 4 3 2 1 9 10 11 12 5 6 7 8 16 15 14 13 AUDIO OUT AUDIO IN VGA LAN POE USB Internet 4 3 2 1 ...

Page 6: ...front USB port to back up your video recordings and to perform a firmware upgrade Connect the Mouse 3 6 Please note Bluetooth and wireless mice and trackpad devices are not supported For USB flash drive and hard drive devices both FAT32 and NTFS file formats are supported 4 3 2 1 9 10 11 12 5 6 7 8 16 15 14 13 AUDIO OUT AUDIO IN VGA LAN POE 1 ...

Page 7: ...ect the other end to a spare HDMI input 1 on your HDTV Make sure the video input on the HDTV matches the physical connection used to connect the NVR Connect the NVR to your HDTV 4 7 HDMI IN 2 HDMI IN 1 1 4 3 2 1 9 10 11 12 5 6 7 8 16 15 14 13 AUDIO OUT AUDIO IN VGA LAN POE ...

Page 8: ...ed to the VGA output on the NVR then connect the other end to the VGA input 1 on your Monitor Connect the NVR to your Monitor optional 5 8 A VGA cable and monitor are not required when using the HDMI cable 1 4 3 2 1 9 10 11 12 5 6 7 8 16 15 14 13 AUDIO OUT AUDIO IN VGA LAN POE ...

Page 9: ...on to a spare wall socket Press the power switch to turn on the NVR All the connections have now been completed You re now ready to run through The Setup Wizard quick start guide to configure the NVR Connect the Power Cable 6 9 1 4 3 2 1 9 10 11 12 5 6 7 8 16 15 14 13 AUDIO OUT AUDIO IN VGA LAN POE ...

Reviews: