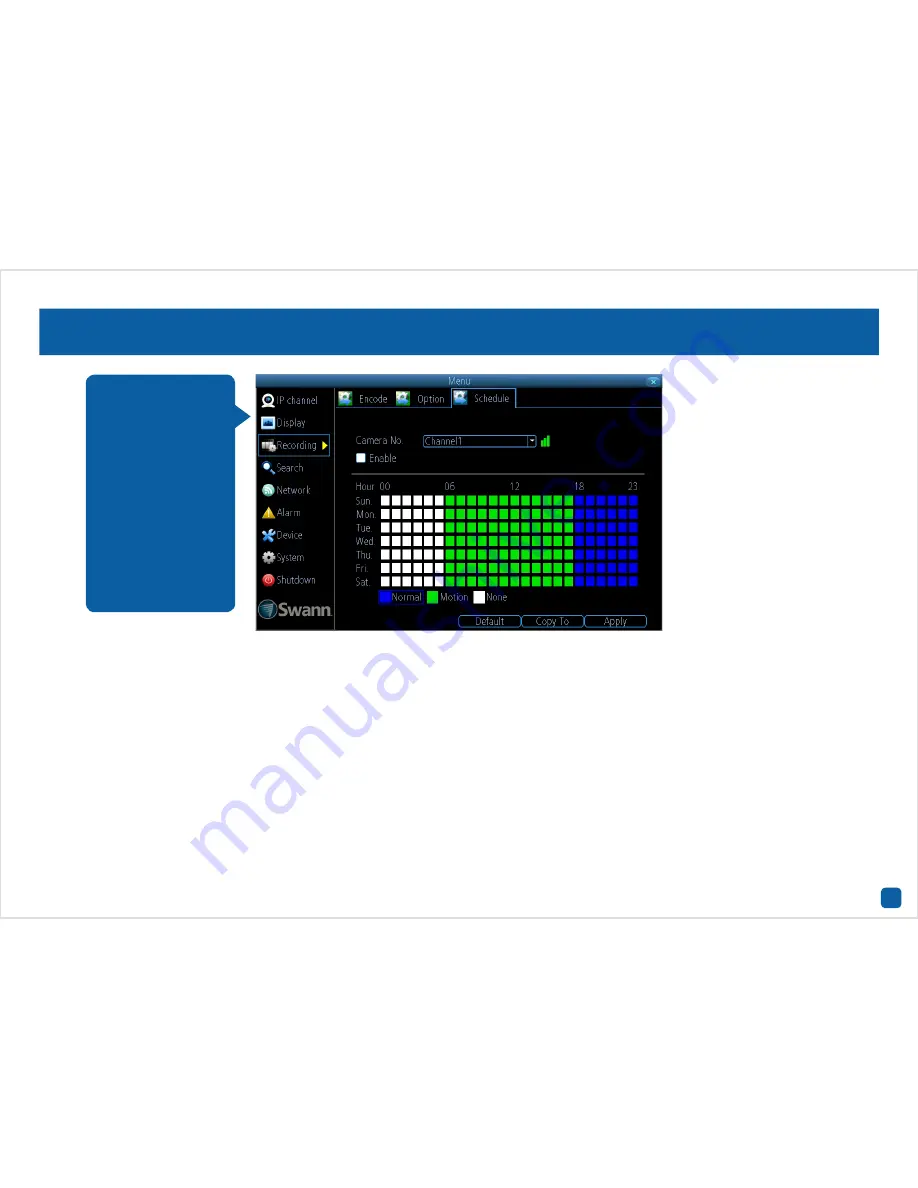
background image

28

Recording: Schedule

Camera No.:


Select a camera that you would like to configure.

Enable:


A Motion Detection recording schedule is enabled by default.

Normal:

 The NVR will constantly record for a set period of time.

Motion:

 The NVR will only record when motion has been detected from 

one or more cameras.

None:

 As the name suggests, the NVR will not record.

In the above example, a Motion Detection recording schedule has been 
created for 06:00 a.m. to 06:00 p.m. and a Normal recording schedule 
for 06:00 p.m. to 12:00 a.m. Sunday to Saturday. Using the mouse, you 
can click on a particular square or section to change or select the de-
sired recording mode (Normal, Motion or None) then click and drag the 
mouse over the squares corresponding to your desired time period.

•  Click the “Default” button to revert back to default settings.
•  Use the “Copy to” button to apply all settings to the other cameras.
•  Don’t forget to click “Apply” to save settings.
•  Right-click the mouse to exit the Menu.

By default, a Motion 
Detection recording 
schedule has been 
enabled for each con-
nected camera. You 
can however change 
the schedule according 
to what fits in with your 
needs. The schedule is 
presented as a 24 hour 
7 days a week grid and 
is colour coded to rep-
resent the event type.

Summary of Contents for M7285201015E

Page 1: ...1 PLATINUM DIGITAL HD Network Video Recorder INSTRUCTION MANUAL...

Page 2: ...regulations FCC Regulation for USA Prohibition against eavesdropping Except for the operations of law enforcement officers conducted under lawful authority no person shall use either directly or indi...

Page 3: ...s 21 Alarm Video Loss 22 Video Loss Schedule 23 Controlling an Optical Zoom Auto focus Camera 24 Chapter 4 Recording Configuration 25 Recording Encode 26 Recording Option 27 Recording Schedule 28 Chap...

Page 4: ...4 Contents System System Information 48 Warranty Information 49 Helpdesk Technical Support 50...

Page 5: ...reen You can check the status or operation of your NVR and cameras using the icons and Menu Bar on the Live View screen Right click the mouse to access the Menu Bar 5 09 12 2014 10 30 15 Tue Camera2 C...

Page 6: ...creen in single or four camera view 7 Click to enable PIP mode 8 Click to manually record the se lected camera 9 Click to access the Setup Wiz ard Double click a live video channel to view full screen...

Page 7: ...mera This indicates that the camera records at 720P 1280 x 720 high definition resolution This indicates that the channel displaying this message has lost the feed from its camera The Camera Toolbar p...

Page 8: ...e on the NVR You can also access previous ly recorded video for playback and to export to a USB storage device such as a flash drive To maintain system integrity a firmware upgrade can be per formed w...

Page 9: ...er of tabs or sub categories that can be changed from their de fault value Some options may have additional menus that can be accessed To exit or access the previous menu right click the mouse To shut...

Page 10: ...isplay Recording and Alarm menus that are accessible from the Menu You can change the resolution and bitrate settings as well as the image settings for brightness contrast and more The NVR has several...

Page 11: ...enabled by default The NVR will automatically detect and display cameras connected directly to the NVR or connected directly to your network Auto assign camera IP address Enable this if you would lik...

Page 12: ...footage was captured OSD Display Position Allows you to change the position of the camera name on the Live View screen Click the Set button to change Use the mouse to reposition the camera name Right...

Page 13: ...reset all image settings Mask Click the checkbox to enable then click Area Settings to create one or more privacy masks see page 14 for more information Camera Parameter See page 15 for more informati...

Page 14: ...mask or click Cancel to exit Click the Default button to revert back to default settings Use the Copy to button to apply all settings to the other cameras Don t forget to click Apply to save settings...

Page 15: ...s utilise 60Hz for their mains frequency OFF Anti flicker is turned off Exposure Mode This function determines how light or dark an image will appear on screen If there is very little light the image...

Page 16: ...toring Black White Select this for night time monitoring CDS This allows the image to be set by the camera s light sensor Backlight Compensate for differences between dark and light objects OFF The ba...

Page 17: ...mera is connected to then change the resolution to 1080P Frame Rate fps For Main Stream the default frame rate is 25fps PAL and 30fps NTSC For Sub stream the default frame rate is 6fps PAL and 7fps NT...

Page 18: ...nable an audio warning to send an email and to trigger other cameras when motion is detected Click the Default button to revert back to default settings Use the Copy to button to apply all settings to...

Page 19: ...de of these zones will not be detected 1 Right click the mouse to access the sub menu then click Delete All 2 Click and drag to select the area that you want to create a zone for Multiple zones can be...

Page 20: ...n to revert back to default settings Don t forget to click Apply to save settings Click Cancel to exit Right click the mouse to exit the Menu Bydefault aMotionDe tection alarm schedule has been enable...

Page 21: ...or back door so it s advisable to place the cameras near those areas 4 When installing cameras outside it s important to keep your front and backyard well lit for ideal night vision and the ability t...

Page 22: ...nd to send an email Click the Default button to revert back to default settings Use the Copy to button to apply all settings to the other cameras Don t forget to click Apply to save settings Right cli...

Page 23: ...r 06 00 a m to 06 00 p m Sunday to Saturday Using the mouse click on a particular square or section to change Click the Default button to revert back to default settings Don t forget to click Apply to...

Page 24: ...on what the camera is focused on if you find the image is out of focus give the Zoom Out button a quick tap to refocus Zoom Out Click this to zoom out of the scene You can click and hold to do a conti...

Page 25: ...are available in the Re cording menu From here you can access and change the re cording schedule for each cam era connected as well as how the NVR will record video to the hard drive You can also ena...

Page 26: ...o monitor what is being recorded the NVR s audio output has to be enabled see page 41 for more information Click the Default button to revert back to default settings Use the Copy to button to apply a...

Page 27: ...t most day to day situations but you can change according to your needs Pack Duration This instructs the NVR to split the recording into dis crete units Even though the recording is broken up into sep...

Page 28: ...Saturday Using the mouse you can click on a particular square or section to change or select the de sired recording mode Normal Motion or None then click and drag the mouse over the squares correspond...

Page 29: ...ly recorded vide os that are stored on the NVR s hard drive You have the choice of playing video that matches your recording schedule man ual recordings or motion events only The Backup function gives...

Page 30: ...earch criteria see page 31 for more information Detail Clicking this option will give you an overview of video recorded on a particular day for a particular month for each video input on the NVR You c...

Page 31: ...3 Copy Click this to save to a USB storage de vice such as a flash drive 4 Fast Rewind Click this to play backwards Click a number of times to increase speed 5 Play Click to play 6 Pause Single Frame...

Page 32: ...ill dis play full screen and the zoom controls will ap pear on screen From left to right here are the descriptions for each button Zoom In Click this to zoom into the video Keep clicking to zoom furth...

Page 33: ...start date and time End Time Select your end date and time 1 Click Search to display a list of videos matching your search criteria 2 Select a video then click Play You have the choice of selecting o...

Page 34: ...heckbox next to the CH heading then click the checkbox next to the video that you want to backup 3 You can also click Play to check that the video you have selected is the one that you want to backup...

Page 35: ...configured and how it operates Some of the options such as screen resolution time zone emailconfiguration pass word creation and Daylight Sav ing Time are configured during the Setup Wizard so they wo...

Page 36: ...system time and date if required Enable Password Enable this for added security when accessing the Menu Auto Lock Time You can change this to alter the time the NVR will exit the Menu when idle Device...

Page 37: ...e note the Administrator cannot be deleted Modify Modify an existing user s password Click the Permission but ton to modify configuration and operation permissions see above right example Please note...

Page 38: ...he Upgrade but ton to proceed then follow the on screen instructions Upgrade IPC From USB Click this to upgrade the camera s firmware from a local source such as a USB flash drive see above right scre...

Page 39: ...ired to your email account not available for Net Disconnected IP Con flict Show Exception Click the checkbox to display a message on screen for the exception type you have selected Push Click the chec...

Page 40: ...l be listed here for selection Init Click the checkbox next to the hard drive that you want to format then click this button Please note formatting the hard drive will re move all information that is...

Page 41: ...e top bottom left and right border if nec essary for your HDTV or monitor Audio Click the checkbox to enable audio monitoring in Live View mode If you are using the VGA connection for display audio mo...

Page 42: ...egated based on a network configuration A typical address might be 255 255 255 0 or something similar Default Gateway This allows the NVR to connect to the Internet This is typically the same IP addre...

Page 43: ...s the port that the NVR will use to send information through The default number will work in most situations HTTP Port This port is used to log into the NVR from a remote location UPNP enable This opt...

Page 44: ...have been selected for the NVR to function Each action that the NVR performs as well as events detected are logged which you can search and view If you call our helpdesk for assistance our staff may...

Page 45: ...the major type selected you have various options to choose from Start Time Select your start date and time End Time Select your end date and time Search Click this to commence the search The logs mat...

Page 46: ...46 Network Status Displays the current network settings provided by your network Right click the mouse to exit the Menu...

Page 47: ...47 Device S M A R T Displays technical and performance information about the hard drive selected Right click the mouse to exit the Menu...

Page 48: ...48 System System Information Displays technical information about the NVR Right click the mouse to exit the Menu...

Page 49: ...n The warranty does not cover any incidental accidental or consequential damages arising from the use of or the inability to use this product Any costs associated with the fitting or removal of this p...

Page 50: ...nical Support E mail tech swann com Telephone Helpdesk USA Toll Free 1 800 627 2799 USA Parts Warranty 1 800 627 2799 M F 9am 5pm US PT AUSTRALIA 1800 788 210 NEW ZEALAND Toll Free 0800 479 266 UK 080...

Reviews: