


Congratulations on your purchase of the DVR4-5600!
You’ve chosen a versatile, powerful and great value security monitoring and
recording solution for your home or business. Let’s just take a moment to talk
about some of the great features that the DVR4-5600 offers and some of the
things to think about before installing the system.
4 Channel Monitoring and Recording
The DVR4-5600 can monitor and record four channels simultaneously. You can
confi gure the recording modes for the four channels quite independently – for
example, you could have two channels recording on a schedule, one recording
constantly and one armed to record on motion. Or any other combination you can
think of!
Powerful H.264 Compression
The advanced video codec used by the DVR4-5600, called H.264, offers high
quality video fi les at a fraction of the size of older video codecs such as MPEG-2
or similar. Basically, this means you can get store more footage on the DVR’s hard
drive, and that the quality of that footage can be signifi cantly higher than many
older video formats. H.264 has been engineered to provide the highest level of
data compression possible (saving space on your hard drive) whilst maintaining a
high image quality.
Powerful Networking and Remote Access Features
The DVR4-5600 features an Ethernet port, which can be used to connect the
DVR to your home network. With the addition of a high-speed Internet service,
this allows you to remotely access the DVR from any high-speed Internet terminal
on Earth! If that isn’t convenient enough, the DVR also features mobile device
support, allowing you to connect to it from a device running
Microsoft Windows
Mobile
®
(version 6 or later) as well as the increasingly popular
iPhone
.
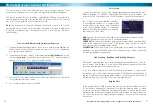
All-In-One Monitoring Solution
The DVR4-5600 features an incorporated high defi nition 19” LCD monitor. This
will let you display images from your cameras at a massive resolution of 1280 x
1024, which is about four times the resolution of a standard television! On top
of that, there are fewer plugs and cables to worry about, saving you time, energy
and space.
6
Overview
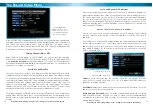
Installing/Changing the HDD
Note:
the following instructions are
for installing or changing the hard
drive. If your DVR already has a hard
drive pre-installed, and you don’t want
to change it, disregard these steps.
Ensure the DVR is switched off
1.
and unplugged from mains
power.
Unlock the hard drive keylock,
2.
located immediately below the
hard drive caddy.
Remove the hard drive caddy.
3.
To open the hard drive caddy,
4.
slide the top off in the direction
indicated.
Remove the screws holding the
5.
hard drive in the caddy. There
are screws on both sides.
To disconnect the hard drive
6.
from the caddy, slide it forward.
If replacing the hard drive, put the
7.
new hard drive into the caddy. Slide
it towards the back to connect the
SATA and power connections.
Screw in the hard drive to chassis
8.
as in step 5, and replace the top
of the caddy as in step 4.
Insert the caddy onto the DVR.
9.
Lock the caddy in place.
10.
63
3
4
5
6


