


8
Photo and Video Recording
Let’s face it - you probably bought this helicopter because
OMG, IT HAS A CAMERA IN IT, OMG,
I WANTS IT
(or “
Oh, that’s a neat feature, it’s got a camera... I think I’ll purchase it
” if you don’t get
quite as worked up about these things as we do). So, in order that you can be the cool guy/girl
you always knew you were, here’s how to operate the camera.
Starting/Stopping Recording
The right shoulder button starts recording, and also stops recording. Yep, one button. How
easy is that?
The camera will only start or stop recording while the helicopter is in fl ight.
This is because we put a fail-safe system in it:
the helicopter
won’t respond to any commands while stopped idle on
the ground
(except increasing throttle). This is the case to
prevent any weird or unusual activity while the helicopter is
idle if, say, the controller is bumped, or someone uses another
IR remote control in the vicinity which happens to interfere.
Aiming the Camera (shown above)
The lens of the camera can pivot up and down, depending on what you want to shoot.
Detaching/Attaching the Camera (shown to the right)
You can remove the camera by gently sliding it backwards
(towards the tail rotor). It’s held in place by two clips, which
attach/detach when slid forward or back, respectively.
Arrows indicate direction to
attach
the camera.
Inserting a microSD card
Hold the helicopter upside down, so that the underside of the camera is facing up. The
microSD card slot is on the side of the camera unit.
Orient the microSD card so that the text is facing up. Gently insert it into the microSD card slot.
To remove a microSD card, push it in momentarily - it will spring back out. Be careful - the
microSD card can spring back out with surprising speed... and microSD cards are easy to lose!
Connecting to a Computer
You can easily transfer data (a fancy, computer term for “your videos”) off the microSD card by
plugging the big end of the included USB-to-camera cable into a USB port on your computer,
and the little end into the USB socket on the rear of the camera.
It’ll pop up on your computer in the same way that USB fl ash drives do.
Note that the helicopter will not be recharged via the camera cable - only the yellow
USB cable connected to the charging socket will actually charge the internal battery.
The fi le structure looks something like this:
Root ---> IMAGES
---> DCIMG
---> Your
Photos
VIDEO
--->
DVREC
--->
Your Videos
The videos are stored as FILE TYPE, and can be played back by most media players. If you’re
having trouble, we recommend VLC media player - it’s free, and can be downloaded from
www.videolan.org/vlc
.
The Camera
5
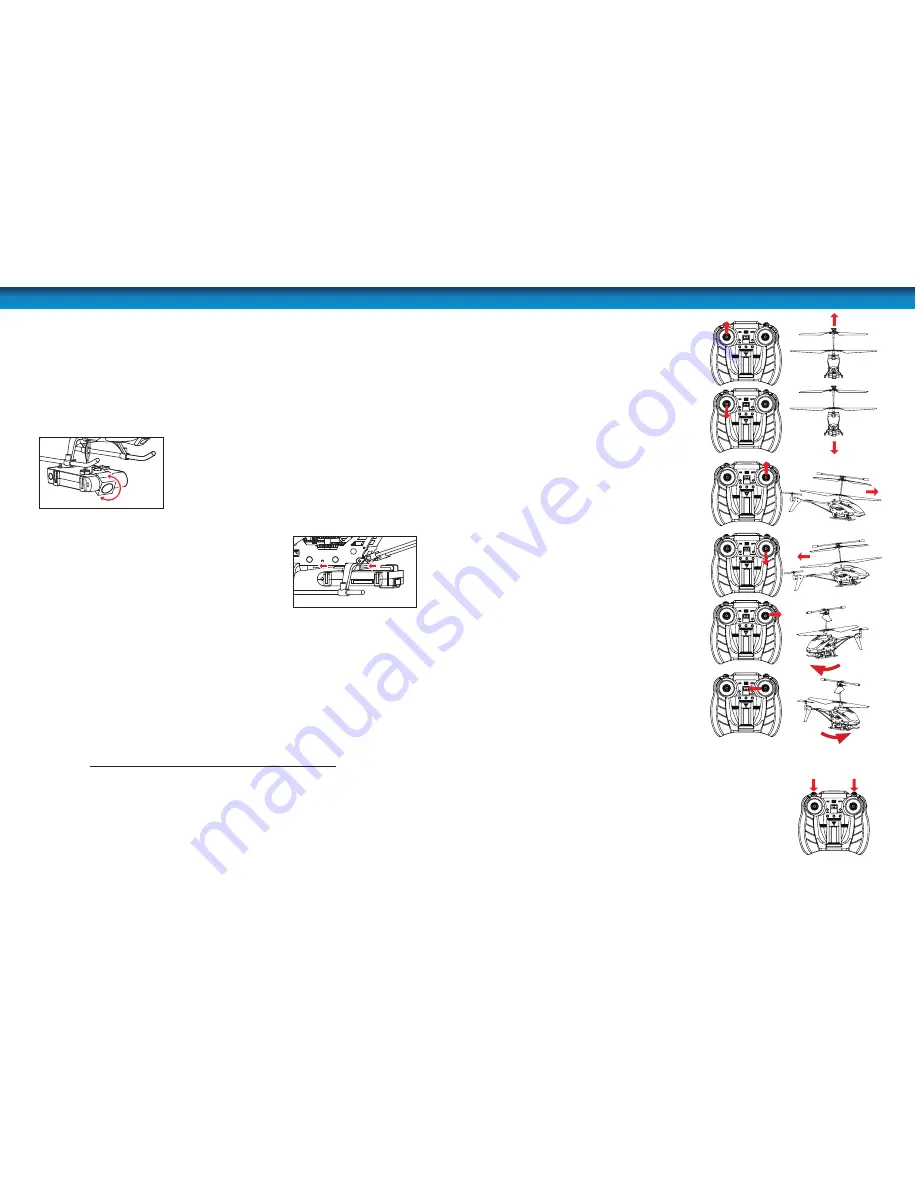
Control
Forward, Backwards
The right stick (the rudder) on the controller aff ects
the helicopter’s direction, kind of like the right stick
on a video game controller.
Forwards
: Pushing the right stick up will pitch
the nose of the helicopter down and move the
helicopter forward.
Backwards
: Pulling the right stick down will
pitch the nose of the helicopter up and move the
helicopter backwards.
Up/Down (Ascend/Descend)
The height the helicopter fl ies is controlled by the
throttle which varies the speed of the spinning
rotors.
Ascend
: Push the throttle UP gently to increase
the spinning speed of the rotors and make the
helicopter ascend.
Descend
: Move the throttle DOWN to reduce
the speed of the spinning rotors and make the
helicopter descend.
To get good results, be gentle and subtle. Small
adjustments made slowly and carefully are the best
way to get the helicopter to fl y well.
Rotating the helicopter left and right
The rudder control can be used to turn the
helicopter to the left or right. When hovering,
this will make it rotate but when the helicopter is
in motion, this can be used to perform tricks like
spiralling to the left or right.
Rotate/Turn Right
: To make the helicopter turn
to the right, push the right stick (the rudder) to the
right.
Rotate/Turn Left
: To make the helicopter turn to
the left, push the right stick (the rudder) to the left.
Operating the Camera
The video camera is controlled by the
right shoulder button
. The
camera can only be switched ON or OFF
while the helicopter is in fl ight
.
The
left shoulder button
will activate the camera momentarily, taking
a still photograph.
The camera will continue to record (if already set to ON while the
helicopter is in fl ight) if you land and sit idle. Recording cannot be
stopped while the helicopter is on the ground.
Simply apply a small amount of throttle (gently!) and then press the
button if you want recording to start/stop. For more about the camera,
see
“The Camera” on page 8
.
Photo Video


