background image

SWAGTRON

TM

 SWAGdRONe

TM

 4-UP Racing Quadcopter Goggle Quick Start Guide

9

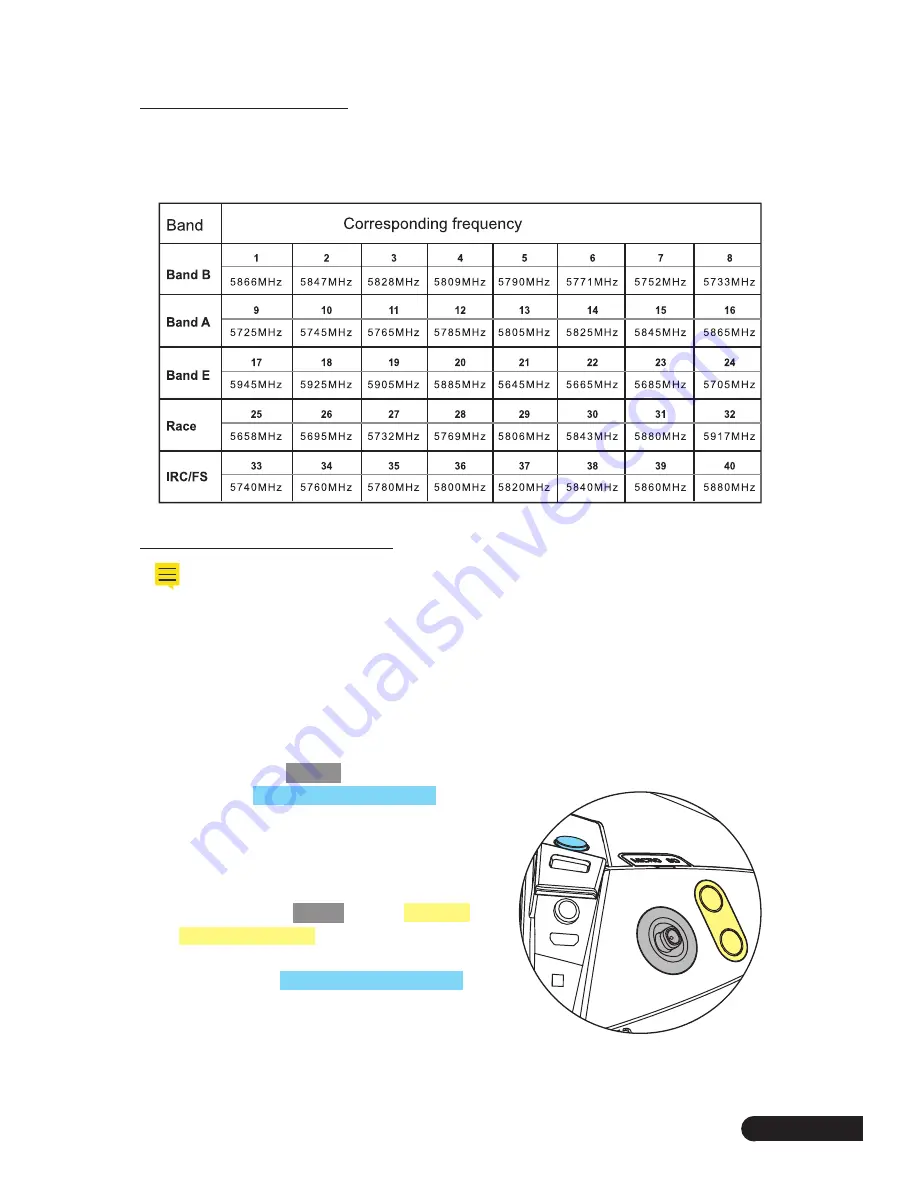
8.0 Band & Channel Table

This equipment comes with 5 bands and 40 channels for option. Please select and use the 
channel according to your usage needs.

9.0 Receiving 5.8 Transmission

* Images can be received only when the 5.8G receiving channel is consistent 

with 5.8G transmitting channel.

* Refer to Section 8 to check 5.8G receiving channel info.

* When the 4-UP’s screen flashes “Batt: 7.2V”, recharge it.

1. Use the Power Switch to turn the 4-UP on.
2. Long-press the 

CF Key

 for 3~5 seconds 

then press 

Receiver Module Button

 to 

turn on the receiver module. The 4-UP 
will automatically search for channels 
transmitting 5.8G images. If the search is 
unsuccessful, try again or move to step 3.

3. Quick-press the 

CF Key

, use the 

Channel 

Selection Buttons

 to manually select the 

appropriate 5.8G receiving channel, and 
then press the 

Receiver Module Button

 to 

turn the module on. 

5.8G Antenna A

5.8G Antenna B

5V Power Cable

Summary of Contents for SWAGDRONE 4-UP

Page 1: ...QUICK START GUIDE SAVE THIS GUIDE FOR FUTURE USE www SWAGTRON com 4 UP...

Page 2: ......

Page 3: ...visuals of a VR headset and tops it off with an extra bit of swag To ensure your safety and the safety of others please read and follow the guidelines in this User Manual carefully and thoroughly bef...

Page 4: ...ons 7 7 0 Setting Up the Goggles 8 8 0 Band Channel Table 9 9 0 Receiving 5 8 Transmission 9 10 0 Brightness Chroma Contrast Adjustment 10 11 0 AV Input Output Function 10 12 0 Troubleshooting 11 13 0...

Page 5: ...or product damage please don t let the product come into contact with water or any other type of liquid or objects filled with any type of liquid Please avoid dropping the product shaking the product...

Page 6: ...8G Antenna A 5V Power Cable Charger User Manual 5 8G Antenna B QUICK START GUIDE SAVE THIS GUIDE FOR FUTURE USE www SWAGTRON com 4 UP 1 5 8G Antenna A 2 5 8G Antenna B 3 Receiver Module Switch 4 AV O...

Page 7: ...e 4 UP has a low voltage it must be recharged 1 Plug the Charger into a suitable wall outlet 100 240V 50 60Hz 2 Insert the Charger plug DC 9V 18V into the 4 UP s Charger Socket 8 Charging Indicator Li...

Page 8: ...t are subject to extreme temperature fluctuations 7 0 Setting Up the Goggles 1 Install both 5 8G Antennas on top of the 4 UP 2 Plug the 5V Power Cable into 5V Output Port and 5V Input Port Red LED Lig...

Page 9: ...to Section 8 to check 5 8G receiving channel info When the 4 UP s screen flashes Batt 7 2V recharge it 1 Use the Power Switch to turn the 4 UP on 2 Long press the CF Key for 3 5 seconds then press Rec...

Page 10: ...n and black arrows in the adjacent image Reset Open the menu by moving the key back see the blue arrow in the adjacent image Press the CF Key to confirm Gradually adjust according to the image and des...

Page 11: ...Ensure all cables are properly connected and all plugs are fully inserted 5 Ensure all antennas from the 4 UP and the transmitter if using one are properly installed and extended Image quality is poor...

Page 12: ...roduct for any purpose other than described in this user manual 13 2 Disposal at End of Life This product must not be disposed of by incineration landfilling or mixing with household trash Improper di...

Page 13: ...an experienced radio TV technician for help 14 0 Warranty One Year Limited Hardware Warranty Your SWAGTRON 4 UP Product includes a One Year Limited Hardware Warranty Warranty The Warranty covers produ...

Page 14: ...e Product will void this Warranty Only SWAGTRON or a party expressly authorized by SWAGTRON should perform service on this Product DISCLAIMER OF WARRANTY THE REMEDIES DESCRIBED ABOVE ARE YOUR SOLE AND...

Page 15: ......

Page 16: ...SWAGTRONTM SwagdroneTM 4 UPRacing Quadcotper Goggle Quick Start Guide 16...

Reviews: