background image

Set-­‐Up   and   Installation   

Step   1:   Download   the   Software   

Each   ATR201   ships   with   an   auto-­‐IP   address   in   the   range   of   169.254.xxx.xxx   with   netmask   255.255.0.0.   Please   

download   SVSi’s   Conductor   NetLite   configuration   software,   free-­‐of-­‐charge   from   the   

Resources

   page.   

The   host   machine   running   Conductor   NetLite   must   have   a   unique   169.254.xxx.xxx   IP   address   assigned   to   its   

network   interface   connection   to   be   able   to   auto-­‐discover   and   communicate   with   the   ATR201.   After   discovery,   

a   static   IP   address   can   be   assigned   or   a   DHCP   server   used   to   define   the   unit’s   IP   address.   Audio   streams   can   be   

assigned   to   your   device   through   NetLite   or   SVSi’s   Conductor   VDC108   or   VDC208   hardware   controller.   

The   ATR201   does   not   ship   with   a   wall-­‐wart   power   supply   since   it   is   capable   of   POE   power.   Please   contact   your   

local   reseller   if   POE   is   not   available   and   an   external   power   supply   is   required.   

Step   2:   Install   the   software   

After   the   download   completes,   double-­‐click   the   downloaded   file   to   start   the   installation.   Follow   the   prompts   

to   install   NetLite   and   associated   Add-­‐Ons.   

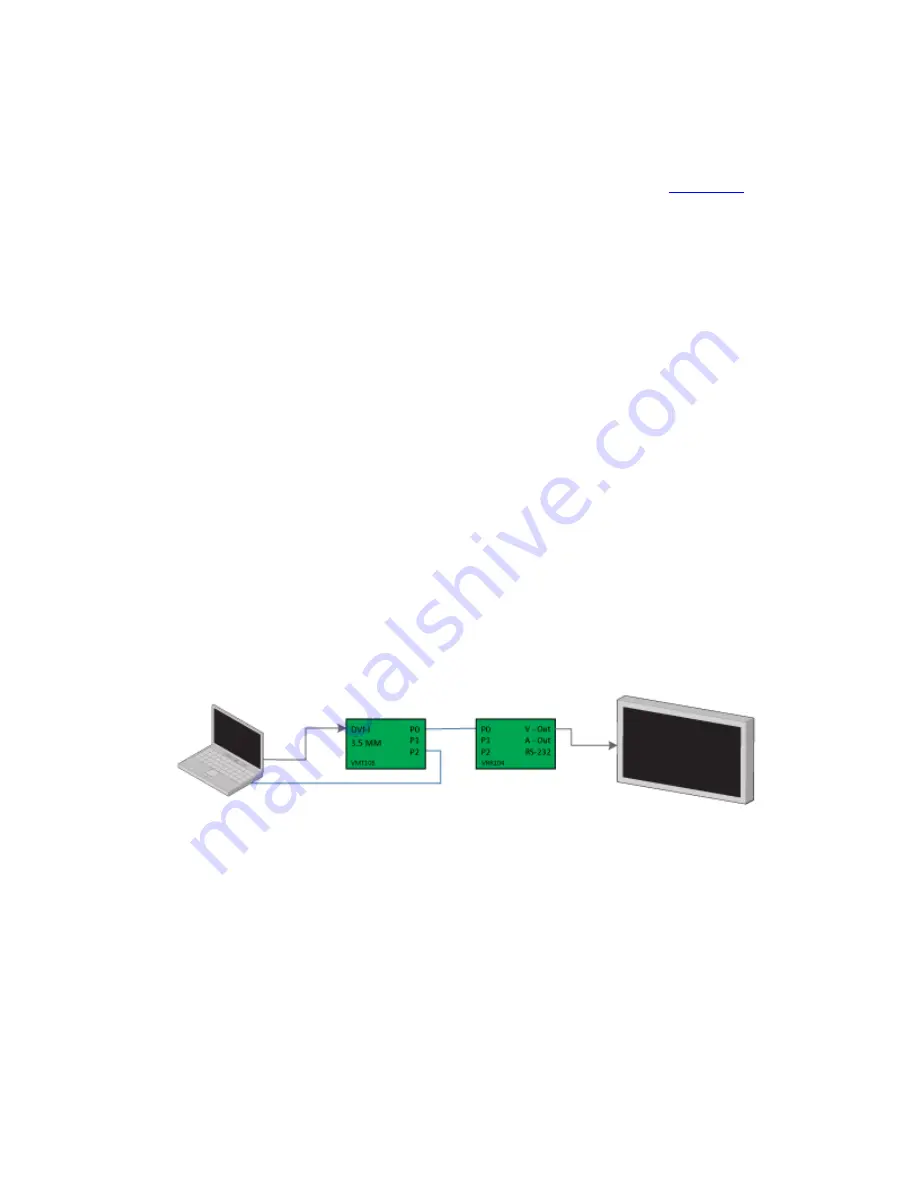
Step   3:   Wire   your   Devices   together   

Follow   the   below   wiring   diagram   during   initial   setup   to   insure   first   time   success.   You   can   add   additional   

devices   to   what   is   shown   on   the   diagram,   or   include   a   switch.   However,   if   the   switch   is   improperly   configured   

for   SVSi   products,   problems   can   occur.   If   you   have   a   pre-­‐configured   switch   from   SVSi,   simply   attach   your   

devices.   

Add   your   computer   into   the   network   either   via   a   port   on   the   switch,   or   by   attaching   to   one   of   the   SVSi   devices.   

Diagram:   Blue   –   Network,   Black   –   Video   


Step   4:   Configure   your   computers   IP   Address   

SVSi   equipment   comes   default   with   an   IP   Address   of   169.254.XX.XXX.   Your   computer   MUST   have   an   IP   Address   

in   a   similar   range.   To   do   this   in   Windows   7:   

1.


Open   network   and   sharing   center.   

2.


Choose   “Change   Adapter   Settings”   on   the   Left   hand   side   of   the   screen.   

3.


Locate   the   appropriate   adaptor   in   your   list,   and   go   to   it’s   properties   (right-­‐click,   Properties)   

4.


Choose   TCP/IPv4   and   Select   Properties.   

5.


Select   “Use   the   following   IP   Address”   

Summary of Contents for ATR-201

Page 1: ...One Ethernet port is POE for use with a POE switch eliminating the need for an external power supply An audio matrix with any number of inputs and outputs can be constructed with the ATR201 Since control is the same as for voLANte s video matrix video and audio matrices can be combined and routed using the same controller for the ultimate in digital media distribution Technical Specifications Audi...

Page 2: ... Gigabit Ethernet Switch Port 3 RJ 45 Auto Sensing Gigabit Ethernet Switch Port w POE 4 Power Supply Connector Power Supply Sold Separately Rear of ATR 201 5 LED Indicator Lights 6 Input Phoenix Connector 5 pin 7 Output Phoenix Connector 5 pin 8 Headphone Jack ...

Page 3: ...Application Examples ...

Page 4: ...ownload completes double click the downloaded file to start the installation Follow the prompts to install NetLite and associated Add Ons Step 3 Wire your Devices together Follow the below wiring diagram during initial setup to insure first time success You can add additional devices to what is shown on the diagram or include a switch However if the switch is improperly configured for SVSi product...

Page 5: ...Select All B Click on Add Selected and then Close You have successfully added your devices to your system Step 7 Organization and Setup of Devices 1 Close the System Admin Window and open the Matrix View 2 Starting with Transmitters in turn do the following A Double click the device s name to bring up the Properties B On the Basic Settings Tab i Change the Name to something friendlier I E Cable Bo...

Page 6: ...ame to bring up the Properties for each Receiver in turn and do the following i General Tab a Change the Name of the Device b Decide if you want to force Audio to Follow Video If this option is not set you can independently switch audio and video streams using advanced control options ii Serial Port a If using the on board RS 232 Port configure your port settings as needed Testing of RS 232 Comman...

Page 7: ...of still image files These can be used to display a slideshow to multiple receivers in a similar fashion to Live Play This will turn off the attached video sources video and begin playing back the slideshow B Live Play This is the video coming from the attached device C EmCast An Emergency Messaging system that can send message to all receivers in the network 2 Receivers A Local Play The same thin...

Page 8: ...blem 1 Try to search by MAC Address A Locate the sticker on the bottom of the device that has the mac address In the discovery window select find by Mac Address Enter the MAC address and search B If the device is found determine the units IP Address and if it has a different IP Address from the default you may need to change the computers IP address to be in the same range After changing the compu...

Page 9: ...nd decoder are set to LivePlay in software and not LocalPlay or HostPlay Verify that Power DVI and LAN lights on VRR104 are illuminated Display shows only black screen Verify that cable connecting encoder and decoder shows gigabit Ethernet connectivity with a 3 blink pattern on left LED on RJ 45 connector Verify that video source is not putting out a black screen by default If connected through a ...

Page 10: ... DiVAS VDC108 208 Conductor Server running on a dedicated Linux 2RU device with email notification and simplified ASCI control through serial or telnet 3 TCP IP control by any third party controller such as AMX Crestron Altinex Extron etc Control modules for AMX and Crestron controllers are available from SVSi s partner portal website Appendix C Using SVSi as a point to point video extender 1 Conn...

Page 11: ...I and de embedded analog audio from the dual RCA connectors Both embedded digital and de embedded analog audio signals can be accessed at the same time however audio over DVI is disabled by default and must be enabled in software before use The VRR204 supports only embedded digital audio over DVI Note when using a computer monitor as display audio over DVI must be disabled or image will be corrupt...

Reviews: