SCT020 User Guide
Index
1.Welcome
2.Features
3.Technical Specifications
4.System requirements
5.Content
6.Hardware
7.Installation
7.1 Driver installation for Smart card reader
7.2 Driver installation for DNIe
8.Multimedia keyboard
9.Keyboard
9.1 Key location
9.2 Special functions
9.3 Numeric pad
10.FAQs
11.Warning: Disposal of waste batteries
13
English
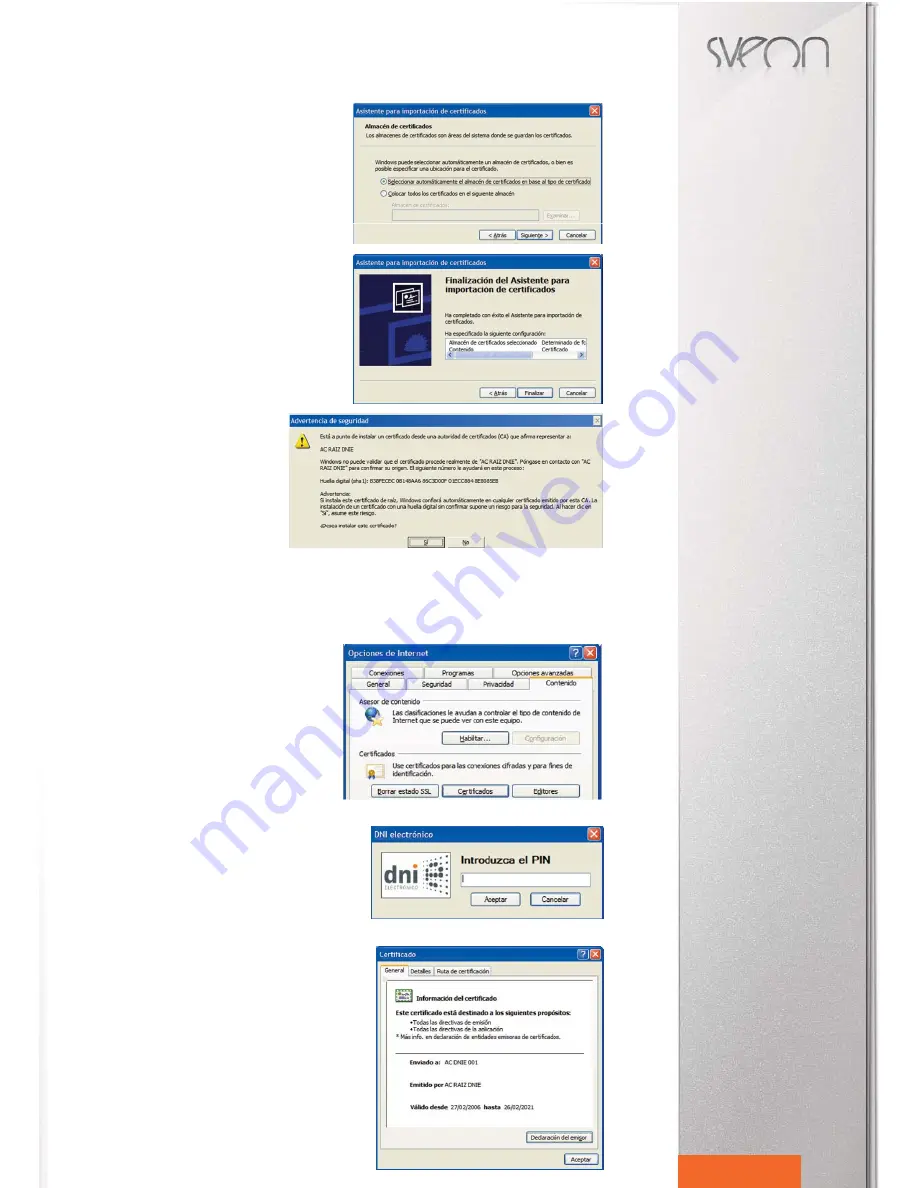
3. Click on “Next” to continue.
4. Click on “Finish”.
.
5. Select "Yes" to allow the installation of the
DNIe Root Authorization (AC RAIZ DNIE) in
your navigator. Thanks to this installation, the
certification could be properly done.
6. Click on “Ok”.
Verification of installation
If you want to verify that the installation process has been completed properly, you can access to any of the available ser-
vices you can find in http://www.dnielectronico.es/servicios_disponibles/.
You can also verify the installation in a manual mode, following the next steps (depending on the navigator softwares ins-
talled in your PC).
1. Internet Explorer
Step 1. Insert the DNIe in its slot and then go to “Tools” menu
/ Internet Options / Content / Certificates.
Step 2. If the CSP module is correctly installed (Certification Ser-
vice Provider), the DNIe PIN will be required.
Step 3. Once you write the correct PIN of your DNIe, you will be
able to see your certificates in “Personal” section, and “Certification
entities”:
- Certificate of Authentication
- Certificate of signature
Step 4. In the tab “Trusted Root Certification Authorities” you can
view the root certificate of AC RAIZ DNIe.
Step 5. If you have sucessfully completed the previous steps and
you can view your certificates, it means that the CSP module and
the Microsoft root certificate are properly installed.


