background image

ENG

3

6. MOUNTING AND INSTALLATION

• 

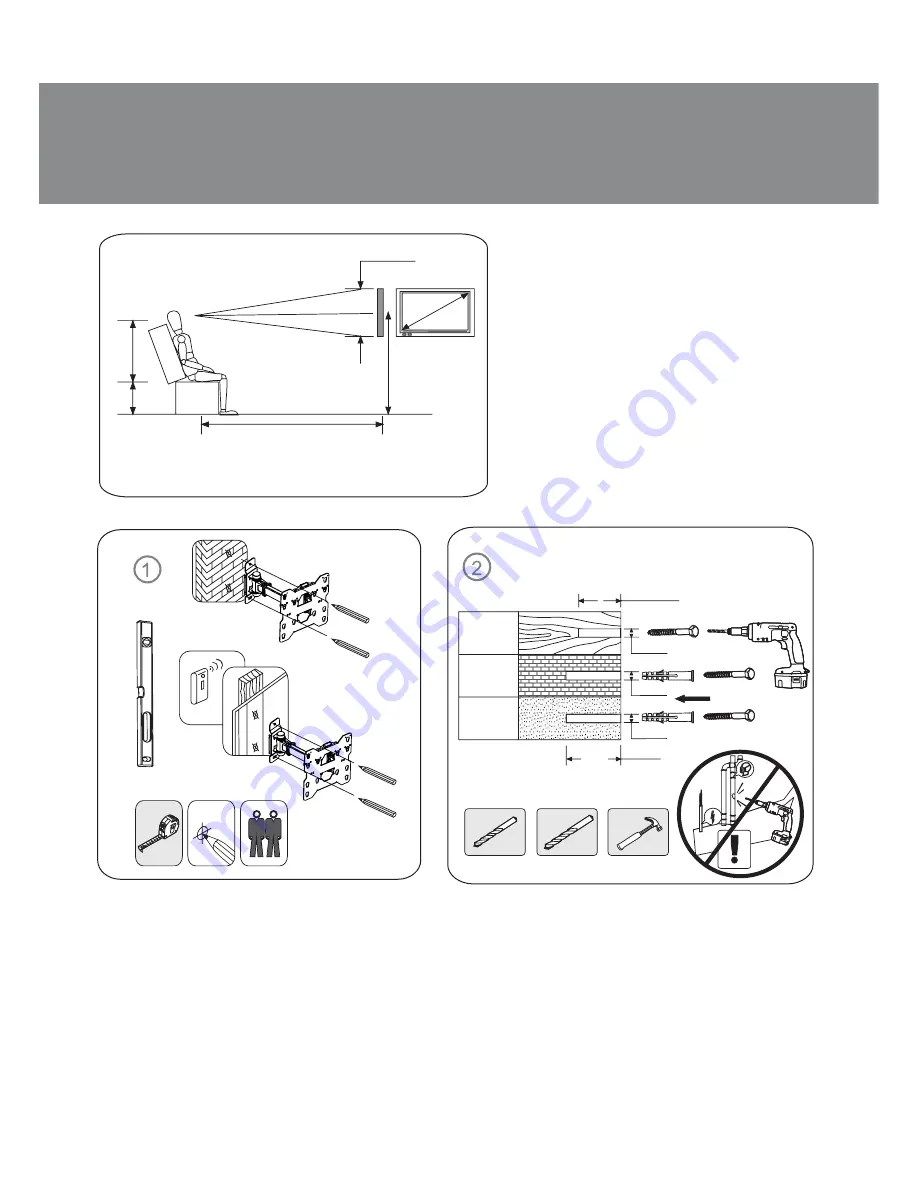
Choose a wall to hang your mount on. 

It’s recommended that the height

 H 

and  

the distance 

L

 from the viewer


be cal- 

culated according to the formulas in the 

fi

gures on the left.

• 

Then, place the mount against the wall 

and mark the spots where the holes 

should be drilled (see Fig. 

a

). In a wooden 

wall, drill two 

Ø

 5 mm and 30-40 mm deep 

holes; in a brick or concrete wall, drill 

Ø

 10 mm and 60 mm deep holes (Fig. 

b

). 

H

 = ?

b

Ø 5

Ø 5

Ø 10

30-40 mm

60 mm

Ø 10

Ø 10

Wooden

wall

Brick

wall

Concrete

wall

L

 = (3 ~ 5) 

a

H

 = 

c + d

L

c

d

a

C77-22

User’s Manual

Summary of Contents for C77-22

Page 1: ...USER S MANUAL www sven fi C77 22 Wall Mount for LED LCD TVs and Monitors ...

Page 2: ...or an organization for loss or damage which has arisen from the information contained in this Manual 1 BUYER RECOMMENDATIONS Unpack the device carefully Make sure there are no accessories left in the box Check up the device for damage if the product was damaged during transportation address the firm which carried out the delivery if the product functions incorrectly address the dealer at once Chec...

Page 3: ...en wall drill the holes as close as possible to the center of the board to provide secure support Fasten the screws until they are fixed Do not use electric tools for this purpose For safety reasons do not install the wall mount alone 4 SPECIAL FEATURES VESA 100 100 200 100 200 200 mm Diagonal compatibility 26 40 66 101 6 сm Level included 5 to 15 adjustable tilt angle Swivel angle 90 Easy install...

Page 4: ...as in the figures on the left Then place the mount against the wall and mark the spots where the holes should be drilled see Fig a In a wooden wall drill two Ø 5 mm and 30 40 mm deep holes in a brick or concrete wall drill Ø 10 mm and 60 mm deep holes Fig b H b Ø 5 Ø 5 Ø 10 30 40 mm 60 mm Ø 10 Ø 10 Wooden wall Brick wall Concrete wall L 3 5 a H c d L c d a C77 22 User s Manual ...

Page 5: ...ve plastic panels as shown in Fig e and hang your TV on the wall mount The security locks will snap shut Adjust the tilt and swivel angle as desired Run the wires through the guides on both sides of the mount as shown in Fig f For conve nience fasten them with cable ties 13 mm Max 1 5N M A B C D E F G H N I J K L I J K L O I J K L I J K L O Wall Mount for LED LCD TVs and Monitors ...

Page 6: ... strength polymer 7 TECHNICAL SPECIFICATIONS Notes Technical specifications given in this table are supplemental information and cannot give occasion to claims Technical specifications are subject to change without notice due to the improvement of SVEN production Ok Release the lock To unmount your TV release the security locks by pressing down on them see Fig g Lift your TV slightly and take the ...

Page 7: ...hiat Road 02 02 Singapore 427447 Produced under the control of Oy Sven Scandinavia Ltd 15 Kotolahdentie Kotka Finland 48310 Made in China Registered Trademark of Oy SVEN Scandinavia Ltd Finland Настенное крепление для LED LCD телевизоров и мониторов C77 22 Настенное крепление для LED LCD телевизоров и мониторов C77 22 Настенное крепление для LED LCD телевизоров и мониторов C77 22 Настенное креплен...

Reviews: