background image


Setup 

 
Each ModbusLink-S module in the network must have a unique node address. The address of the 
ModbusLink-S module must match that of the modbus Sensor connected to it. The ModbusLink-S can be 
configured to operate in Auto address mode or it can also be assigned a static address. The ModbusLink-M 
module does not need any address configuration. 
 
The ModbusLink module is shipped with an internal D-Cell battery that is used to power the radio and 
communications with a local modbus sensor (if connected).  To prevent damage, the internal battery is 
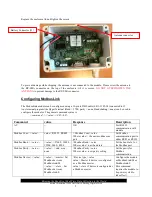
disconnected before shipping. Unscrew the lid and connect the battery connector to J5 as shown in the figure 
below. 

If,  using automatic Node address configuration(described below), ensure that the Modbus sensor is 

connected to the ModbusLink-S at power up

 . Also ensure that the modbus communication parameters like 

baud, parity etc of the sensor are the same as ModbusLink-S module. If the parameters are different from the 
default settings of the ModbusLink-S, refer to the Appendix for details on how to change the Modbus 
communication parameters. 
 
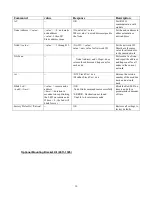
If configured to operate in the automatic address mode, The ModbusLink-S modules will automatically scan 
the RS232/RS485(based on configured port)  ports for a Modbus sensor, during the power up sequence. On 
receiving a response from the sensor, the ModbusLink-S Node sets it own address to that of Modbus sensor 
(If no sensor is found, the ModbusLink-S will retry after an hour.  If the automatic configuration is not 
desired, the ModbusLink-S node can be assigned a static address. The static address assigned to each node 
must be unique throughout the network 

and

 match the address of the local modbus sensor connected to it 


Summary of Contents for ModbusLink-M

Page 1: ...ModbusLink M ModbusLink S OPERATIONS MAINTENANCE MANUAL Part No 8800 1197 Revision 1 0 April 1 2013...

Page 2: ......

Page 3: ...on 6 Modbus Connections 6 ModbusLink Network basics 6 Setup 8 Configuring ModbusLink 9 Optional Mounting Bracket Kit 2911 1395 10 Quick Start Guide 12 Verifying Communication 12 6 Troubleshooting and...

Page 4: ...ensor directly it will try to discover a route to the destination via intermediate ModbusLink S modules Features 300 meters LOS range longer ranges possible via intermediate nodes mesh networking Very...

Page 5: ...tainer and visually inspect the unit for signs of damage during shipment Report any such damage to the factory immediately to ensure a prompt response and resolution Retain one shipping container in t...

Page 6: ...ogger sensor over RS 485 a 5 terminal connector is provided The module can also be provided external power via the 5 pin connector Please refer to Table 1 for a detailed description of the connector T...

Page 7: ...dbus over RS485 B Red 8 16v dc power input Black Power Ground Battery Connections The ModbusLink M S has an internal battery to power the unit however external power 8 16v dc can be applied to J3 If e...

Page 8: ...se of simplicity the Network ID can be represented by an imaginary physical wire connecting each ModbusLink module to other ModbusLink modules within radio range having an identical Network ID in a me...

Page 9: ...te Once a route has been established data can be sent through the route to the destination node Data messages are never broadcast to conserve power They are only addressed to a single node unicast whi...

Page 10: ...is connected to the ModbusLink S at power up Also ensure that the modbus communication parameters like baud parity etc of the sensor are the same as ModbusLink S module If the parameters are differen...

Page 11: ...lue CR LF Command value Response Description AT OK Test RS232 communication with module Modbus Com value value RS232 RS485 Modbus Com value Where value the new modbus com port Set Modbus communication...

Page 12: ...s returns the address and hop count for each node Performs a live Scan and report the address and hop count for all nodes in the current network ver NW Stack Ver x xx Modbus Stack Ver x xx Returns the...

Page 13: ...1 The optional mounting bracket kit provides an easy way to mount the ModbusLink modules to a 1 5 standard pipe The kit includes the mounting plates alignment bracket and u bolts hose clamps and screw...

Page 14: ...arity types To change the Network ID issue command NwID Network Id Power cycle the device Node Address config The ModbusLink S modules can be configured to operate in 2 address modes 1 Static address...

Page 15: ...of the Modbus sensor If using automatic address mode ensure that the Modbus sensor is powered and connected to the ModbusLink S module before powering it up Power cycle the ModbusLink S module Ensure...

Page 16: ...aud Rates 4800 9600 19200 38400 57600 Parity Odd Even None Mechanical Environmental Enclosure 5 x 4 x 2 NEMA rated enclosure Weight 400gms including battery Temperature 40C to 60C Power Input optional...

Page 17: ...th our Integrated Systems Division and Engineering Division for additional assistance Introductory Training Training is an important part of the Sutron Customer Service philosophy The Sutron training...

Page 18: ...shall pay transportation for the return of the repaired equipment to the customer when the validity of the damage claim has been established Otherwise Sutron will prepay shipment and bill the custome...

Reviews: