


When you run the SMR series for the first time, you need to go through the following steps within the
Quick Install Wizard after logging in.
1.Make sure the hard drives are inserted into the SMR case. Click
Next
to continue.
2. Click
Storage Manager
to do RAID configuration.
Logging into SMR
5
The VMS Client will prompt for the following information after the SMR system is powered on:
●
●
VMS/NVR:
The default IP address for the SMR Server, which is the local host.
●
Username:
The username of the domain,
which is always admin
.
●
Password:
The password of the domain.
Default password is admin.
●
Access Method:
Directly Access.
Type:
Choose VMS.
Click Login after the password is entered.
Access Method:
Port:
Type:
VMS/NVR:
Username:
Password:
Cancel
Login
Auto Login
admin
admin
Local Host - 127.0.0.1
VMS
Directly Access
Search
Install Wizard
6
Note:
(1)
Auto Login
is recommended to be ticked. (2) If you need to connect remote PC(s)
to the SMR server within a private LAN, please refer to
Port Forwarding
and
Start the VMS Client
section in SMR user manual for more details.
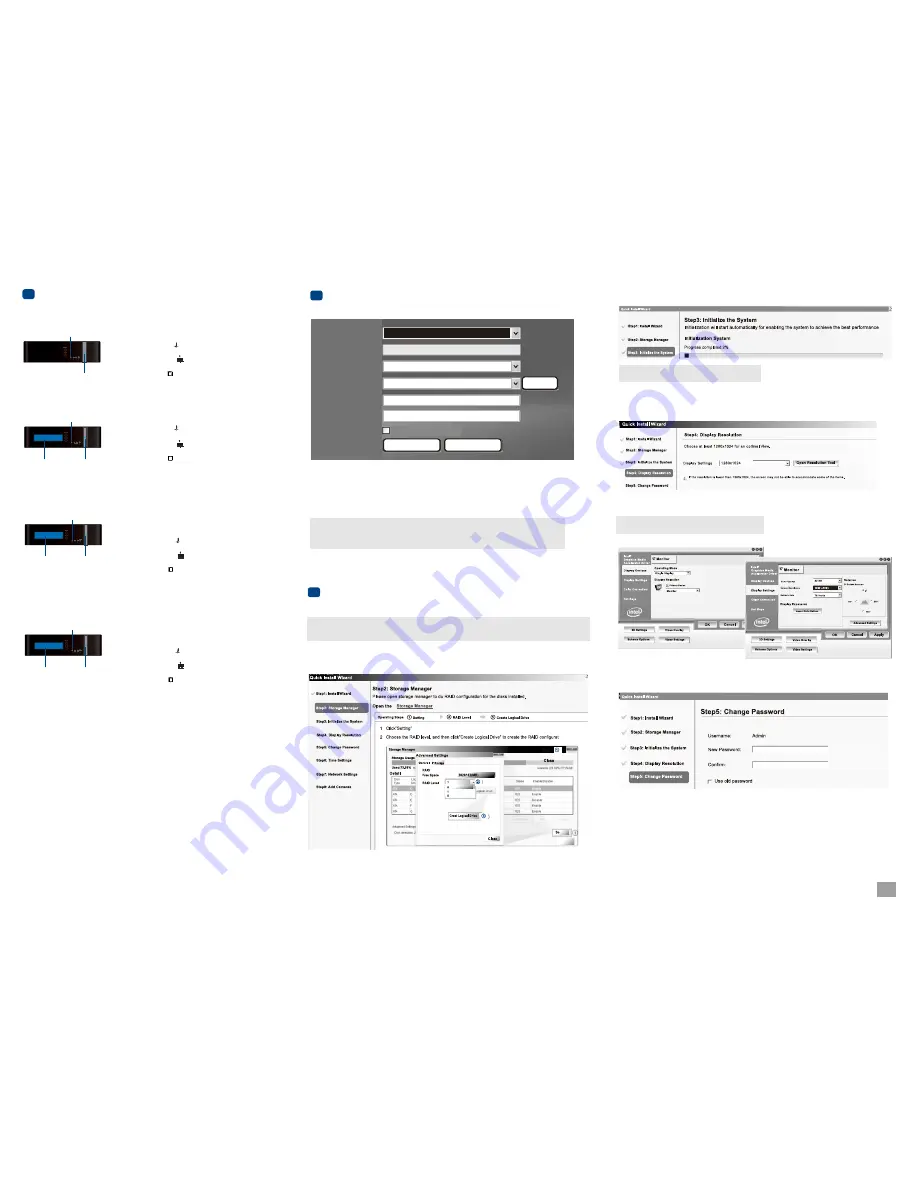
Click
Setting
, choose the RAID level in the
Advanced Settings
dialogue, and then click
Create Logical
Drive
to create the RAID configuration.
Please click
OK
after the configuration is done, and the system will reboot automatically.
About 2 minutes later, the Wizard window will appear again. Click
Next
to continue.
Note:
(1) If your monitor resolution is lower than 1280x1024, a warning message will jump out after SMR
starts up. You can change the resolution setting at this time. Then you can skip step 4 later.
3. System initialization will start.
The system will shut down after the initialization is done successfully. Please click
OK
.
Press the power switch to restart the system. About 1.5 minutes later, the Wizard window will pop up again.
4. Click
Open Resolution Tool
to change the resolution setting .
Choose
Single Display
as the operate mode and monitor as the display selection in
Primary Device
.
Change the screen resolution in Display Settings. Click
OK
to finish.
Click
Next
to continue.
5. The default password for SMR login is admin. If you want to change the password, please enter a new
one in both the blanks of
New Password
and
Confirm
.
/4
Note:
SMR6/8 bay models support dual display.
Note:
SMR8000 series will not go through step 3.
Powering
up
4
.
/4
2/3
2 Bay Models
1. Attach the power cable to the power socket on the rear panel.
2.
3. See if the system LED is blinking, which means that the system
is starting up.
4. See if the network LED has turned green, which indicates that
the power is on and network is connected.
5. See if the HDD LED is on, which means that the hard drive can
be accessed.
Press the power switch.
LED
Indicators
Power
Switch
LED
Indicators
LCD
Display
Power
Switch
1. Attach the power cable to the power socket on the rear panel.
2.
3. See if the system LED is blinking, which means that the system
is starting up.
4. See if the network LED has turned green, which indicates that
the power is on and network is connected.
5. See if the HDD LED is on, which means that the hard drive can
be accessed.
6. The Server name and the IP address will be shown on the LCD screen.
Press the power switch.
5 Bay Models
LED
Indicators
LCD
Display
Power
Switch
1. Attach the power cable to the power socket on the rear panel.
2. Make sure the safety switch on the rear panel is switched to the “-”
side, which means that it is turned on.
3.
4. See if the system LED is blinking, which means that the system
is starting up.
5. See if the network LED has turned green, which indicates that
the power is on and network is connected.
6. See if the HDD LED is on, which means that the hard drive can
be accessed.
7. The Server name and the IP address will be shown on the LCD screen.
Press the power switch.
6 Bay Models
LED
Indicators
LCD
Display
Power
Switch
1. Attach the power cable to the power socket on the rear panel.
2. Make sure the safety switch on the rear panel is switched to the “-”
side, which means that it is turned on.
3.
4. See if the system LED is blinking, which means that the system
is starting up.
5. See if the network LED has turned green, which indicates that
the power is on and network is connected.
6. See if the HDD LED is on, which means that the hard drive can
be accessed.
7. The Server name and the IP address will be shown on the LCD screen.
Press the power switch.
8 Bay Models
Summary of Contents for SMR Series
Page 4: ......


