Surveillix ESV16 Quick Installation Manual Download Page 22

22


ESV16


Quick


Installation


Guide


22 


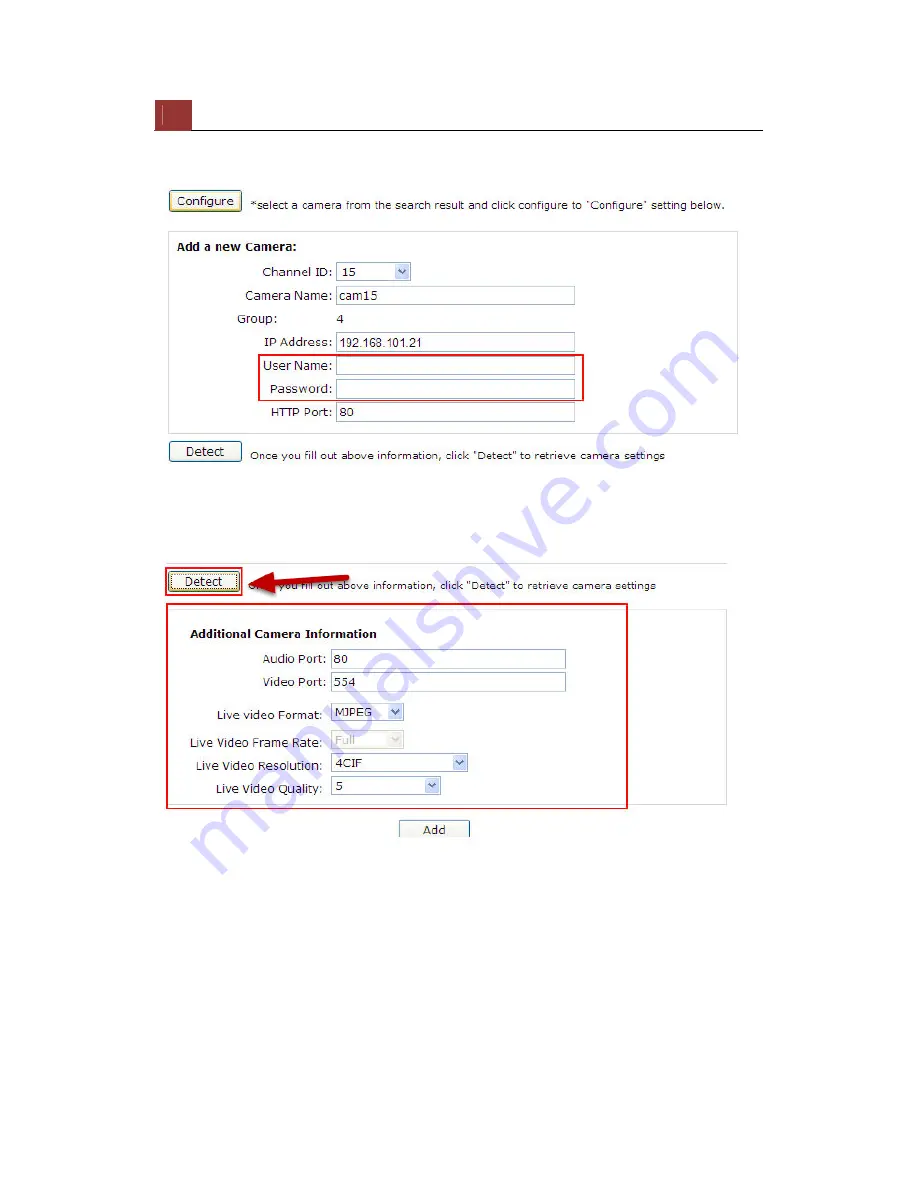
Its corresponding information should be displayed in the “Camera 
Information” section. Enter its username and password and select the 

channel ID and name the camera.


Click on “Detect” to establish connection between the recorder and the 

camera. If a connection is established successfully, the camera’s 
detailed information will be displayed as below.


Adjust its video format, frame rate, resolution or bitrate...etc if you 

wish and then click “Add” to finish adding the camera


Summary of Contents for ESV16

Page 1: ...Version 1 0 0 ESV16 Quick Installation Guide 16CH Network Video Recorder with Local Display...

Page 2: ...9 Camera Installation 20 Adding a Camera Automatic Search 20 Adding a camera manually 23 Refer to the user s manual PDF file contained in the CD ROM for settings operations and other information The a...

Page 3: ...use harmful interference to radio communications Operation of this equipment in a residential area is likely to cause harmful interference in which case the user will be required to correct the interf...

Page 4: ...pply before cleaning 6 Attachments Do not use attachments not recommended by the NVR manufacturer as they may pose safety risks 7 Water and Moisture Do not use this NVR near water Some examples are ne...

Page 5: ...overs may expose you to dangerous electrical or other hazards Refer all servicing to qualified service personnel 17 Damage Requiring Service Disconnect this NVR from the power supply and refer servici...

Page 6: ...harmless for any damages or losses incurred by the user in any of the following cases 1 Fire earthquake or any other act of God acts by third parties misuse by the user whether intentional or accident...

Page 7: ...failure could lead to injury to persons or loss of life or catastrophic property damage Accordingly Toshiba disclaims any and all liability arising out of the use of the product in any critical appli...

Page 8: ...8 ESV16 Quick Installation Guide 8 System Overview Front View Rear View...

Page 9: ...ESV16 Quick Installation Guide 9 9 LED Status...

Page 10: ...10 ESV16 Quick Installation Guide 10 Installation HDD Installation Release the HDD tray by pulling the lock to the right Pull the HDD tray out of the case...

Page 11: ...back to the case secure it with three flat head screws at the bottom of the tray NOTE Maximum capacity of each hard disk drive is 3TB Do not use hard disk drives with power saving functions such as I...

Page 12: ...12 ESV16 Quick Installation Guide 12 Push the tray door back to the case to secure it...

Page 13: ...VR Device Search Utility The NVR is placed in a network without DHCP server or you are connecting to it directly Access the NVR with its default IP Using NVR Device Search Utility If the NVR is placed...

Page 14: ...14 ESV16 Quick Installation Guide 14 To begin launch the NVR Device Search utility from the CD and proceed with the installation...

Page 15: ...ESV16 Quick Installation Guide 15 15 Once the installation is complete check the Launch the Search AP option and click Finish The search should start automatically and its status should be dis played...

Page 16: ...tallation Guide 16 The NVR should be located and its IP address should be displayed Double click on an NVR and the search program should automatically access the NVR s web administration page from you...

Page 17: ...ESV16 Quick Installation Guide 17 17 You will be prompted for the NVR s username and password Enter its default username admin and password admin and then click OK to enter the system...

Page 18: ...NVR will turn on its DHCP server function and act as the DHCP server in the network To connect to the NVR use a PC that is on the same network over a switch or hub or connect the PC directly to the N...

Page 19: ...SV16 Quick Installation Guide 19 19 Again you should be prompted for the username and password Enter its default username admin and password admin and then click OK to enter the system Set up Password...

Page 20: ...ord of the admin account go to Setup System Con figurations User Account click on the admin account in the account list then press the edit button to change its password Finally click Apply to save th...

Page 21: ...tall Active Control component in order for the search to function properly Go ahead and click Install After that the search should begin and its status should be displayed Found cameras should be list...

Page 22: ...rd and select the channel ID and name the camera Click on Detect to establish connection between the recorder and the camera If a connection is established successfully the camera s detailed informati...

Page 23: ...stallation Guide 23 23 Adding a camera manually Simply follow the instruction described above but instead of using the Search function enter the camera s IP address and credential in the Camera Inform...

Reviews: