


17
Fig. 10
Plug Surface aligned with Valve
Fig. 11
Socket Surface aligned with Valve
⑤
Before starting operation, perform the conduct leakage
inspections to check that no abnormality can be detected.
・
You are recommended to perform the conduct leakage inspections
in two different stages, low-pressure [20 - 30k Pa (2.9 - 4.3 psi)]
condition and high-pressure condition [400k Pa (58.0 psi)].
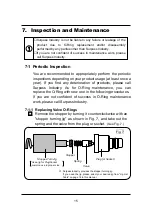
7-1-2 Replacing Plug-Seal O-Rings
①
Remove the plug-seal O-Ring by sticking it with O-Ring
detaching jig.
(See Fig. 12.)
Fig. 12
Surface-A
Surface-Alignment
Checking Jig
Use a jig for Plug/Socket
common use in proper size.
※
Surpass Industry provides the surface-alignment checking jig in different sizes.
If you need the jig, please select your desired jig from "Jig List Table" on page 18 in
this manual.
・
Do not give a scratch
on the O-Ring groove
of valve.
※
Surpass Industry provides the O-Ring detaching jig.
If you need the jig, please select the "O-Ring
detaching jig Q030-003."
Plug-Seal O-Ring
O-Ring Detaching Jig
For socket, check that
surface-B of surface-alignment
checking jig can be aligned
with surface-C of sleeve to
inspect that surface-A of
socket can be aligned with the
valve.
Surface-A
Surface-B of Surface
Alignment Jig
Surface-C of
Sleeve
Surface-Alignment
Checking Jig
Summary of Contents for QCH-F
Page 21: ...21 memo...


