background image

Chapter 2: Server Installation

2-7

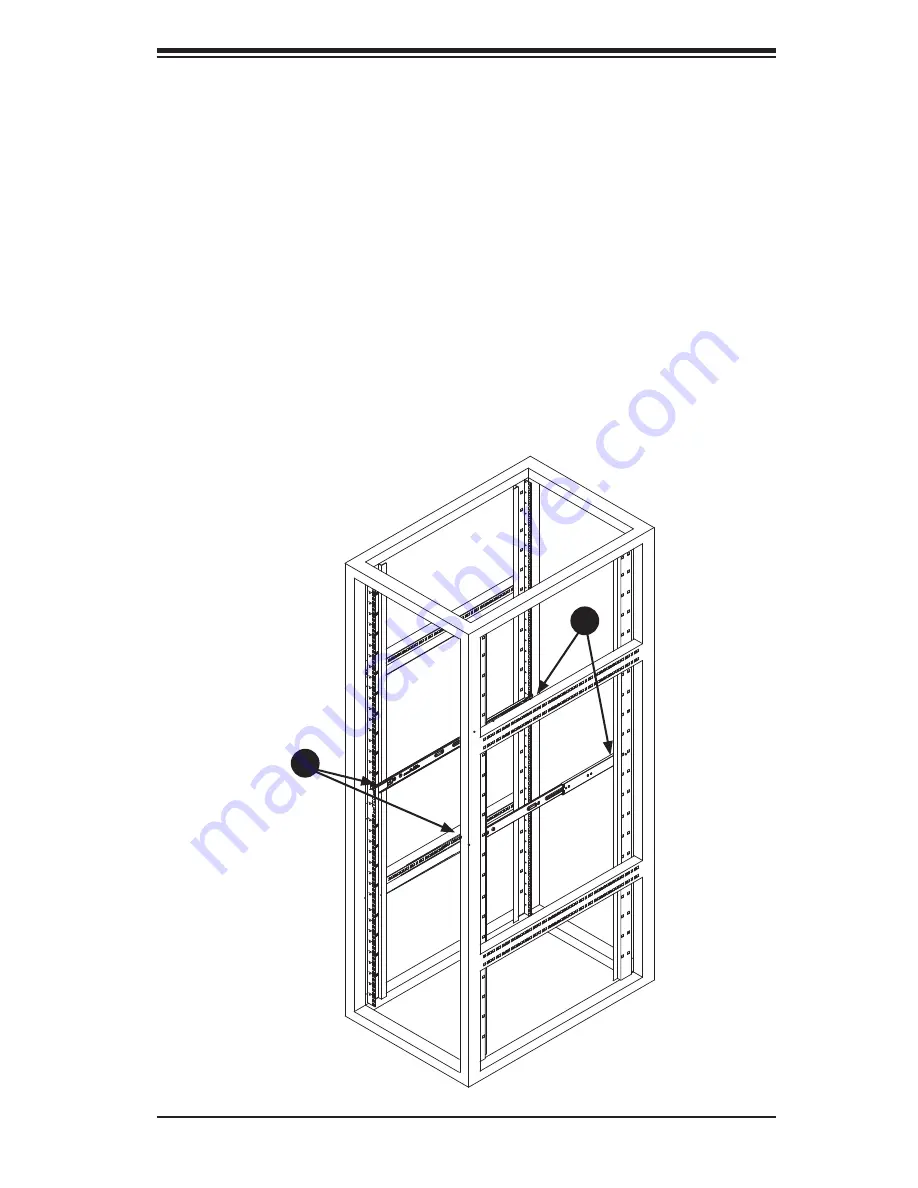
Figure 2-4. Installing the Outer Rails to the Rack

Installing the Outer Rails onto the Rack

Outer Rail Installation

1.  Adjust the outer rails to the proper length so that the outer rail fi ts snugly 

within the rack.

2.  Align the holes on the front of the outer rail, with the holes on the front of the 

rack (C) and secure with the screws provided. 

3.  Align the holes on the rear of the outer rail to the holes on the rack (D) and 

secure with the screws provided. 

4.  Repeat the procedure with the second outer rail assembly.

1

C

1

D

Summary of Contents for SuperServer 5017GR-TF

Page 1: ...SUPER SUPERSERVER 5017GR TF USER S MANUAL Revision 1 0...

Page 2: ...f any such disputes Super Micro s total liability for all claims will not exceed the price paid for the hardware product FCC Statement This equipment has been tested and found to comply with the limit...

Page 3: ...res of the Super X9SRG F motherboard and the SC818G 1K43B chassis Chapter 2 Server Installation This chapter describes the steps necessary to install the system into a rack and check out the server co...

Page 4: ...erboard Chapter 6 Advanced Chassis Setup Refer to Chapter 6 for detailed information on the SC818G 1K43B 1U rackmount server chassis You should follow the procedures given in this chapter when install...

Page 5: ...v Preface Notes...

Page 6: ...view 2 1 2 2 Unpacking the System 2 1 2 3 Preparing for Setup 2 1 Choosing a Setup Location 2 1 Rack Precautions 2 2 Server Precautions 2 2 Rack Mounting Considerations 2 3 Ambient Operating Temperatu...

Page 7: ...4 Chapter 5 Advanced Motherboard Setup 5 1 Handling the Motherboard 5 1 Precautions 5 1 Unpacking 5 1 5 2 Connecting Cables 5 2 Connecting Data Cables 5 2 Connecting Power Cables 5 2 Connecting the C...

Page 8: ...nstalling the Air Shroud 6 8 Checking the Air Flow 6 8 6 6 Power Supply 6 9 Power Supply Failure 6 9 Chapter 7 BIOS 7 1 Introduction 7 1 Starting BIOS Setup Utility 7 1 How To Change the Configuration...

Page 9: ...4 cm counter rotating fans FAN 0117L4 Four 4 cm fans FAN 0102L4 One air shroud MCP 310 81801 0B One passive CPU heatsink SNK P0047PS Riser Cards One RSC R1UG E16R for PCI Express 3 0 x16 card left fro...

Page 10: ...grated into the chipset to provide a 10 port SATA subsystem which is RAID 0 1 5 and 10 supported Two of these are SATA 3 0 ports and eight are SATA 2 0 ports The SATA drives are hot swappable units No...

Page 11: ...tton are also included Cooling System The SC818G 1K43B has an innovative cooling design that includes eight 4 cm counter rotating PWM Pulse Width Modulated fans located in the middle section of the ch...

Page 12: ...ope Address Super Micro Computer B V Het Sterrenbeeld 28 5215 ML s Hertogenbosch The Netherlands Tel 31 0 73 6400390 Fax 31 0 73 6416525 Email sales supermicro nl General Information support supermicr...

Page 13: ...PROCESSOR SSB Socket 1 CPU FRONT PE3 P1 P0 PE2 PE1 DMI DMI PCI Windbond VGA VGA CONN DDR2 RAM TPM Header BMC PHY Super I O HW Monitor NCT7904D W83527 IPMI LAN RJ45 RTL8201F USB 10 11 LPC S SATA0 S SA...

Page 14: ...1 6 SUPERSERVER 5017GR TF User s Manual Notes...

Page 15: ...ver It should be situated in a clean dust free area that is well ventilated Avoid areas where heat electrical noise and electromagnetic fields are generated You will also need it placed near a grounde...

Page 16: ...able before extending a component from the rack You should extend only one component at a time extending two or more si multaneously may cause the rack to become unstable Rack mounted equipment should...

Page 17: ...hat the amount of airflow required for safe operation is not compromised Mechanical Loading Equipment should be mounted into a rack so that a hazardous condition does not arise due to uneven mechanica...

Page 18: ...This rail will fit a rack between 26 and 33 5 deep Identifying the Sections of the Rack Rails The chassis package includes two rack rail assemblies in the rack mounting kit Each assembly consists of t...

Page 19: ...a server rack Attaching the inner rail extensions to to the inner rails stabilizes the chassis within the rack Installing the Inner Rail Extensions 1 Place the inner rail extensions B over the preatt...

Page 20: ...ng on to the rack Assembling the Outer Rails 1 Identify the left and right outer rails by examining the ends which bend outward 2 Slide the front section of the outer rail A into the rear section of t...

Page 21: ...o the proper length so that the outer rail fits snugly within the rack 2 Align the holes on the front of the outer rail with the holes on the front of the rack C and secure with the screws provided 3...

Page 22: ...ter rails are installed on the rack 2 Line chassis rails with the front of the rack rails 3 Slide the chassis rails into the rack rails keeping the pressure even on both sides you may have to depress...

Page 23: ...ine how far follow the server will extend out the front of the rack Larger chassis should be positioned to balance the weight between front and back If a bezel is included on your server remove it The...

Page 24: ...2 10 SUPERSERVER 5017GR TF User s Manual Notes...

Page 25: ...s others on the drive car riers to keep you constantly informed of the overall status of the system as well as the activity and health of specific components There are also two buttons on the chassis...

Page 26: ...formation related to different parts of the system This section explains what each LED indicates when illuminated and any corrective action you may need to take Universal Information LED When this LED...

Page 27: ...hapter 6 for instructions on replacing failed SATA drives Red The red LED to indicate an SATA drive failure If one of the SATA drives fail you should be notified by your system management software Ple...

Page 28: ...3 4 SUPERSERVER 5017GR TF User s Manual Notes...

Page 29: ...e operating system first and then unplug the power cords of all the power supply units in the system When working around exposed electrical circuits another person who is familiar with the power off c...

Page 30: ...t may be connected to an IT power system In all cases make sure that the unit is also reliably connected to Earth ground Serverboard Battery CAUTION There is a danger of explosion if the onboard batte...

Page 31: ...PCBs come into contact with your clothing which may retain a charge even if you are wearing a wrist strap Handle a board by its edges only do not touch its components peripheral chips memory modules o...

Page 32: ...ce is not strictly followed Figure 4 1 Installing the Onboard Battery LITHIUM BATTERY BATTERY HOLDER Please handle used batteries carefully Do not damage the battery in any way a damaged battery may r...

Page 33: ...e hand under the center of the board to support it when handling The following measures are generally sufficient to protect your equipment from electric static discharge Precautions Use a grounded wri...

Page 34: ...on page 5 12 for connector locations SATA drive data cables I SATA0 2 SATA sideband cable T SGPIO 1 Control Panel cable JF1 GPU power cables JPW2 PDB connector SATA backplane power cable JPW5 Importa...

Page 35: ...e various I O ports Figure 5 1 Control Panel Header Pins Figure 5 2 I O Ports NMI x Key Vcc Vcc NIC1 LED Activity NIC2 LED Activity Vcc 3 3V Reset Button Power Button Ground x Key Power On LED HDD LED...

Page 36: ...ake sure to install the motherboard into the chassis before you install the CPU heatsinks When receiving a motherboard without a processor pre installed make sure that the plastic CPU socket cap is in...

Page 37: ...ARNING plastic cap from the socket 5 Use your thumb and index finger to hold the CPU by its edges Align the CPU keys which are semi circle cutouts against the socket keys 6 Once they are aligned caref...

Page 38: ...gain and double check that the CPU is aligned properly 7 With the CPU in the socket inspect the four corners of the CPU to make sure that they are flush with the socket 8 Close the load plate Lock the...

Page 39: ...damage the CPU 5 Add the two remaining screws then finish the installation by fully tightening all four screws Installing a CPU Heatsink Removing the Heatsink 1 Unscrew and remove the heatsink screws...

Page 40: ...s slot Pay attention to the notch along the bottom of the module to avoid installing incorrectly see Figure 5 4 3 Gently press down on the DIMM module until it snaps into place in the slot Repeat for...

Page 41: ...G1 3 1 JPR1 1 2 NORMAL 2 3 BIOS RECOVERY 1 2 NORMAL 2 3 ME RECOVERY SLOT3 PCIE 3 0X8 SXB2B SXB2A SXB1A USB JBT1 CMOS CLEAR JSD1 PWRSDOM PWR JF1 ON FAIL RST PS 2 NIC 1 NIC LED UID LED LED PWR HDD X NMI...

Page 42: ...offering support for two GPU cards the 5017GR TF supports one low profile PCI Express 3 0 x8 expansion card in x16 slot A riser card p n RSC R1U E16R is required to support the expansion card Refer t...

Page 43: ...B1A USB JBT1 CMOS CLEAR JSD1 PWRSDOM PWR JF1 ON FAIL RST PS 2 NIC 1 NIC LED UID LED LED PWR HDD X NMI DIMMA1 2 3 NMI 1 2 RST DEFAULT JWD WATCH DOG TIMER LAN1 LAN2 UID JI2C2 JI2C3 1 2 Enable 2 3 Disabl...

Page 44: ...1 10 5 FAN1 FAN4 System CPU Fan Connectors FANA FAND I O Fan Connectors JSD1 SATA Disk On Module DOM Power Connector JSTBY1 Legacy Wake On LAN Header JPW1 24 pin Main ATX Power Connector JPW2 8 pin S...

Page 45: ...s 1 2 Enabled JPB1 BMC Enable Pins 1 2 Enabled JPME1 Intel ME Mode Select Pins 1 2 Enabled JBR BIOS Recovery Pins 1 2 Off JBT1 CMOS Clear See Section 5 8 Notes Jumpers not indicated are for test purpo...

Page 46: ...he chassis when viewed from the front These power connectors meet the SSI EPS 12V specification See the tables on the right for pin definitions Power Button The Power Button connection is locat ed on...

Page 47: ...Blinking NIC Busy Unit ID LED Status State Definition Off UID Off On UID On Power LED The Power LED connection is located on pins 15 and 16 of JF1 Refer to the table on the right for pin definitions P...

Page 48: ...the tables below for pin definitions Back Panel USB 2 0 Pin Definitions Pin Definition Pin Definition 1 5V 5 5V 2 USB_PN1 6 USB_PN0 3 USB_PP1 7 USB_PP0 4 Ground 8 Ground Front Panel USB 2 0 Header Pi...

Page 49: ...D LED and front panel Unit LED on JF1 if attached to the front Unit ID LED on the chassis will activate Push the Unit ID switch again to turn off both Indicators These Unit ID LED indicators provide e...

Page 50: ...in Definition 1 5V Standby 2 Ground 3 Wake up System Management Bus A System Management Bus header for the IPMI slot is located at JIPMB1 Connect the appropriate cable here to use the IPMB I2C connect...

Page 51: ...tform Module TPM which is available from a third party vendor A TPM is a security device that supports encryption and authen tication in hard drives It enables the motherboard to deny access if the TP...

Page 52: ...2 1 CMOS Clear JBT1 is used to clear CMOS which will also clear any passwords Instead of pins this jumper consists of contact pads to prevent accidentally clearing the contents of CMOS To clear CMOS 1...

Page 53: ...ns 1 2 to reset the system if an ap plication hangs Close Pins 2 3 to generate a non maskable interrupt signal for the application that hangs See the table on the right for jumper settings Watch Dog m...

Page 54: ...er BIOS Recovery The BIOS Recovery JBR1 is used to enable or disable the BIOS Recovery feature of the motherboard Install the jumper on pins 2 3 to begin the recovery process ME Recovery JPME1 Jumper...

Page 55: ...1 blinks it means that IPMI is enabled and functioning properly IPMI Heartbeat LED BD1 LED Settings Green Blinking IPMI is ready for use Off IPMI Disabled Unit ID LED The Unit ID LED is used to indica...

Page 56: ...aged with your system Driver Tool Installation Display Screen Note Click the icons showing a hand writing on paper to view the readme files for each item Click the computer icons to the right of these...

Page 57: ...cial system information such as CPU temperature system voltages and fan status See the Figure below for a display of the Supero Doctor III interface Note The default User Name and Password for SuperDo...

Page 58: ...ded from our Web Site at ftp ftp supermicro com utility Supero_Doctor_III You can also download the SDIII User s Guide at http www supermicro com manuals other SDIII_User_Guide pdf For Linux we will r...

Page 59: ...damage to any printed circuit boards PCBs it is important to handle them very carefully The following measures are generally sufficient to protect your equipment from ESD damage Precautions Use a gro...

Page 60: ...ou of system status See Chapter 3 System In terface for details on the LEDs and the control panel buttons Details on JF1 can be found in Chapter 5 Advanced Serverboard Installation 6 3 System Cooling...

Page 61: ...ver for an extended period of time with the top cover open 2 Turn off the power to the system and unplug the AC power cord 3 Remove the failed fan s wiring from the backplane 4 Remove the four pins se...

Page 62: ...DVD ROM or floppy drive For a complete listing of peripheral drive options visit the Supermicro web site Hard Drive Installation The hard drives are mounted in drive carriers to simplify their instal...

Page 63: ...er 6 Advanced Chassis Setup 6 5 Figure 6 3 Removing a Hard Drive Carrier Warning Except for short periods of time swapping hard drives do not operate the server with the hard drive carriers removed 1...

Page 64: ...rd side facing downward so that the mounting holes align with those in the carrier 4 Secure the hard drive by tightening all six screws Installing a Hard Drive Carrier Into the Chassis 1 Insert the lo...

Page 65: ...er and data cables from the motherboard and or backplane 3 If you are adding a new drive Remove the dummy tray from the drive bay The mini bezel can be removed by pulling out the hard drive beneath th...

Page 66: ...e front of the air shroud over the fan tray sliding the front notches C over the pins on the fan tray D Checking the Air Flow Checking the Server s Air Flow 1 Make sure there are no wires or other obj...

Page 67: ...module in the system power must be com pletely removed from the server before removing and replacing the power supply for whatever reason Removing Replacing the Power Supply Figure 6 6 1 Power down th...

Page 68: ...6 10 SUPERSERVER 5017GR TF User s Manual Notes...

Page 69: ...plays all the options that can be configured Grayed out options cannot be configured Options in blue can be configured by the user The right frame displays the key legend Above the key legend is an ar...

Page 70: ...not upgrade the BIOS unless your system has a BIOS related issue Flashing the wrong BIOS can cause irreparable damage to the system In no event shall Supermicro be liable for direct indirect special i...

Page 71: ...e Tab key or the arrow keys to move between fields The date must be entered in Day MM DD YY format The time is entered in HH MM SS format Note The time is in the 24 hour format For example 5 30 P M ap...

Page 72: ...bled to display the POST messages Select Enabled to display the OEM logo instead of the normal POST messages The op tions are Enabled and Disabled AddOn ROM Display Mode This sets the display mode for...

Page 73: ...e system to instantly power off when the Power Button is pressed The options are 4 Seconds Override and Instant Off Restore on AC Power Loss Use this feature to set the power state after a power outag...

Page 74: ...codes to overwhelm the processor or damage the system during an attack The default is Enabled Refer to Intel and Microsoft Web Sites for more information Intel AES NI Set to Enabled to use the proces...

Page 75: ...and heat dissipation Please refer to Intel s web site for detailed information The options are Disabled and Enabled Turbo Mode This feature allows processor cores to run faster than marked frequency i...

Page 76: ...Acceleration Technology significantly reduces CPU over head by leveraging CPU architectural improvements freeing resources for more other tasks The options are Disabled and Enabled DCA Support This fe...

Page 77: ...6 Force DDR 1333 Force DDR3 1600 and Force SPD Channel Interleaving This feature selects from the different channel memory interleaving methods The options are Auto 1 Way 2 Way 3 Way and 4 Way Rank In...

Page 78: ...all USB ports devices The options are Enabled and Dis abled When set to enabled EHCI Controller 1 and 2 below become available EHCI Controller 1 EHCI Controller 2 This feature enables the Enhanced Ho...

Page 79: ...roller 0 1 This feature is used to activate deactivate the SATA controller and sets the compatibility mode The options are Enhanced and Compatible The default of Serial ATA Controller 0 is Compatible...

Page 80: ...ser to set the PCI PnP configurations for the following items PCI ROM Priority In case of multiple Option ROMs Legacy and EFI compatible this feature speci fies what ROM to launch The options are Lega...

Page 81: ...0s SXB1 PCI E 3 0 x16 x8 OPROM SXB2 PCI E 3 0 x16 x8 OPROM CPU1 SLOT 3 PCI E 3 0 x8 OPROM Use this feature to enable or disable PCI E slot Option ROMs The options are Disabled and Enabled Onboard LAN...

Page 82: ...IRQ 3 IO 3E8h IRQ 5 IO 2E8h IRQ 7 IO 3F8h IRQ 3 4 5 6 7 10 11 12 IO 2F8h IRQ 3 4 5 6 7 10 11 12 IO 3E8h IRQ 3 4 5 6 7 10 11 12 IO 2E8h IRQ 3 4 5 6 7 10 11 12 Device Mode Use this feature to select the...

Page 83: ...Redirection Select Enabled to use a COM Port selected by the user for Console Redirection The options are Enabled and Disabled The default setting for COM1 is Disabled and for SOL is Enabled Console...

Page 84: ...ng with the data bits Select Space to add a Space as a parity bit to be sent with your data bits The options are None Even Odd Mark and Space Stop Bits A stop bit indicates the end of a serial data pa...

Page 85: ...how the host computer will exchange data with the client computer which is the remote computer used by the user Out of Band Mgmt Port Use this feature to select the port for out of band management Th...

Page 86: ...setting allows you to configure the ACPI Advanced Configuration and Power Interface sleep state for your system when it is in the Suspend mode The options are Suspend Disabled S1 CPU Stop Clock High P...

Page 87: ...led Runtime Error Logging Support Change this item to enable or disable runtime error logging The options are En abled and Disabled Memory Correction Error Threshold Change this item to define the sys...

Page 88: ...tem Boot Event logging to enabled or disabled The options are Disabled and Enabled MECI The Multiple Event Count Increment MECI counter counts the number of times a duplicate event must happen before...

Page 89: ...Log This feature is used to change the System Event Log SEL configuration SEL Components Change this item to enable or disable all features of System Event Logging The options are Enabled and Disabled...

Page 90: ...amic Host and Configuration Protocol Dynamic or manually entered by the user Static When Dynamic is selected all the options below are automatically assigned to the sys tem by itself or by an external...

Page 91: ...ion 2 etc The settings are any detected boot device and Disabled Network Devices This option sets the order of the legacy network devices detected by the motherboard Delete Boot Option This feature al...

Page 92: ...is defined ONLY this password will need to be entered during each system startup or boot and will also have Administrator rights in the setup Passwords must be at least 3 and up to 20 characters long...

Page 93: ...iscard Changes and Exit from the Exit menu and press Enter Save Changes and Reset When you have completed the system configuration changes select this option to leave the BIOS Setup Utility and reboot...

Page 94: ...formance Save As User Defaults To set this feature select Save as User Defaults from the Exit menu and press En ter This enables the user to save any changes to the BIOS setup for future use Restore U...

Page 95: ...ntinue the boot up procedure If a fatal error occurs you should consult with your system manufacturer for possible repairs BIOS POST Error Codes Beep Code Error Message Description 1 beep Refresh Circ...

Page 96: ...A 2 SUPERSERVER 5017GR TF User s Manual Notes...

Page 97: ...kets supporting up to 256 GB of registered ECC DDR3 1600 1333 1066 800 MHz RDIMMs or 64 GB of DDR3 unbuffered non ECC UDIMMs up to 1600 MHz Note See the memory section in Chapter 5 for details GPUs Gr...

Page 98: ...ting cooling fans fan speed controlled by BIOS setting System Input Requirements AC Input Voltage 180 240 VAC Rated Input Current 7 2A 180V to 9 5 240V Rated Input Frequency 50 60 Hz Power Supply Rate...

Page 99: ...r agrees to fully indemnify defend and hold Supermicro harmless for and against any and all claims demands actions litigation and proceedings of any kind arising out of or related to such ultra hazard...

Page 100: ...B 4 SUPERSERVER 5017GR TF Series User s Manual Notes...

Reviews: