5-11
Chapter 5: Chassis Setup and Maintenance
J
I
H
D
B
8
7
6
5
4
3
2
F
E
A
1
L
K
G
C
DESIGN /
³]-p :
MODEL NO./
¾÷«¬ :
SIZE/¹Ï®Ø
APPROVED /
¼ f®Ö :
DRAWN /
ø¹Ï
:
MATERIAL /
§÷½è :
UNIT /
³æ¦ì
:
FINISH /
ªí-±³
B¸Ì :
DATE /
¤é´Á:
DATE /
¤é´Á:
DATE /
¤é´Á:
TITLE /
«~¦W :
PART NO. /
®Æ¸¹ :
Ablecom Technology Inc.
A
BLEC
DWG NO. /
¹Ï¸¹
:
²Ä¤T¨¤ªk
THE 3RD PROJECTION
¤j˚T¬ì§ÞªÑ¥÷¦³--¤½¥
q
M
R E V I S I O N S /
-×-q
REV
ª©¥»
DESCRIPTION
±Ô-z
LOCATION
¦ì¸
m
DRAWN
-קïªÌ
DATE
¤é´Á
SC510
SC510_SYSTEM_ASSY
A1
*
SCALE /
¤ñ¨Ò :
1:1
SHEET
1
OF
1
*
SHO
06-Nov-07
See Note.
SHO
06-Nov-07
MM
*
REV.
ª©¥»
1
RANGE
½ d³ò
TOLERANCE
¤½®t
X.xx
± 0.10
X.x
± 0.25
X
± 1.00
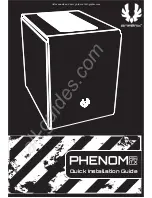
Figure 5-10: System Fans
Mounting thru holes
5-7 System Fans
System Fans for the SC510-200B/203B and SC510L-200B
Two heavy-duty fans within a single fan housing provide cooling for the chassis.
These fans circulate air through the chassis as a means of lowering the chassis
internal temperature.
1. If necessary, open the chassis while the power is running to determine which
fan has failed (Never run the server for an extended period of time with the
chassis open).
2. Turn off the power to the system and unplug the system from the outlet.
3. Remove the failed fan's power cord from the serverboard.
4. Remove the fan housing from the chassis by removing the two screws which
attach the housing to the chassis. These screws are located in the mount-
ing thru holes on either side of the fan housing. (See figure 5-10). Set these
screws aside for later use.
5. Disconnect the fan wiring from the connectors and carefully lift the fan hous-
ing out of the chassis.
Fan housing
Fans