background image

14 • 15 

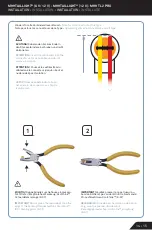
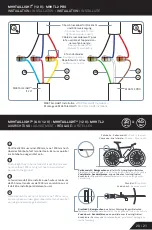
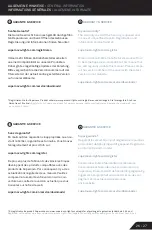
ACHTUNG! Kabelenden bis zum Ende in 

den Steckverbinder einschieben und nicht 

abisolieren. 

ATTENTION! Insert the cable ends into the 

connector as far as possible and do not 

remove insulation.

ATTENTION ! Poussez les extrémités du 

câble dans le connecteur jusqu’au bout et 

ne dénudez pas l’isolation. 

LET OP! Duw de kabeleinden tot aan 

het einde in de connector en strip de 

isolatie niet. 

1

2

WICHTIG! Kappe bündig zum Gehäuse einpressen. 

Nicht tiefer! Empfohlenes Werkzeug: Scotchlok™ 

Schneidklemmzange (E-9Y)

IMPORTANT! Do not press the tap deeper than the 

edge of the housing! Requested tool: Scotchlok™ 

IDC crimping pliers (E-9Y)

IMPORTANT! Veuillez presser le capot jusqu’ au 

bord du boîtier et pas au delà! Outil recommandé: 

Pince d’électricien Scotchlok™ (E-9Y)

BELANGRIJK! Druk de beschermkap op de behui-

zing, maar niet verder dan de rand! 

Benodigd gereedschap: Scotchlok™ krimptang 

(E-9Y)

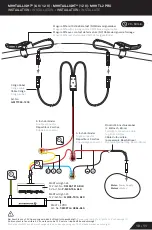
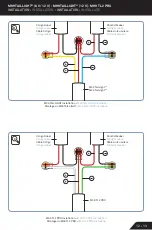
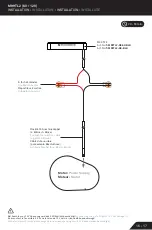
M99 TAIL LIGHT

45

 (6 V / 12 V) • M99 TAIL LIGHT

25

 (12 V) • M99 TL 2 PRO

INSTALLATION • 

INSTALLATION

 • INSTALLATION •

INSTALLATIE

Hinweis für alle Verbinder dieser Bauart •

Note for all connectors of this type

Note pour tous les connecteurs de ce type •

Opmerking voor alle connectoren van dit type

Summary of Contents for M99 Tail Light 25

Page 1: ...V 05 2020 DE EN FR NL ANLEITUNG MANUAL MODE D EMPLOI HANDLEIDING M99 TAIL LIGHT45 M99 TAIL LIGHT25 M99 TL 2 M99 TL 2 PRO M99 TAIL LIGHT ...

Page 2: ...t und unsere Testfahrer haben tausende Kilometer in widrigsten Bedingungen zurückgelegt um Ihnen ein Produkt zu bieten an dem Sie lange Freude haben werden Ich wünsche Ihnen allzeit gute Fahrt EN I am very happy that you have chosen this Superno va high performance product My development team has spared no effort and our product testers have ridden thousands of kilometers in adverse conditions to ...

Page 3: ... Toelatingen 50 R 004160 Versorgungsspannung Input voltage Tension d alimentation Voedingsspanning 6 V Anschluss Connection Connexion Aansluiting 3 adrig 3 wired 3 fils 3 aderig TECHNISCHE DATEN TECHNICAL DATA DONNÉES TECHNIQUES TECHNISCHE GEGEVENS E BIKE k m h 45 Montageschraube M4 Installation screw M4 Vis de montage M4 Montageschroef M4 Montageschraube M5 Installation screw M5 Vis de montage M5...

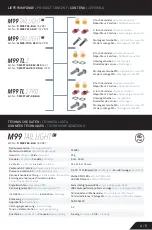
Page 4: ...ng nur für Art No Q ULK 01 License plate illumination only for Art No Q ULK 01 Eclairage de la plaque d immatriculation uniquement pour l art n Q ULK 01 Kentekenplaatverlichting alleen voor Art nr Q ULK 01 Gehäusematerial Housing material Matériau du boîtier Materiaal behuizing Al 6061 Gewicht Weight Poids Gewicht 25 g Candela 10 cd 85 cd L x H x B L x W x H L x L x H L x B x H 22 x 61 5 x 11 6 mm...

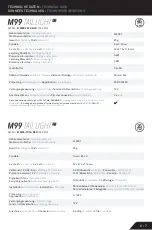
Page 5: ...proval 12 V version Approbation Version 12V Toelating 12 V versie 50R 5039 K 1650 Versorgungsspannung Input voltage Tension d alimentation Voedingsspanning 6 V Version 12 V Version 6 V version 12 V version Version 6 V 12 V 6 V versie 12 V versie Anschluss Connection Connexion Aansluiting 2 adrig 2 wired bipolaire 2 aderig Gehäusematerial Housing material Matériau du boîtier Materiaal behuizing Al ...

Page 6: ...r 2 sorties Dubbele connector 3 fach Verbinder Triple connector Répartiteur 3 sorties Drievoudige connector Bei Anschluss an 12 V Spannung wird das 6 V Rücklicht beschädigt Connecting the 6 V Tail light to 12 V will damage it En branchant le feu arrière 6 V à une tension de 12 V celui ci risque d être endommagé Als het achterlicht van 6 V wordt aangesloten aan een spanning van 12 V zal deze worden...

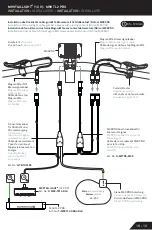
Page 7: ... 2 PRO installatie M99 TAIL LIGHT45 6 V 12 V M99 TAIL LIGHT25 12 V M99 TL 2 PRO INSTALLATION INSTALLATION INSTALLATION INSTALLATIE Y Higo Kabel Y Higo cable Câble Y Higo Y Higo kabel Y Higo Kabel Y Higo cable Câble Y Higo Y Higo kabel Rücklichtkabel Tail light cable Câble du feu arrière Achterlichtkabel Rücklichtkabel Tail light cable Câble du feu arrière Achterlichtkabel M99 Tail Light45 M99 Tail...

Page 8: ...hlok Schneidklemmzange E 9Y IMPORTANT Do not press the tap deeper than the edge of the housing Requested tool Scotchlok IDC crimping pliers E 9Y IMPORTANT Veuillez presser le capot jusqu au bord du boîtier et pas au delà Outil recommandé Pince d électricien Scotchlok E 9Y BELANGRIJK Druk de beschermkap op de behui zing maar niet verder dan de rand Benodigd gereedschap Scotchlok krimptang E 9Y M99 ...

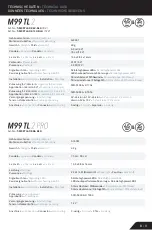
Page 9: ...angesloten aan een spanning van 12 V zal deze worden beschadigd M99 TL 2 6 V 12 V INSTALLATION INSTALLATION INSTALLATION INSTALLATIE Motor Power Supply Moteur Motor 2 fach Verbinder Double connector Répartiteur 2 sorties Dubbele connector M99 TL 2 Art No T M99TL2 KE6V BLK Art No T M99TL2 KE BLK Rücklicht Anschlusskabel z B Bosch Brose Tail Light connection cable eg Bosch Brose Câble du feu arrière...

Page 10: ...PRO Art No T M99TL2 KEBL BLK Magura MTe NO Bremssignalkabel Magura MTe brake signal cable Câble du feu stop Magura MTe Magura MTe rem lichtkabel Magura MTe Bremssignalkabel Magura MTe brake signal cable Câble de signal du feu stop Magura MTe Magura MTe remlichtkabel Fernlichttaster High beam switch Interrupteur du feu de route Schakelaar groot licht Y Anschlusskabel für Rücklicht und Stromversorgu...

Page 11: ...uteur minimum de 250 mm et maximum de 1200 mm en relation au sol Il doit être installé parallèlement au sol NL Het achterlicht moet min 250 mm max 1200 mm bo ven de rijbaan worden gemonteerd Het moet parallel aan de grond worden geïnstalleerd M99 TAIL LIGHT45 6 V 12 V M99 TAIL LIGHT25 12 V M99 TL 2 AUSRICHTUNG ADJUSTMENT RÉGLAGE AFSTELLEN E BIKE k m h 45 E BIKE 25 k m h Draufsicht Top view Vue du ...

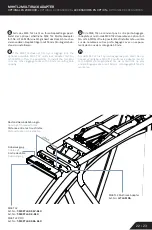
Page 12: ...t No U TL2 MRA offre la possibilité d installer le feu arrière sur de nombreux autres porte bagages avec un espace ment des trous de montage de 50 mm NL Als de M99 TL2 niet op uw bagagerek past biedt de op tioneel verkrijgbare M99 TL2 multi rack adapter Art Nr U TL2 MRA de mogelijkheid om de achterlicht op vele andere bagagerekken met 50 mm montagegatafstand te monteren M99 TL2 MULTIRACK ADAPTER O...

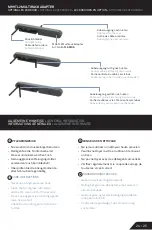
Page 13: ...ggressiven Reinigungsmittel verwenden auch kein Alkohol Überprüfen Sie die Anzugsmomente aller Schrauben regelmäßig EN CARE INSTRUCTIONS Never use a high pressure hose Clean the front glass with water and a soft clean cloth if necessary Do not use aggressive cleaning agents also no alcohol Check the mounting bolts from time to time FR CONSEILS DE NETTOYAGE Ne jamais utiliser un nettoyeur haute pre...

Page 14: ...ter your Supernova product at www supernova lights com register and extend the standard 2 year warranty to 5 years FR GARANTIE SERVICE 5 ans de garantie En réalisant des réparations inappropriées ou en ou vrant le boîtier la garantie est annulée Vous trouvez l enregistrement et plus d info sur supernova lights com register De plus en plus de fabricants de vélos électriques développent des produits...

Page 15: ...DE SUPERNOVA DESIGN GmbH Co KG Industriestr 26 79194 Gundelfingen Germany 49 0 761 600 629 0 info supernova lights com www supernova lights com ...

Reviews: