background image

Chapter 2: Installation

2-3

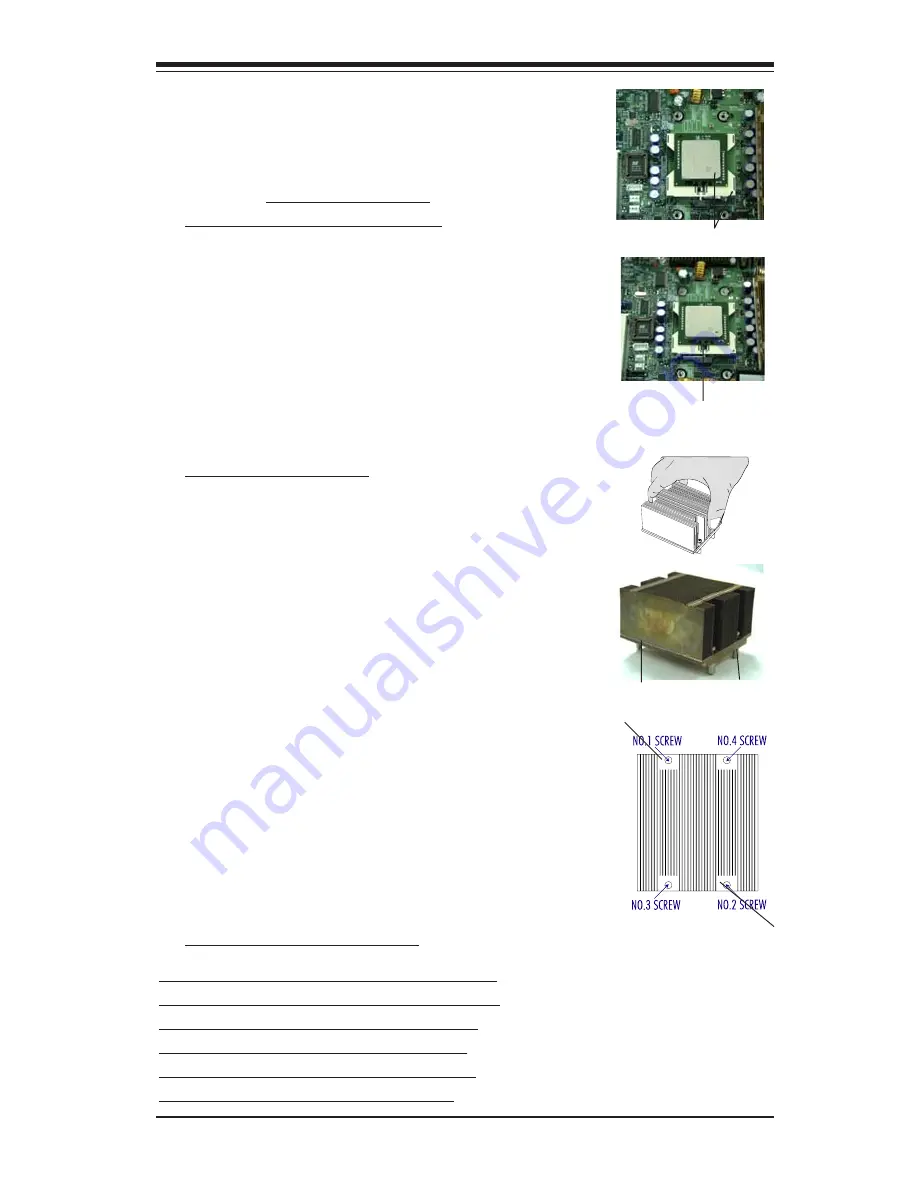
2. Insert the CPU in the socket,

making sure that pin 1 of the CPU

aligns with pin 1 of the socket

(both corners are marked with a

triangle).  When using only one

CPU, install it into CPU socket #1

(Socket #2 is automatically disabled

if only one CPU is used).

3. Press the lever down until

you hear the *click* so you

can be sure that the CPU is

securely installed in the CPU

socket.

Pin1

Heatsink Installation

2. Place the heatsink on top of the

CPU so that the four mounting holes

are aligned with those on the retention

mechanism.

3. Screw in two diagonal screws (ie

the #1 and the #2 screws) until just

snug (-do not fully tighten the screws

to avoid possible damage to the CPU.)

4. Finish the installation by fully

tightening all four screws.

CEK Heatsink

Screw#1

Screw#2

Socket lever in the

locking Position

Screw#1

Screw#2

To Un-install the Heatsink

(Caution!


We do not recommend that the

CPU or the heatsink be removed. However,

if you do need to un-install the heatsink,

please follow the instructions below to

uninstall the heatsink to prevent damage

done to the CPU or the CPU socket. )

1. Do not apply any thermal grease to

the heatsink or the CPU die; the required

amount of thermal grease  has already

been applied.

Summary of Contents for Supero X6DAL-B2

Page 1: ...X6DAL B2 X6DAL TB2 USER S MANUAL Revision 1 1 SUPER...

Page 2: ...ant to Part 15 of the FCC Rules These limits are designed to provide reasonable protection against harmful interference in a residential installation This equipment generates uses and can radiate radi...

Page 3: ...intended to be professionally installed Manual Organization Chapter 1 begins with a checklist of what should be included in your mainboard box describes the features specifications and performance of...

Page 4: ...ry from AC Power Loss 1 9 1 4 PC Health Monitoring 1 10 1 5 ACPI Features 1 11 1 6 Power Supply 1 13 1 7 Super I O 1 13 Chapter 2 Installation 2 1 Static Sensitive Devices 2 1 Precautions 2 1 Unpackin...

Page 5: ...Jumpers 2 19 GLAN Enable Disable 2 19 Alarm Reset 2 20 SATA Enable 2 20 CMOS Clear 2 21 Watch Dog Enable Disable 2 21 SMB to PCI SMB Clock to PCI 2 22 2 7 Onboard Indicators 2 23 GLAN LEDs 2 23 SATA...

Page 6: ...Main Setup 4 2 4 3 Advanced Setup 4 3 4 4 Boot Setup 4 20 4 5 Security Setup 4 22 4 6 Exit 4 23 Appendices Appendix A BIOS Error Beep Codes and DS7 DS8 LED POST Codes A 1 Appendix B BIOS POST Codes B...

Page 7: ...ollowing items have all been in cluded with your motherboard If anything listed here is damaged or miss ing contact your retailer All included with Retail Box One 1 Supermicro Mainboard One 1 ribbon c...

Page 8: ...pe Address SuperMicro Computer B V Het Sterrenbeeld 28 5215 ML s Hertogenbosch The Netherlands Tel 31 0 73 6400390 Fax 31 0 73 6416525 Email sales supermicro nl General Information support supermicro...

Page 9: ...ter 1 Introduction 1 3 Introduction Figure 1 1 X6DAL B2 X6DAL TB2 Image The difference between the X6DAL B2 and the X6DAL TB2 is that the X6DAL TB2 model has an additional Marvell s 4 port SATA Contro...

Page 10: ...the ones shown in this manual KB Mouse DIMM 3A DIMM 3B DIMM 2A DIMM 2B DIMM 1A DIMM 1B Tumwater North Bridge Marvell IDE 1 IDE 2 USB 0 1 COM2 COM1 8 pin PW2 ATX PWR SI O PCI E 6 x16 PCI X 3 66 MHz PC...

Page 11: ...1A 3B Memory DIMM Slots 1A 1B 2A 2B 3A 3B GLAN 1 2 G bit Ethernet Ports IDE1 IDE2 IDE1 2 Hard Disk Drive Connectors J2 Keyboard Mouse J7 Power Fault Header J24 Floppy Disk Drive Connector J27 Power Sy...

Page 12: ...MI Flash ROM APM 1 2 DMI 2 3 PCI 2 2 ACPI 1 0 Plug and Play PnP SMBIOS 2 3 PC Health Monitoring Onboard voltage monitors for CPU cores chipset voltage 3 3V 5V 12V 5V standby 3 3V standby 12V and DIMM...

Page 13: ...face up to 2 88 MB 1 EPP ECP Parallel Port Header PS 2 mouse and PS 2 keyboard ports Up to four USB 2 0 Universal Serial Bus 2 ports back panel 2 Headers front panel 2 Hance Rapids Serial ATA Ports 4...

Page 14: ...oard Features pages for details on the features of each motherboard DDR2 DDR2 DDR2 DDR2 DDR2 DDR2 2 2 400MHz DDR DDR2 400MHz E7525 BCM5721 BCM5721 RJ45 LAN RJ45 LAN ESB6300 PCI X 66MHz Slot 3 PCI X 66...

Page 15: ...of up to 2 67 GB s per channel The E7525 Tumwater also supports the new PCI Express high speed serial I O interface for superior I O bandwidth These interfaces support connection of the MCH to a varie...

Page 16: ...Standby 1 8V for DRAM 1 5V Standby 1 2V An onboard voltage monitor will scan these voltages continuously Once a voltage becomes unstable a warning is given or an error message is sent to the screen o...

Page 17: ...stem more stable 1 5 ACPI Features ACPI stands for Advanced Configuration and Power Interface The ACPI specification defines a flexible and abstract hardware interface that pro vides a standard way to...

Page 18: ...e set in the Power section of the BIOS Setup routine External Modem Ring On WOR Wake up events can be triggered by a device such as the external modem ringing when the system is in the SoftOff state N...

Page 19: ...tor drive interface control logic and interrupt and DMA logic The wide range of functions integrated onto the Super I O greatly reduces the number of components required for interfacing with floppy di...

Page 20: ...1 14 Introduction X6DAL B2 X6DAL TB2 User s Manual Notes...

Page 21: ...o not touch its components periph eral chips memory modules or gold contacts When handling chips or modules avoid touching their pins Put the motherboard and peripherals back into their antistatic bag...

Page 22: ...the BIOS battery and prevent the system from booting up CPU Installation 1 Lift the lever on the CPU socket lift the lever completely as shown on the picture on the right otherwise you will damage the...

Page 23: ...th those on the retention mechanism 3 Screw in two diagonal screws ie the 1 and the 2 screws until just snug do not fully tighten the screws to avoid possible damage to the CPU 4 Finish the installati...

Page 24: ...screws from the motherboard in the sequence as show in the second picture on the right 2 Hold the heatsink as show in the picture on the right and gently wriggle the heatsink to loosen it from the CP...

Page 25: ...h along the bottom of the module to prevent inserting the DIMM module incorrectly 3 Gently press down on the DIMM module until it snaps into place in the slot Repeat for all modules see step 1 above M...

Page 26: ...ance with the PC 99 specification See Figure 2 3 below for the colors and locations of the various I O ports Figure 2 3 I O Port Locations and Definitions II Figure 2 2 Installing and Removing DIMMs T...

Page 27: ...ed specifically for use with Supermicro server chassis See Figure 2 4 for the descriptions of the various control panel buttons and LED indicators Refer to the following section for descriptions and p...

Page 28: ...8 pin Processor connector at PW2 must also be connected to your power supply See the table on the right for pin definitions Pins 1 2 3 4 Definition Ground 12 V 12V 4 pin Connector PW3 Required Connect...

Page 29: ...PWR_LED Pin Definitions JF1 KB Mouse DIMM 3A DIMM 3B DIMM 2A DIMM 2B DIMM 1A DIMM 1B Tumwater North Bridge Marvell IDE 1 IDE 2 USB 0 1 COM2 COM1 8 pin PW2 ATX PWR SI O PCI E 6 x16 PCI X 3 66 MHz PCI...

Page 30: ...ee the table on the right for pin defini tions HDD LED Pin Definitions JF1 Pin Number 13 14 Definition Vcc HD Active KB Mouse DIMM 3A DIMM 3B DIMM 2A DIMM 2B DIMM 1A DIMM 1B Tumwater North Bridge Marv...

Page 31: ...umber 5 6 Definition Vcc GND KB Mouse DIMM 3A DIMM 3B DIMM 2A DIMM 2B DIMM 1A DIMM 1B Tumwater North Bridge Marvell IDE 1 IDE 2 USB 0 1 COM2 COM1 8 pin PW2 ATX PWR SI O PCI E 6 x16 PCI X 3 66 MHz PCI...

Page 32: ...on the computer case Refer to the table on the right for pin definitions Pin Number 3 4 Definition Reset Ground Reset Pin Definitions JF1 KB Mouse DIMM 3A DIMM 3B DIMM 2A DIMM 2B DIMM 1A DIMM 1B Tumw...

Page 33: ...pin definitions Pin Number 1 2 Definition Intrusion Input Ground Chassis Intrusion Pin Definitions KB Mouse DIMM 3A DIMM 3B DIMM 2A DIMM 2B DIMM 1A DIMM 1B Tumwater North Bridge Marvell IDE 1 IDE 2 US...

Page 34: ...data toPCIEn SMBCLKtoPCI En C N 1 AlMRset J27 J 7 P W Fault SMB PW J 2 J 4 J 5 PCI 5 33MHz J 3 PW1 PW3 LAN CTRL BIOS Printer Spkr SA T A3 SA T A0 SA T A2 JL1 SATA CTRL Marvell SATA Enable H SATA0 1 M...

Page 35: ...ure Wake on Ring Pin Definitions WOR Pin Number 1 2 Definition Ground Wake up KB Mouse DIMM 3A DIMM 3B DIMM 2A DIMM 2B DIMM 1A DIMM 1B Tumwater North Bridge Marvell IDE 1 IDE 2 USB 0 1 COM2 COM1 8 pin...

Page 36: ...OL KB Mouse DIMM 3A DIMM 3B DIMM 2A DIMM 2B DIMM 1A DIMM 1B Tumwater North Bridge Marvell IDE 1 IDE 2 USB 0 1 COM2 COM1 8 pin PW2 ATX PWR SI O PCI E 6 x16 PCI X 3 66 MHz PCI X 2 66 MHz Battery WOR JPS...

Page 37: ...ATA SMB on your system SATA SMB J35 Pin Definitions Pin Number 1 2 3 Definition Data Ground Clock KB Mouse DIMM 3A DIMM 3B DIMM 2A DIMM 2B DIMM 1A DIMM 1B Tumwater North Bridge Marvell IDE 1 IDE 2 USB...

Page 38: ...nitions JF2 Pin Number 1 3 5 7 Function Key Definition Red wire Speaker data No connection Key Speaker data KB Mouse DIMM 3A DIMM 3B DIMM 2A DIMM 2B DIMM 1A DIMM 1B Tumwater North Bridge Marvell IDE 1...

Page 39: ...ult setting is enabled Jumper Position Pins 1 2 Pins 2 3 Definition Enabled Disabled GLAN Enable Disable Jumper Settings JPL1 JPL2 KB Mouse DIMM 3A DIMM 3B DIMM 2A DIMM 2B DIMM 1A DIMM 1B Tumwater Nor...

Page 40: ...er set tings Jumper Position Pins 1 2 Pins 2 3 Definition Enabled Disabled Serial ATA Enable Disable Jumper Settings JPS1 For Marvell s SATA Controller KB Mouse DIMM 3A DIMM 3B DIMM 2A DIMM 2B DIMM 1A...

Page 41: ...WD to reset the system if an appli cation hangs Close Pins 2 3 to generate a non maskable interrupt signal for the application that hangs See the table on the right for jumper settings Watch Dog can...

Page 42: ...ta toPCIEn SMBCLKtoPCI En CN1 AlMRset J27 J 7 P W Fault SMB PW J 2 J 4 J 5 PCI 5 33MHz J 3 PW1 PW3 LAN CTRL BIOS Printer Spkr SA T A3 SA T A0 SA T A2 JL1 SATA CTRL Marvell SATA Enable H SATA0 1 M SATA...

Page 43: ...DIMM 1B Tumwater North Bridge Marvell IDE 1 IDE 2 USB 0 1 COM2 COM1 8 pin PW2 ATX PWR SI O PCI E 6 x16 PCI X 3 66 MHz PCI X 2 66 MHz Battery WOR JPS1 FAN1 LAN1 PCI 4 33MHz J13 J15 JPL1 Floppy PW LED K...

Page 44: ...t LED DS9 Pin Definitions DS9 Green Yellow Red Definition System On OK System Off PWR Cable Connected PWR or CPU Failure KB Mouse DIMM 3A DIMM 3B DIMM 2A DIMM 2B DIMM 1A DIMM 1B Tumwater North Bridge...

Page 45: ...a Bit 1 7 Data Bit 2 9 Data Bit 3 11 Data Bit 4 13 Data Bit 5 15 Data Bit 6 17 Data Bit 7 19 ACK 21 BUSY 23 PE 25 SLCT Pin Number Function 2 Auto Feed 4 Error 6 Init 8 SLCT IN 10 GND 12 GND 14 GND 16...

Page 46: ...J24 KB Mouse DIMM 3A DIMM 3B DIMM 2A DIMM 2B DIMM 1A DIMM 1B Tumwater North Bridge Marvell IDE 1 IDE 2 USB 0 1 COM2 COM1 8 pin PW2 ATX PWR SI O PCI E 6 x16 PCI X 3 66 MHz PCI X 2 66 MHz Battery WOR JP...

Page 47: ...6 GND 28 BALE 30 GND 32 IOCS16 34 GND 36 Addr 2 38 Chip Select 1 40 GND IDE Connector Pin Definitions J44 J38 KB Mouse DIMM 3A DIMM 3B DIMM 2A DIMM 2B DIMM 1A DIMM 1B Tumwater North Bridge Marvell IDE...

Page 48: ...2 28 X6DAL B2 X6DAL TB2 User s Manual Note Please refer to Appendix C and Appendix D for software installation instructions...

Page 49: ...re it is fully seated and connect the chassis speaker and the power LED to the motherboard Check all jumper settings as well 5 Use only the correct type of onboard CMOS battery as recommended by the M...

Page 50: ...r troubleshooting services They should know of any possible problem s with the specific system configuration that was sold to you NOTE If you are a system integrator VAR or OEM a POST diagnos tics car...

Page 51: ...ntact cfm 4 Distributors For immediate assistance please have your account number ready when placing a call to our technical support department We can be reached by e mail at support supermicro com by...

Page 52: ...plications you need Applications on the CD include chipset drivers for Windows and security and audio drivers Note The CD is a bootable disc and can be used to create driver diskettes 3 4 Returning Me...

Page 53: ...uide The Main BIOS setup menu screen has two main frames The left frame displays all the options that can be configured Grayed out options cannot be config ured Options in blue can be configured by th...

Page 54: ...in tab on the top of the screen The Main BIOS Setup screen is shown below When you select the Main Setup the following items will be automatically displayed System Overview The following BIOS informat...

Page 55: ...ough the keyboard Press the Tab key or the Up Arrow and the Down Arrow keys to move between fields The date must be entered in HH MM DD YY format The time is entered in HH MM SS format Note The time i...

Page 56: ...alue Limit This feature allows the user to set the maximum CPU ID value Enable this function to boot legacy OS that cannot support processors with extended CPUID functions The options are Enabled and...

Page 57: ...the CPU to only operate at its minimum speed Select Automatic to allow the cpu speed to be controlled by the operating system Select Disabled to allow the CPU to operate only at its default speed CPU...

Page 58: ...A Only S ATA Serial ATA Only and P ATA S ATA P ATA S ATA Combined Mode Operation This feature allows the user to select the IDE Combined Mode The options are P ATA Parallel ATA 1ST Channel and S ATA S...

Page 59: ...lave Secondary IDE Master Slave Third IDE Master Slave Fourth IDE Master Slave Sub Menu From the Advanced Setup screen press Enter to access this sub menu for the primary secondary third and fourth ID...

Page 60: ...s a data transfer rate of 11 1 MBs Select 4 to allow the AMI BIOS to use PIO mode 4 It has a data transfer rate of 16 6 MBs This setting generally works with all hard disk drives manufactured after 19...

Page 61: ...32Bit Data Transfer Select Enabled to activate the function of 32 Bit data transfer Select Disabled to deactivate the function The options are Enabled and Dis abled Hard Disk Write Protect Select Ena...

Page 62: ...vices on the PCI bus Select 32 to set the PCI latency to 32 PCI clock cycles Select 64 to set the PCI latency to 64 PCI clock cycles Select 96 to set the PCI latency to 96 PCI clock cycles Select 128...

Page 63: ...in order for it to function properly The options are Auto PCI Slot1 PCI Slot2 PCI Slot3 PCI Slot4 PCI Slot5 and PCI Slot6 IRQ3 IRQ4 IRQ5 IRQ7 IRQ9 IRQ10 IRQ11 IRQ14 IRQ15 This feature specifies the av...

Page 64: ...serial port from accessing any system resources When this option is set to Disabled the serial port physically becomes unavailable Select 2F8 IRQ3 to allow the serial port to use 2F8 as its I O port...

Page 65: ...ndenhurst NorthBridge chipset Memory Remap Feature Select Enabled to allow remapping of overlapped PCI memory above the total physical memory The options are Enabled and Disabled Memory Mirroring and...

Page 66: ...ions are S1 POS and S1 S3 STR Advanced ACPI Configuration Use this feature to configure additional ACPI options Select Yes if the operating system supports ACPI Select No if the operating system does...

Page 67: ...used in conjunction with the WD jumper see Chapter 2 for details The options are Enabled and Disabled XEvent Log Configuration Highlight this item and press Enter to view the contents of the event lo...

Page 68: ...PCI Express slot The options are Enabled and Disabled PCI Express Compliance Mode Select Enabled to enable MCH to activate PCI Express Compliance Mode The options are Disabled and Enabled Spread Spect...

Page 69: ...o configure the serial port settings for console redirection The options are 115200 8 n 1 57600 8 n 1 38400 8 n 1 19200 8 n 1 and 09600 8 n 1 bits per second data bits parity stop bits Flow Control Th...

Page 70: ...d in the system The options are Disabled Enabled and Auto USB 2 0 Controller This setting allows you to enable or disable USB 2 0 Controller The options are Disabled or Enabled USB 2 0 Controller Mode...

Page 71: ...d by the CPU temperature When the CPU temperature is higher the fan speed will be higher as well If this option is set to 4 pin the onboard fan speeds are controlled by Thermal Management via PWM If s...

Page 72: ...allow the computer system to display the OEM logo Add On ROM Display Mode Set this option to display add on ROM read only memory messages The default setting is Force BIOS Select Force BIOS to allow t...

Page 73: ...Quiet Boot is enabled first The options are Enabled and Disabled XBoot Device Priority This feature allows the user to specify the sequence of priority for the Boot Device The settings are 1st Floppy...

Page 74: ...r to access the sub menu You can use the sub menu to clear the user password 4 5 Security Settings AMI BIOS provides a Supervisor and a User password If you use both passwords the Supervisor password...

Page 75: ...S Setup Utility screen to enter the Exit the BIOS Setup screen Saving Changes and Exit When you have completed the system configuration changes select this option to leave the BIOS Setup and reboot th...

Page 76: ...automatically load Optimal Defaults to the BIOS Settings The Optimal settings are designed for maximum system performance but may not work best for all computer ap plications Load Fail Safe Defaults...

Page 77: ...ors are usually communicated through a series of audible beeps The numbers on the fatal error list on the following page correspond to the number of beeps for the corresponding error All errors listed...

Page 78: ...A 2 X6DAL B2 X6DAL TB2 User s Manual A 2 DS7 DS8 LED Post Codes LEDIndicators Description Message DS7 DS8 On On PWR On On Off SPD Read OK Off On Memory Size OK Off Off Starting Bus Initialization...

Page 79: ...e initialization code checksum will be verified D1h Initializing the DMA controller performing the keyboard controller BAT test starting memory refresh and entering 4 GB flat mode next D3h Starting me...

Page 80: ...te FAT to find the clusters occupied by the AMIBOOT ROM file F3h Next reading the AMIBOOT ROM file cluster by cluster F4h The AMIBOOT ROM file is not the correct size F5h Next disabling internal cache...

Page 81: ...llers 1 and 2 and interrupt controllers 1 and 2 13h Thevideodisplayhasbeendisabled PortBhasbeeninitialized Next initializing the chipset 14h The 8254 timer test will begin next 19h The 8254 timer test...

Page 82: ...ace checking next 34h Video display checking is over Setting the display mode next 37h The display mode is set Displaying the power on message next 38h Initializing the bus input IPL general devices n...

Page 83: ...xt 4Fh The memory size display has started The display is updated during the memory test Performing the sequential and random memory test next 50h The memory below 1 MB has been tested and initialized...

Page 84: ...completed Checking for a locked key next 84h Locked key checking is over Checking for a memory size mismatch with CMOS RAM data next 85h The memory size check is done Displaying a soft error and chec...

Page 85: ...after the Coprocessor test next 9Eh Initialization after the Coprocessor test is complete Checking the extended keyboard keyboard ID and Num Lock key next Issuing the keyboard ID command next A2h Dis...

Page 86: ...B 8 X6DAL B2 X6DAL TB2 User s Manual Notes...

Page 87: ...ile Serial ATA cables can extend up to one meter Overall Serial ATA provides better functionality than Parallel ATA Introduction to the Intel 6300ESB Hance Rapids I O Con troller Hub Located in the So...

Page 88: ...ler adds RAID functionality to the Serial ATA I O controller by supporting RAID 0 Striping or RAID 1 Mirroring to enhance the industry s pioneer PCI to e host con troller products RAID striping RAID 0...

Page 89: ...er 4 for System BIOS Configurations and then press the Ctrl and A keys simultaneously when prompted to do so during the system startup Refer to the previous page for detailed instructions Note To sele...

Page 90: ...ys Select this option to view array properties and delete arrays The following sections describe the operations Of Managing Arrays To select this option use the arrow keys and the enter key to select...

Page 91: ...ou delete it to prevent the loss of data Deleted arrays cannot be restored To delete an existing array 1 Turn on your computer and press Ctrl A when prompted to access the ARC utility 2 From the ARC m...

Page 92: ...annot be used See the section Initializing Disk Drives To create an array 1 Turn on your computer and press Ctrl A when prompted to access the ARC utility 2 From the ARC menu select Array Configuratio...

Page 93: ...the array is created and its properties are assigned you cannot change the array properties using the ACU You will need to use the Adaptec Storage Manager Browser Edition Refer to Adaptec s User s Gu...

Page 94: ...lect Migrate for RAID 0 or Build for RAID 1 you will be asked to select the source drive The contents of the source drive will be preserved However the data on the new drive will be lost Raid Level Cr...

Page 95: ...nt sizes in a RAID However during a build operation only the smaller drive can be selected as the source or first drive 5 When migrating from single volume to RAID 0 migrating from a larger drive to a...

Page 96: ...sterisk will appear next to the bootable array as shown in the picture below Deleting a Bootable Array To delete a bootable array 1 From the Main menu select Manage Arrays 2 From the List of Arrays se...

Page 97: ...rites the partition table on the disk and makes any data on the disk inaccessible If the drive is used in an array you may not be able to use the array again Do not initialize a disk that is part of a...

Page 98: ...C 12 X6DAL B2 X6DAL TB2 User s Manual 4 Use the up and down arrow keys to highlight the disk you wish to initialize and press Insert as shown in the screen below...

Page 99: ...p 4 so that both drives to be initialized are selected as shown in the screen below 6 Press Enter 7 Read the warning message as shown in the screen 8 Make sure that you have selected the correct disk...

Page 100: ...rform a Rebuilding to optimalize the perfor mance For a critical array Rebuild operation the optimal drive is the source drive Note 2 If no spare array exists and a hard disk drive fails you need to c...

Page 101: ...e Disk Utilities The Disk Utilities enable you to format or verify the media of your Serial ATA hard disks To access the disk utilities 1 Turn on your computer and press Ctrl A when prompted to access...

Page 102: ...C 16 X6DAL B2 X6DAL TB2 User s Manual 3 Select the desired disk and press Enter as shown in the screen below 2 From the ARC menu select Disk Utilities as shown in the screen below...

Page 103: ...ure to back up your data before performing this operation 2 Verify Disk Media Scans the media of a disk drive for defects To Exit Adaptec RAID Configuration Utility 1 Once you have completed RAID arra...

Page 104: ...rom CD g Press the F6 key when the message Press F6 if you need to install a third party SCSI or RAID driver displays h When the Windows OS Setup screen appears press S to specify additional device s...

Page 105: ...contents of the CD C 3 Installing Other Software Programs and Drivers A Installing Drivers other than the Adaptec Embedded Serial ATA RAID Controller Driver After you ve installed the Windows Operatin...

Page 106: ...tem voltages and fan status See the Figure below for a display of the Supero Doctor III interface Note 1 The default user name and password are ADMIN Note 2 In the Windows environment the Supero Docto...

Page 107: ...te Control Note SD III Software Revision 1 0 can be downloaded from our Web site at ftp ftp supermicro com utility Supero_Doctor_III You can also down load SDIII User s Guide at http www supermicro co...

Page 108: ...C 22 X6DAL B2 X6DAL TB2 User s Manual Notes...

Page 109: ...It is a serial link which supports SATA Transfer rates up to 150MBps Because the serial cables used in SATA are thinner than the traditional cables used inParallel ATA PATA SATA systems have better ai...

Page 110: ...a new system that does not have the OS installed 1 Create a driver disk by following the instructions from the Web site or the product CD 2 Restart the computer 3 If creating an array press Ctrl A wh...

Page 111: ...Wizard which searches for the controller driver 3 Insert the driver disk you created in Step 1 Select the floppy disk drive as the source and click Next 4 If necessary select the appropriate driver f...

Page 112: ...CD ROM drive and restart the system 5 When the Red Hat Welcome screen appears type expert or linux dd at the boot prompt 6 When prompted insert the driver disk see Step 1 and select OK 7 Follow the p...

Page 113: ...The physical disks associated with the array are displayed here 5 Press Esc to return to the previous menu Deleting Arrays Caution Back up the data on an array before you delete it Otherwise all data...

Page 114: ...ate Array 4 Select the disks for the new array and press Insert To deselect any disk highlight the disk and press Delete 5 Press Enter when both disks for the new array are selected The Array Properti...

Page 115: ...way to restart and no way to recover the data that was on the source drive 5 When you are finished press Done C Initializing Disk Drives If an installed disk does not appear in the disk selection list...

Page 116: ...nu select Disk Utilities 3 Select the desired disk and press Enter You are offered the following options Format Disk Simulates a low level format of the hard drive by writing zeros to the entire disk...

Reviews: